Gear & guides
Gain insights into optimizing your video podcast for YouTube success.
Some links in this story are affiliate links. If you buy through them, we may earn a commission at no extra cost to you.
Make the title, thumbnail, and opening deliver the same promise.
Add accurate captions and useful chapters for accessibility and navigation.
Use analytics to improve the next episode; no checklist awards guaranteed algorithm points.
If you're just throwing your podcast episodes onto YouTube every week without any strategy or video optimization, you're really missing out!
Or if you're already going through all of the work and effort it takes to produce a podcast episode every week but don’t upload it to YouTube, you're also really missing out!
But don't worry, it's really easy to properly optimize your podcast on YouTube and incorporate some strategy into your weekly workflow.
To show you how to optimize a video podcast on YouTube step-by-step, I will take you behind the scenes as I work on optimizing our client's video podcast for YouTube.
You’ll also watch me create the brand package for his video thumbnails, YouTube channel banner, and YouTube logo.

I’ll share the packaging, accessibility, and publishing checks I use, with no promise of a particular ranking or view count.
(it’s almost a one-and-done situation, I recommend you check up on it each year)
(the real sweet and juicy stuff that makes the algorithm happy)
(with an easy-to-follow checklist for each stage of production)
So as you can see, this is a value-packed masterclass. I hope you're ready to roll up your sleeves and take notes.
I’m Stephen, AKA Studio Steve, co-founder of PSS Creative Media and an audio and video producer.
Okay, now that I’ve introduced myself, we better get started because we've got a lot to cover!
First up: production.
I won't get into the weeds about gear here, but you don't need fancy equipment to get started. It is more important to get started, and start posting episodes with whatever equipment you have than it is to put off podcasting or video podcasting until your budget is right to get that sweet Sony camera that you're after.
If you need help choosing the right camera, watch this video: Best Cameras for Video Podcasting: From Consumer Gear to Professional Gear
If you need recommendations for building or selecting gear for your at-home video podcast studio, check this out: Build My Video Podcast Studio and Multipurpose Content Office with Me
Make sure your background looks clean, organized, and professional!
The first, and most important thing you need to get set up correctly is your background and scene composition.
This means that where your head and body are positioned within the camera shot, and the background behind you both need to be pleasing to the eye.
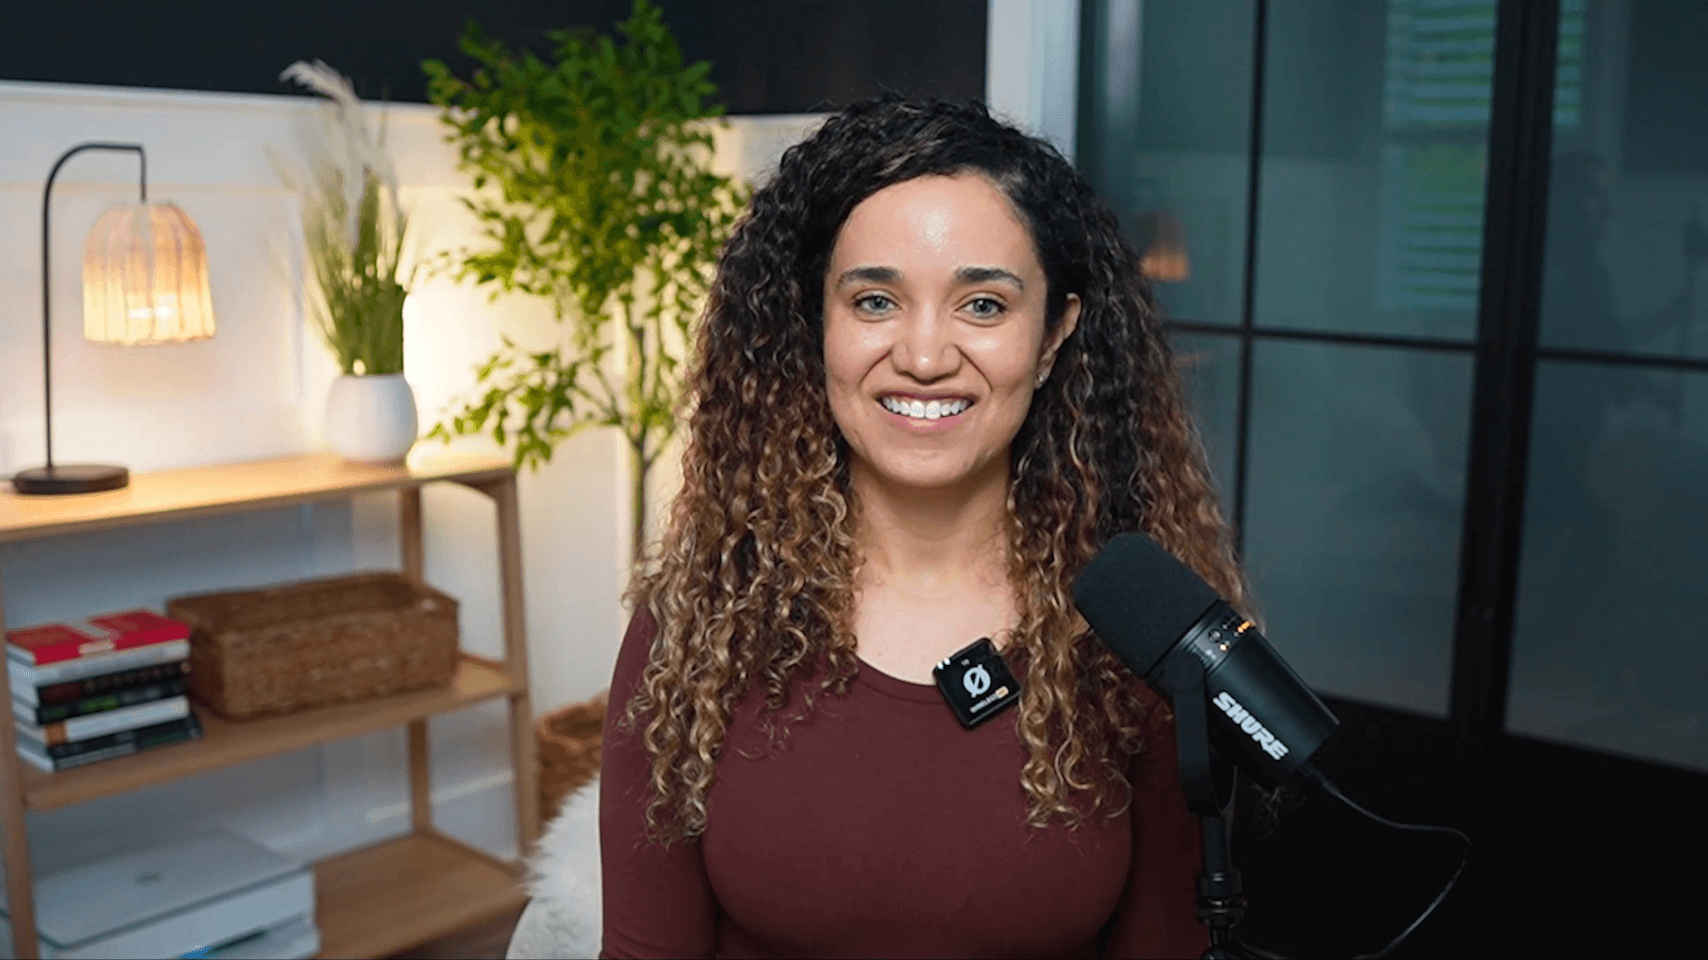
Make sure your camera is at eye level with you!
For example, if you're using the camera on your laptop, you’ll need to back away from the camera a little bit, and place the laptop on a stack of books or a laptop stand to get it to be at eye level with you.
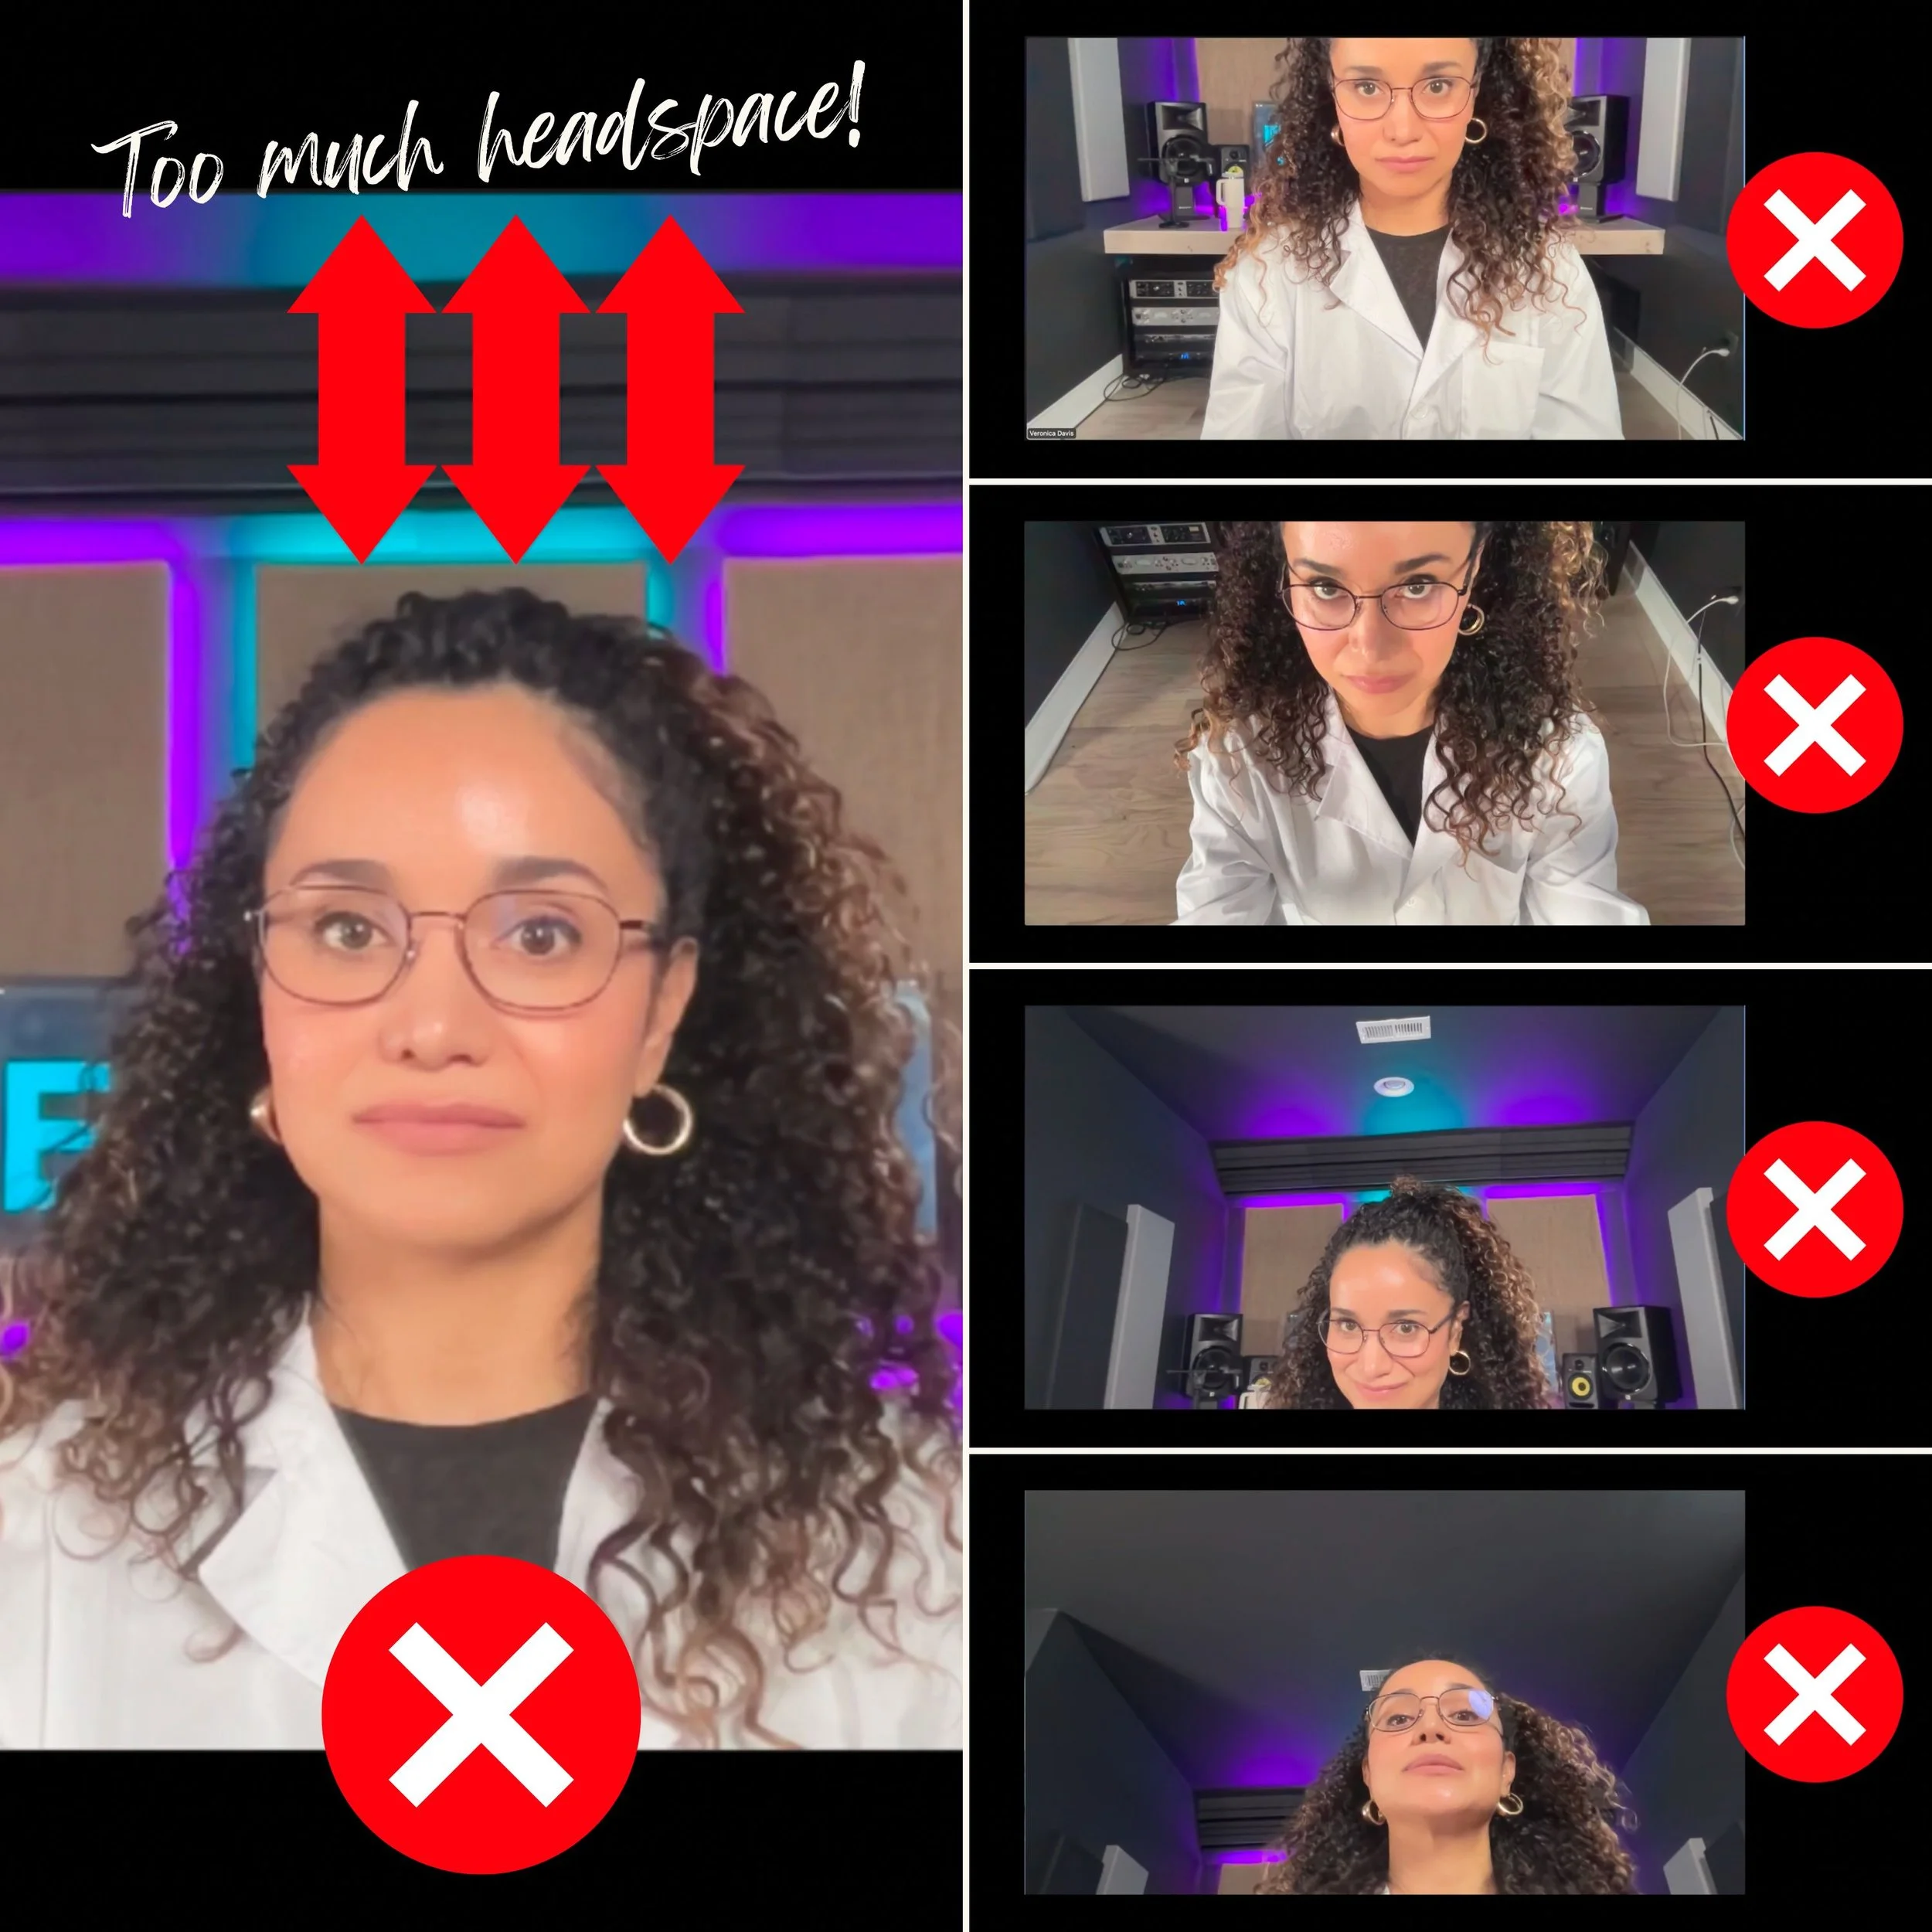
Make sure you DON’T have too much headroom on camera!
Don’t leave too much space between the top of your head and the top of the frame.
On the flip side, make sure you don’t cut off the top of your head.
Sitting in the sweet spot on camera will make it easier to create eye-catching short vertical videos for social media.
I recommend you move back just far enough to include your bust and face in the shot and give yourself space to move your hands around.
If you get too close to the camera, and then try to cut your horizontal video into a vertical video, your face will take up the entire shot which is not a good look.
On the flip side, you don’t want to be too far away from the camera because your face must stay in focus and well-lit.
Find a nice place to bring your podcast microphone into the shot!
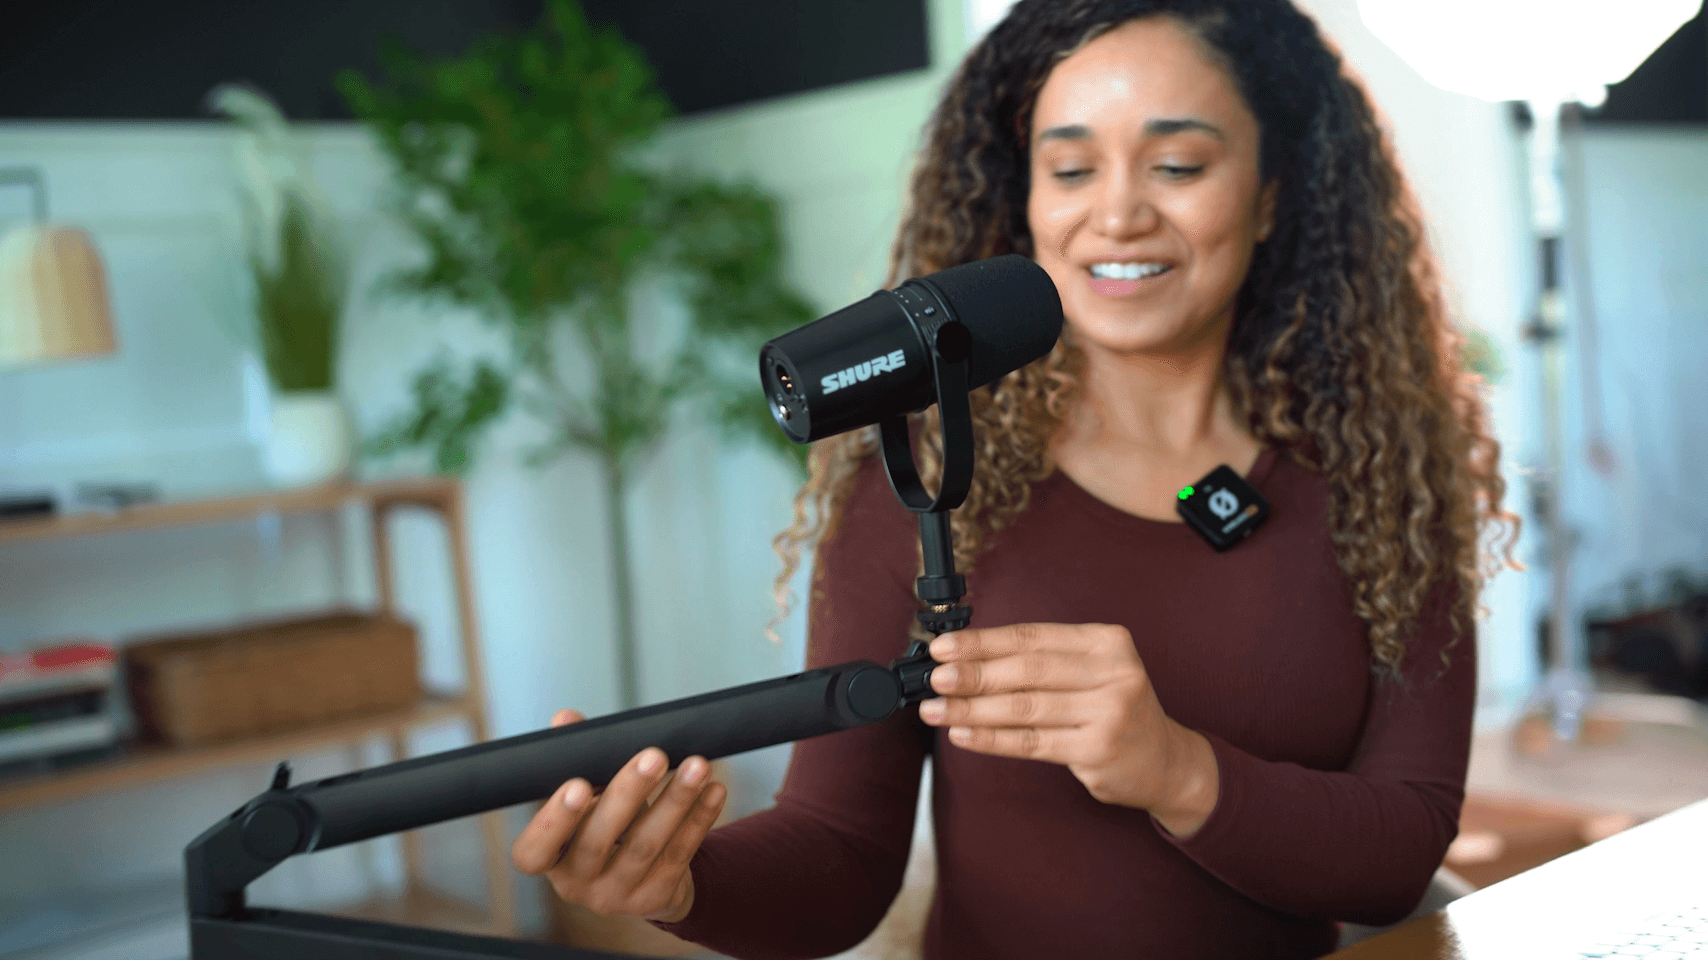
You may want to upgrade to a low-profile desk clamping microphone stand like our new favorite one from Elgato. This will help the microphone stand or boom arm stay out of your shot and give you more freedom to move your hands around and be more animated in front of the camera.
Perhaps the biggest struggle that we all deal with when it comes to video podcasting is recording length and also where and how to capture and record your video.
You can record to the camera’s memory card or use a supported computer capture workflow. Check the exact model’s recording limits, temperature behavior, storage, and power before a full-length session.
Run a rehearsal longer than your planned episode. Confirm that the recording stays reliable and that you have a backup.
However, the best option is to get a 4k HDMI adapter and plug a professional mirrorless camera with a sweet lens directly into your computer. Then you can record directly into a solution like Descript on your computer to capture high-quality video footage that never touches the internet.
For remote interviews, choose a recording platform whose current plan supports your guests, recording duration, and editing workflow. Make a test recording and check how files are saved before the interview.
I know that Underlord and similar AI tools can edit our episodes for us, but only to a certain degree. If you’ve ever used these amazing AI tools to edit your podcast episodes, you probably quickly discovered the limitations I’m talking about. So here is where a podcast editor becomes very important.
Many podcasters fall into the trap of trying to edit their own podcast. As soon as it is possible for you, you need to outsource your editing. This is mandatory for our clients. We absolutely would never allow our clients to edit their own podcasts because it simply is not the best use of their time and often it is not something they have expertise in.
Why should you hire a podcast editor?
When you work with a really good editor, you will be amazed at what happens to your brand.
Editors do far more than just the basic stuff that AI does for us, like removing filler words automatically and cleaning up our bad takes.
An editor can actually make higher-level creative decisions when piecing things together in your episode, adding music, refining the vocal processing effects, adding all the important assets, even camera movement, text annotations, skin retouching, and the list goes on and on.
While Descript is really amazing and the ramifications of what they're creating are just mind-blowing, it can’t do everything so you’ll still need an editor who knows how to use more than just Descript.
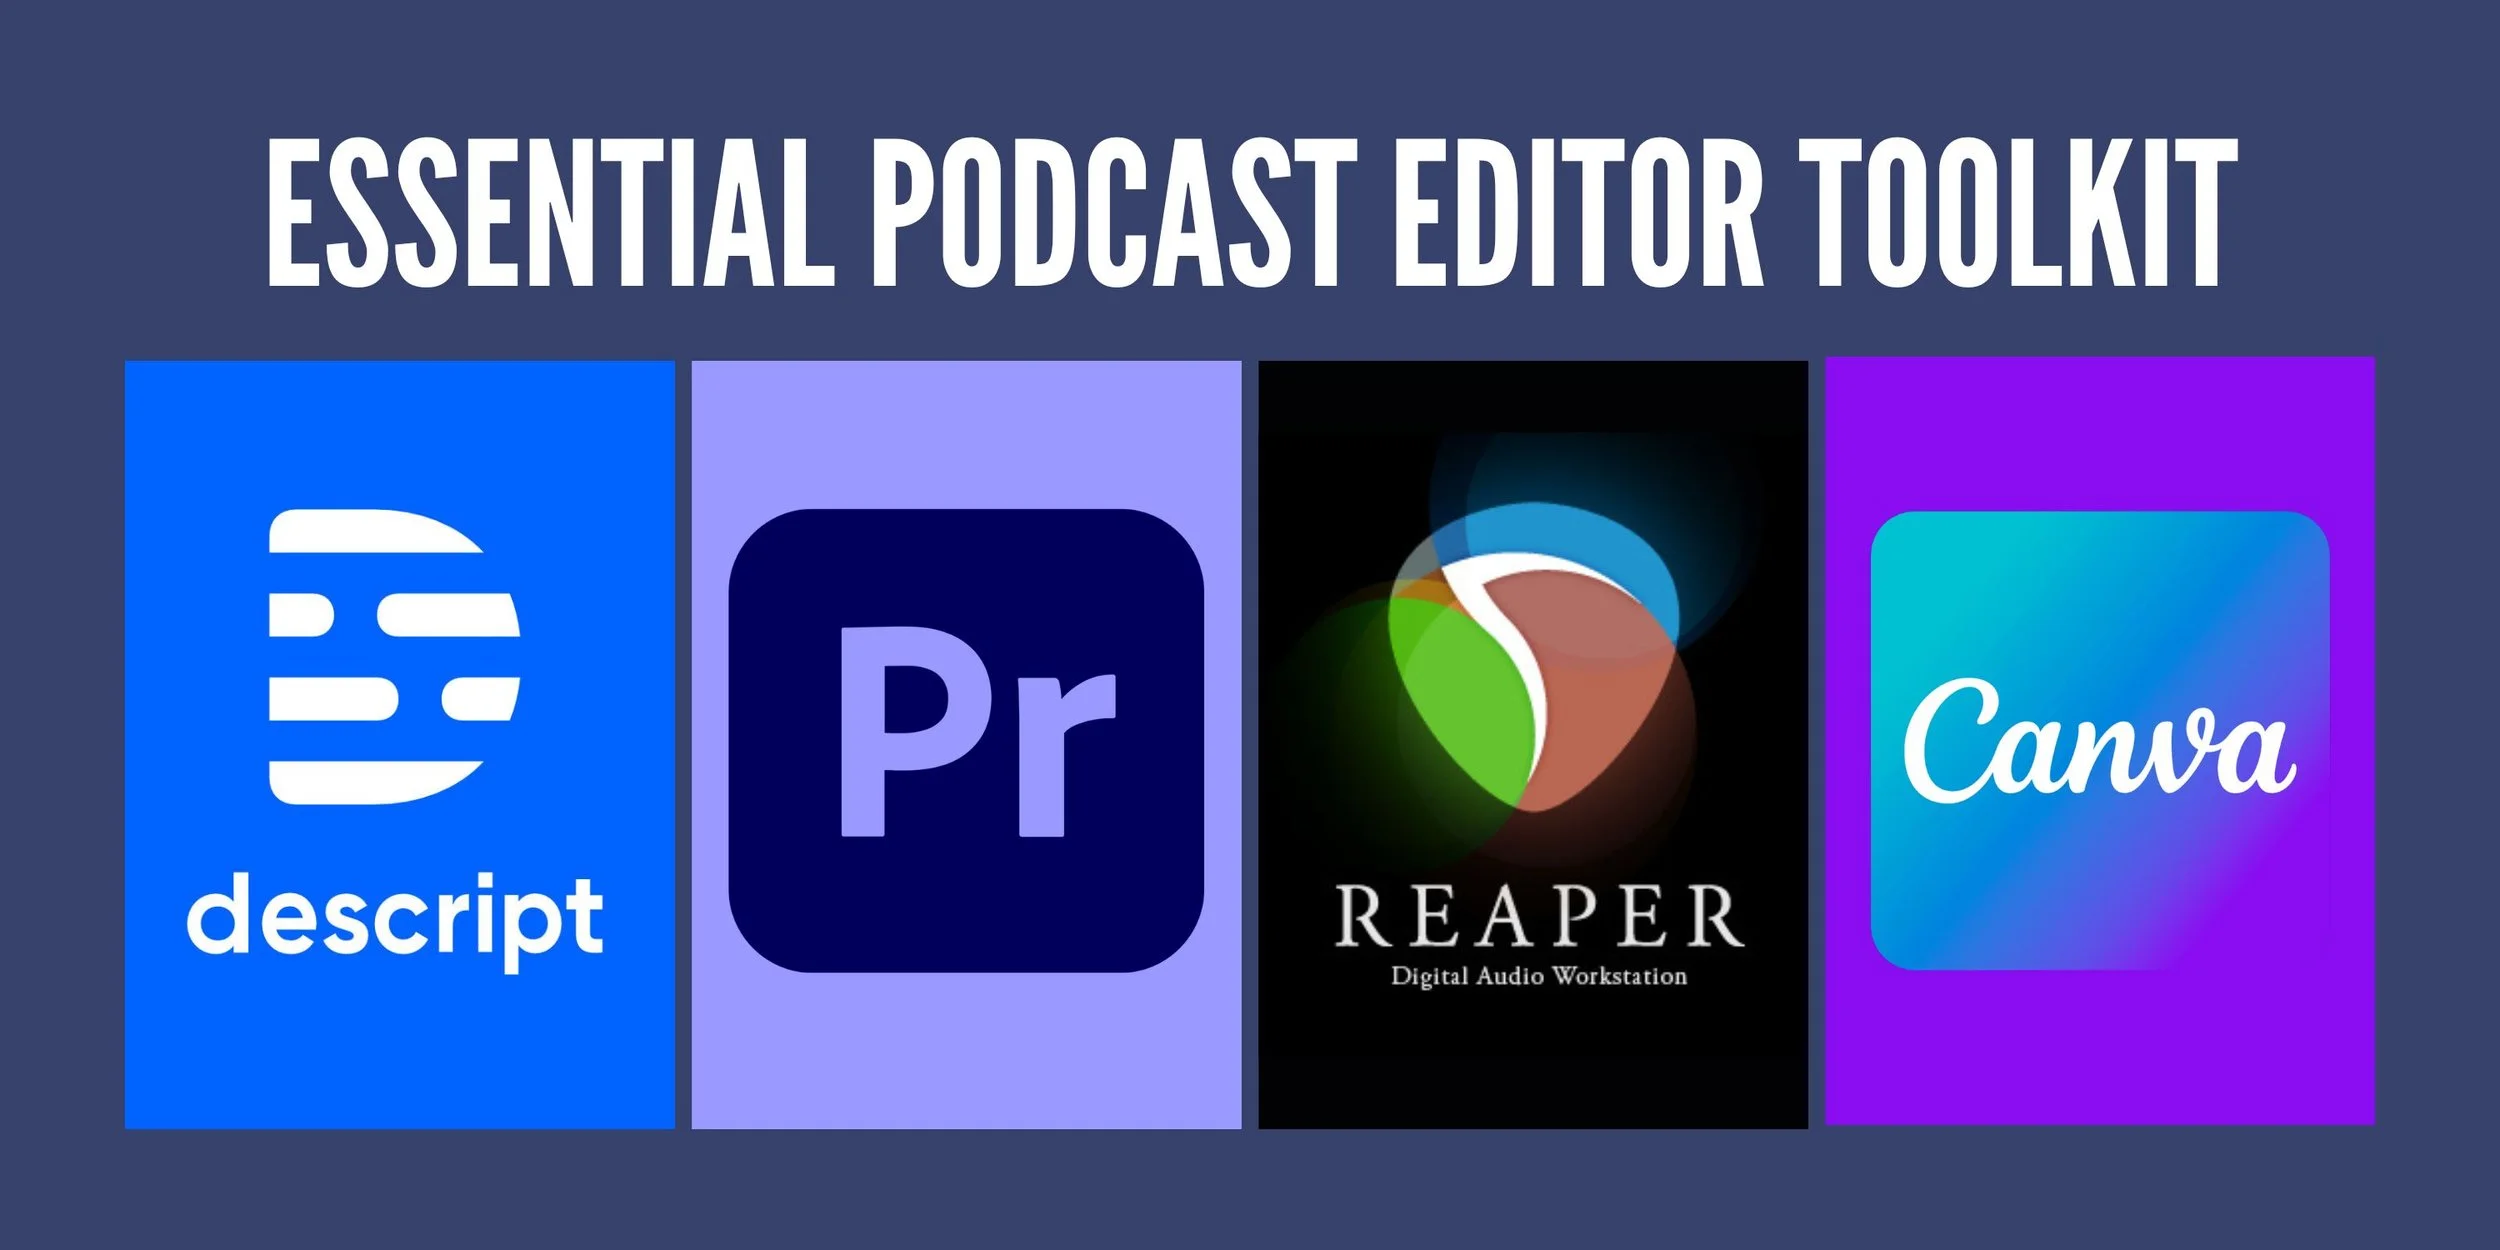
Modern-day editors aren't program-centric. They don't just have one program that they use anymore. They use a diverse set of tools like Descript, Adobe Premiere, Reaper, and Canva to create dynamic, captivating video podcasts.
A PSS Creative Media certified editor is the kind of editor you should be working with, a truly creative professional who has the skills to give your show a custom, high-quality edit so it stands out from the crowd.
So now, moving out of production with the last point, let's talk about creating assets.
A podcast show intro is an example of an asset commonly used in podcasts and it’s definitely an asset you want to have in your assets folder too.
Strategically placed assets like an intro will help keep your audience engaged from start to finish.
In this video, I show you how I created a video podcast show intro for a client.
really cool video podcast episode intros and show intros
music selections
sound effects
anything that's pre-recorded and ready to drag and drop into any project, like a midroll ad, shoutout, or outro
updated Canva templates created for your editor, or created by your editor
photoshoot images
behind-the-scenes videos
B roll footage
time-lapse footage
So once you have all of these things:
✅ a good podcast studio set up
✅ clean audio and crisp video
✅ a clean, professional, on-brand background
✅ a good editor on your team
✅ a collection of assets
Now you’re ready to reap the rewards of what YouTube offers.
But as your skills, budget, knowledge, and show grow, you should also improve and upgrade your production quality, assets, gear, and studio.
you're competing with a lot of big shows now on YouTube
it directly communicates to your audience that you take your show seriously
it will help attract those big industry guests that you want on your show
it will also help you grow your podcast quicker
But again, at the very beginning, you don't need 3 different camera angles, a camera switcher, 5 lights, the 3 best microphones, and colorful mood lighting in the background. Don’t make it so complex that you quit before you get started.
It’s okay to start with a simple USB microphone and the camera on your computer or even on your phone.
In this section, YouTube channel optimization, I'm going to bring you along with me as I do this process for a client, Ryan Denis of What the Futures! Podcast.
Ryan was so nice to allow us to peer inside his channel so I could show you several YouTube optimization tips and tricks to ensure your channel and videos are optimized correctly.
You’ll also see what his channel and videos looked like BEFORE AND AFTER being re-branded or re-packaged.
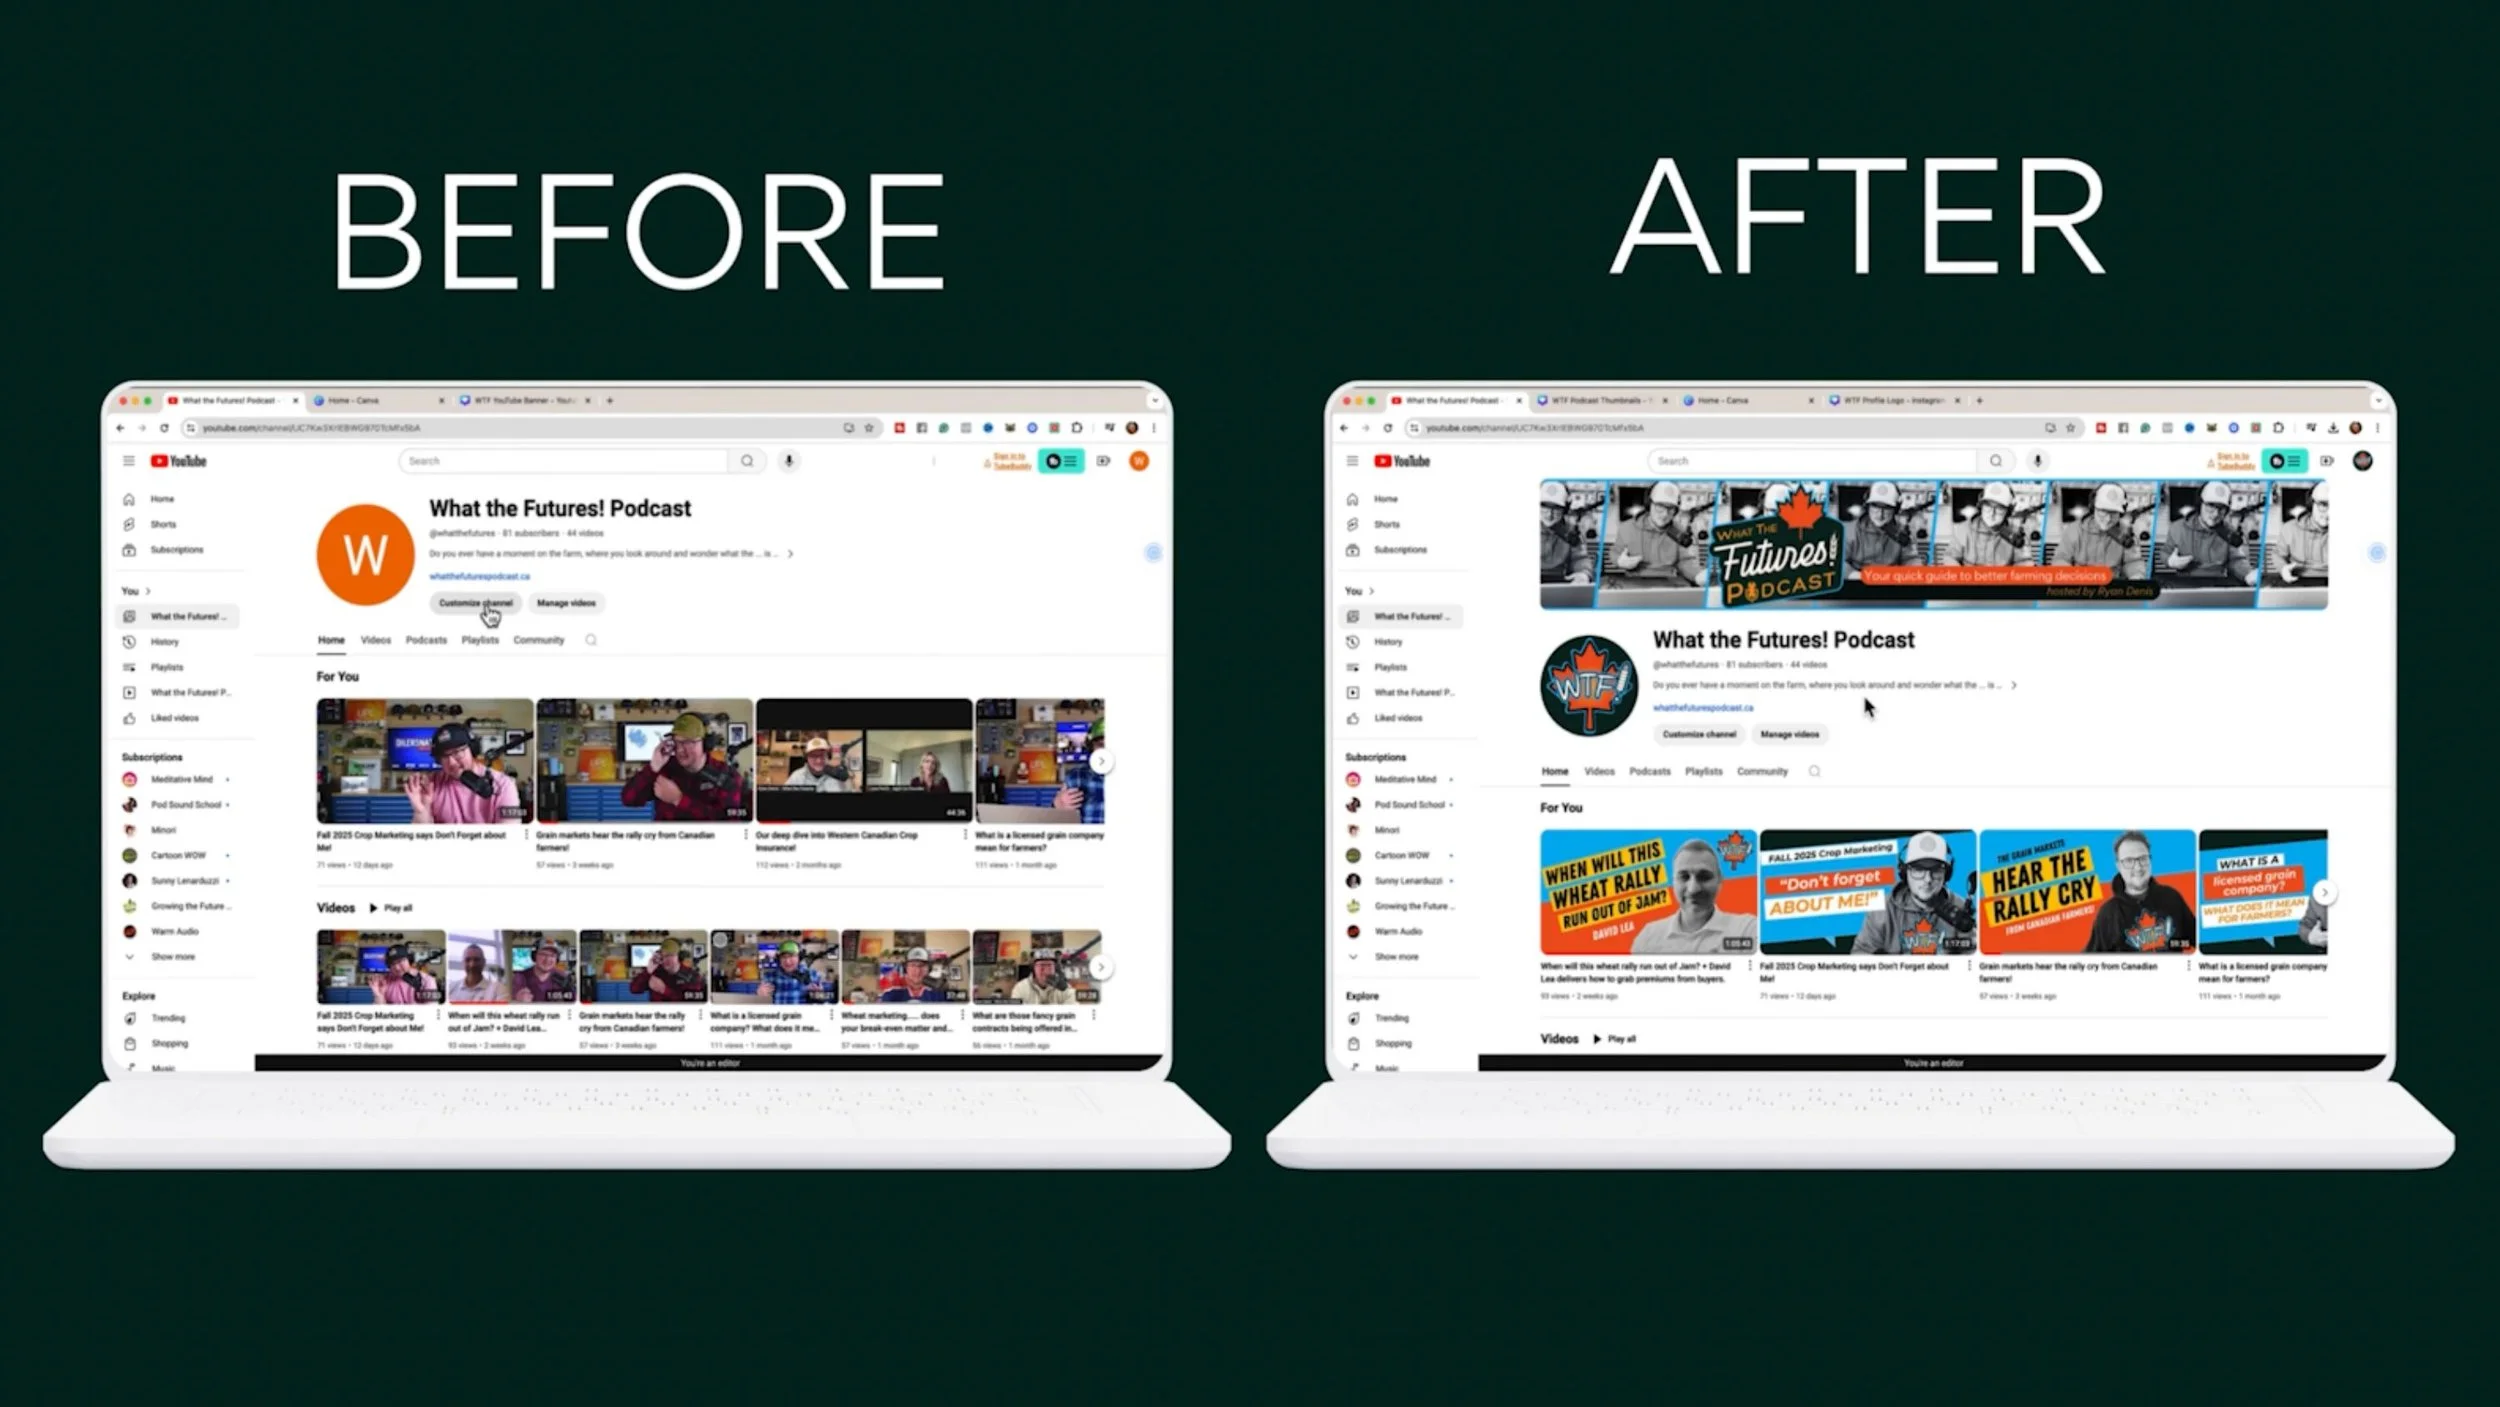
the profile picture
the YouTube channel banner image
the video thumbnail images
Create templates for your video thumbnail images to ensure the videos on your channel look cohesive. A cohesive look will help your brand become instantly recognizable and it shows everyone on YouTube that you’re taking your business seriously.
You’ll be able to use your thumbnail templates every week to quickly drag and drop in a picture of your guest and change the words to a new engaging phrase.
Luckily it’s super easy to start DIYing thumbnail images using Canva Pro. It should come as no surprise to you that I'm a Canva Pro freak, and I have a playlist of Canva Pro tutorial videos on YouTube.
To learn how to create graphics in Canva for your YouTube channel, watch these 3 videos:
But with Ryan's podcast, because I had his brand colors and an existing logo that he had created, I was able to use his brand colors and his logo to start building a brand kit in Canva.
I also luckily had a ton of photos that he sent me for the intro video that I made prior to this, so I could use those photos and poses of him as well.
When viewing your YouTube channel, click on the button that says Customize Channel.
On the channel customization page, click on the Branding tab.
Upload your profile picture.
Upload your YouTube banner.
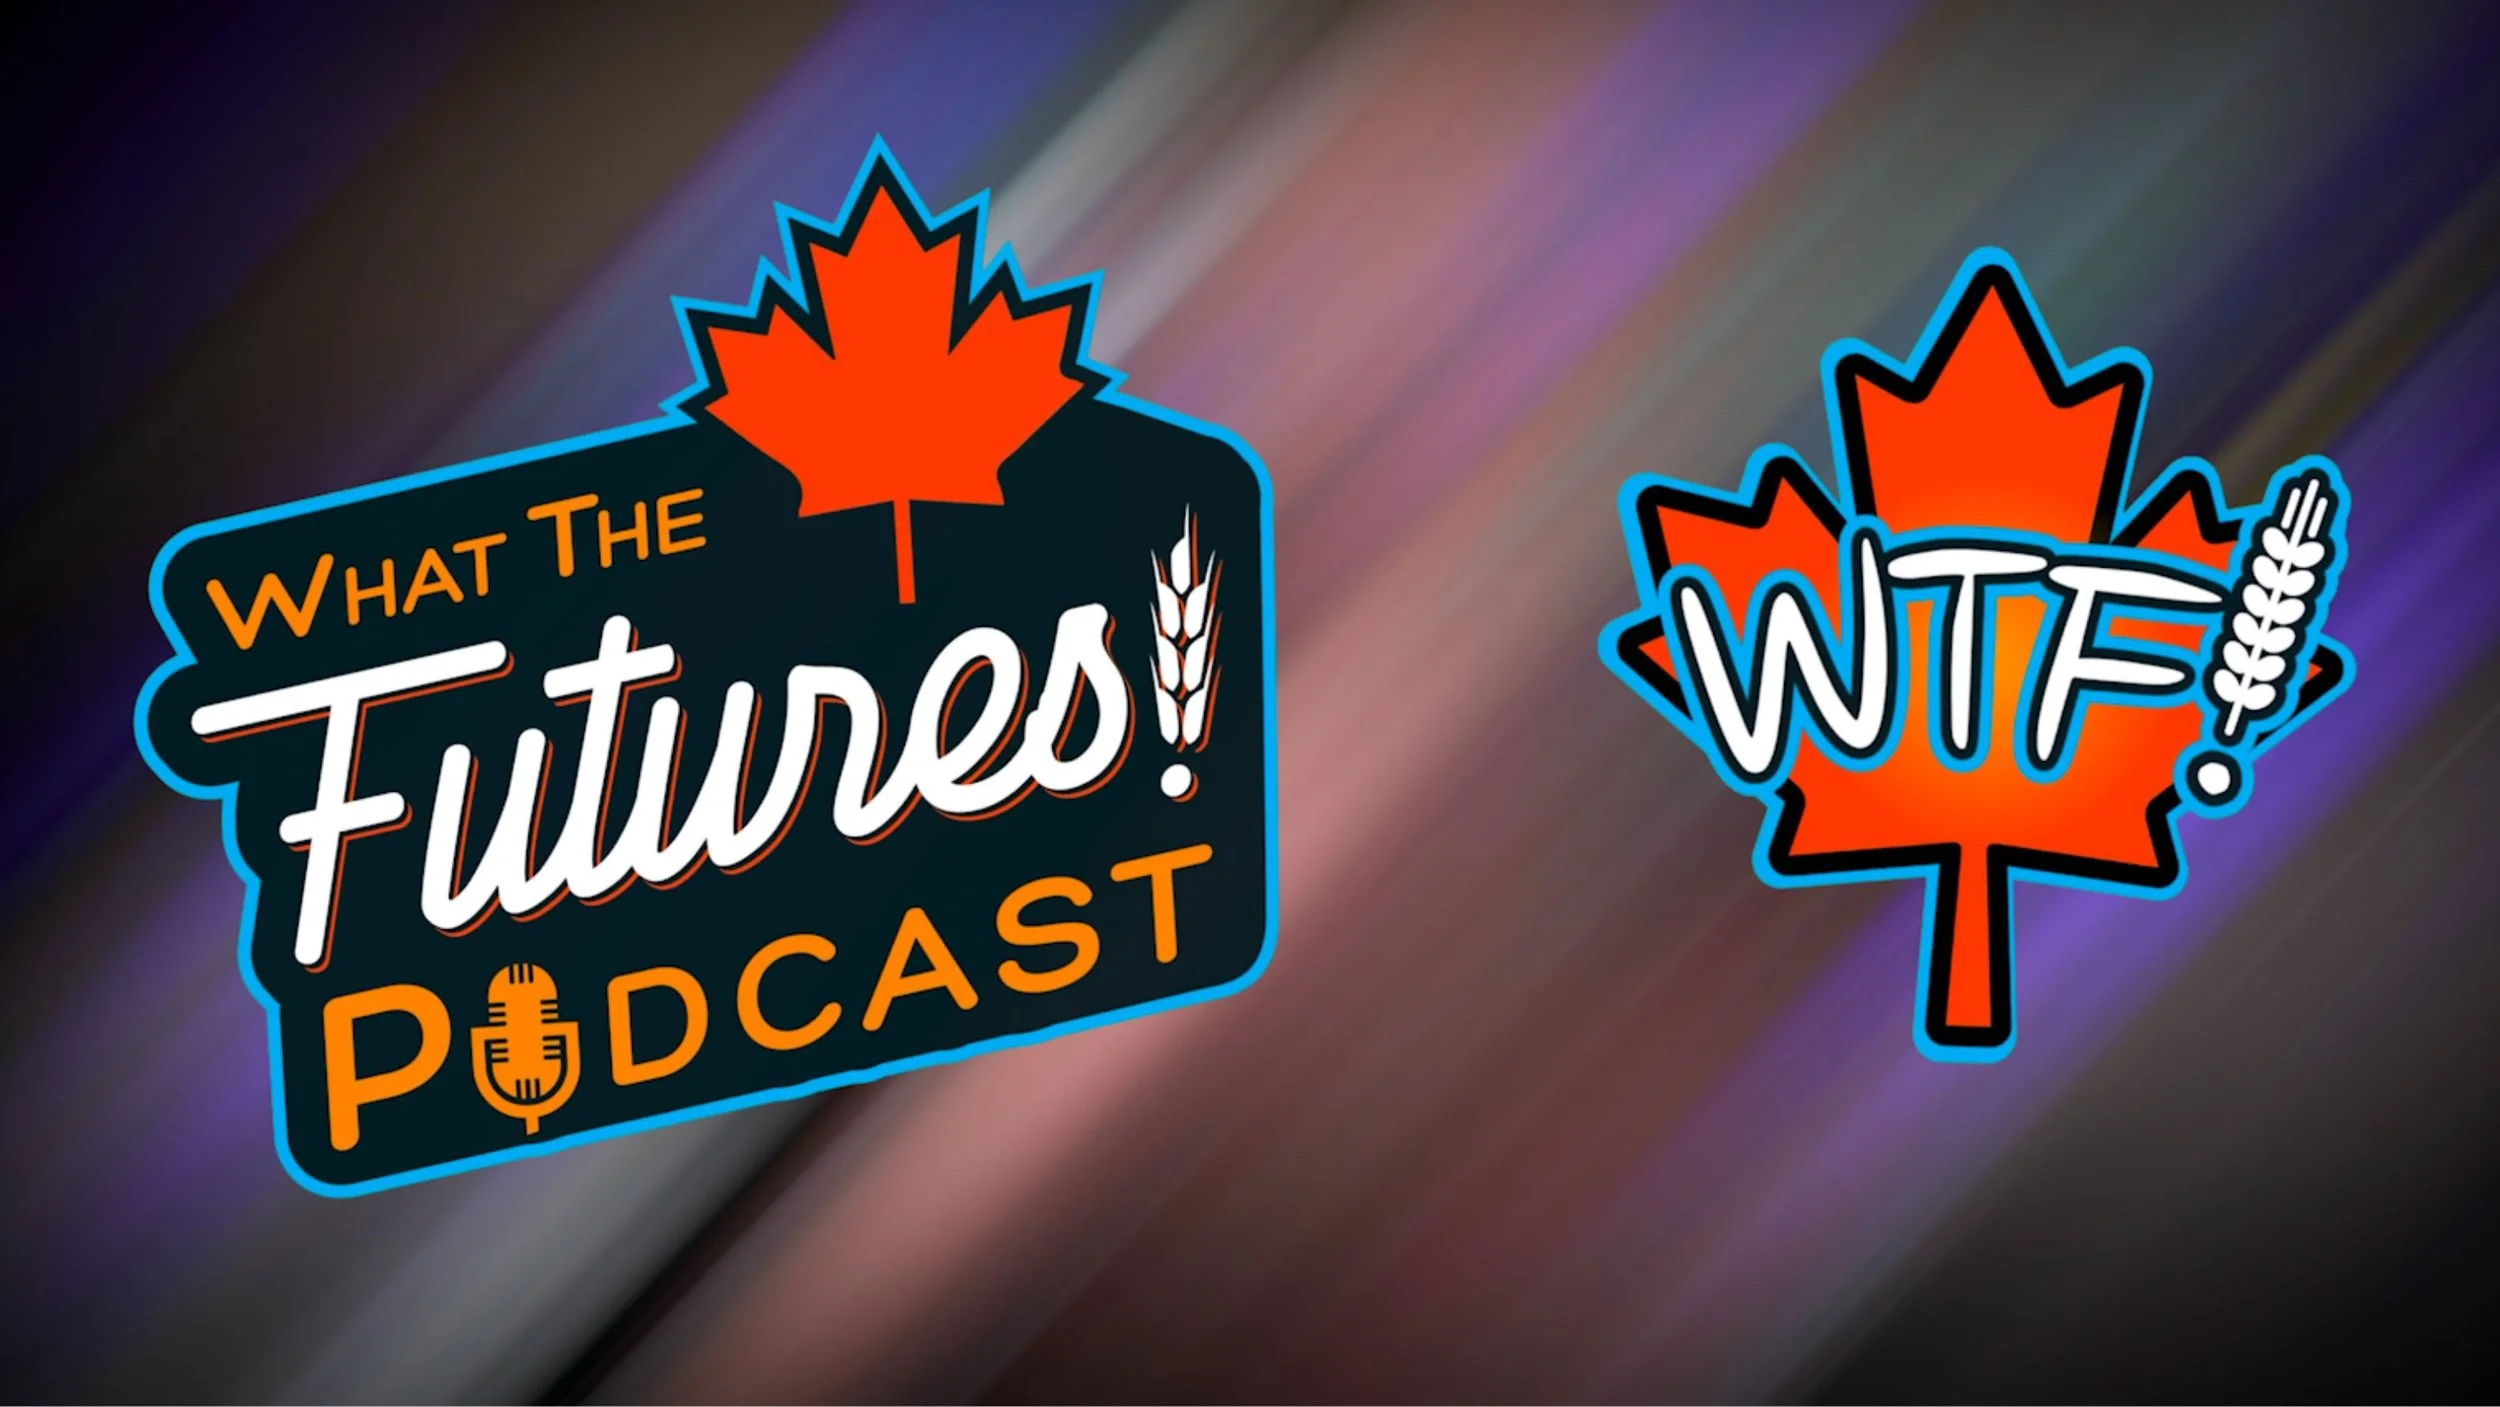
So first I got to work creating a bunch of different logo variations for Ryan, and I had a lot of fun using a blade of wheatgrass as an exclamation point.
I created a simplified version of Ryan’s logo that easily fits into his little circle profile picture on YouTube. This simplified logo stands out more on his thumbnails and it gives him 2 variations of his logo that he can use for marketing and branding his podcast.
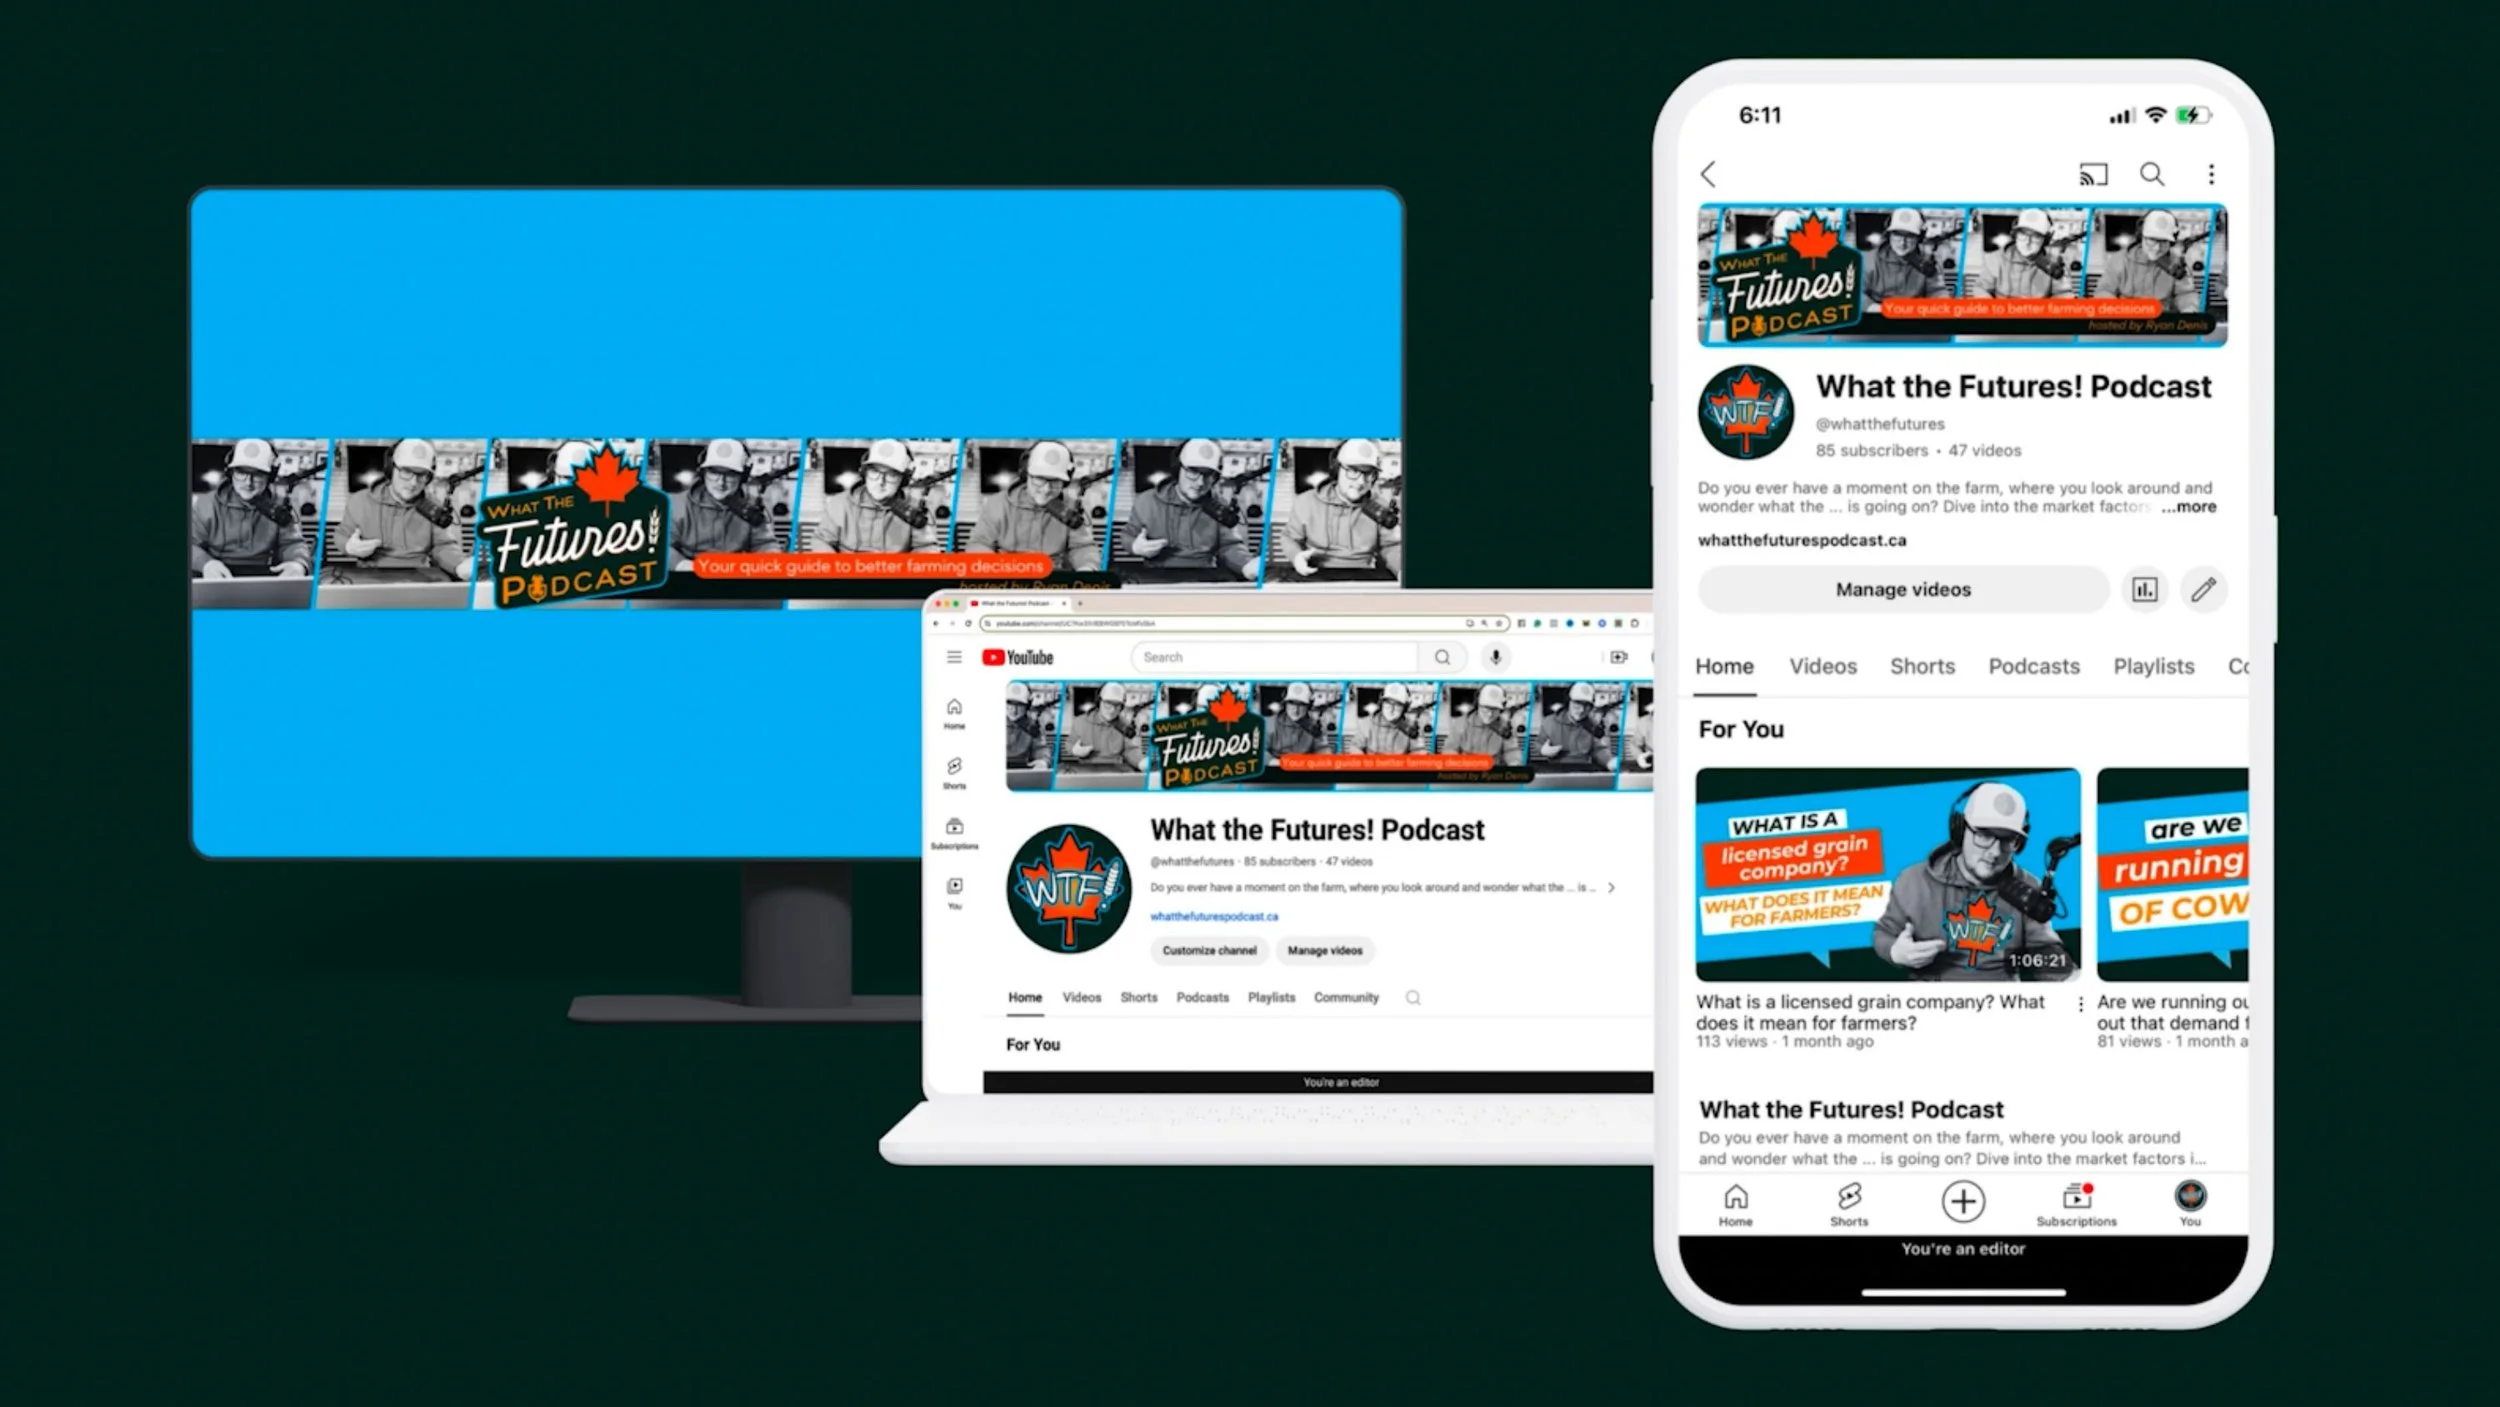
The YouTube banner image is also really easy to create in Canva.
Click the purple Create a Design button, type YouTube banner in the search bar, and select YouTube banner.
From here you'll see a lot of templates that you can use that will get your design sized properly.
I like to Google YouTube banner templates and pull a template image into Canva. Then I use the rulers in Canva to drag some guidelines onto the canvas to outline the device safe area in the design that will show on all devices. This can be a little tricky and can take some experimentation.
After you upload it to the banner image section under the branding tab of your channel customization, you'll be able to skew the selection, move things around, and fine-tune it to get it to appear just how you want.
When you’re done adjusting your banner image in YouTbe, it's a good idea to test and see what it looks like on different-sized devices like your phone and a computer.
The full image will be visible when somebody looks at your channel on a TV.
Most of the banner will be visible when viewed on a computer or a desktop.
Only the small, central part of the original full image will be visible to people who view your channel on their smart devices.
Canva has a ton of good YouTube thumbnail templates. To find them, simply type YouTube thumbnail into Canva’s search bar. And that's how I usually start.
When I find a template that looks good, I move things around, add the client's brand colors to it, and then start dragging in photos.
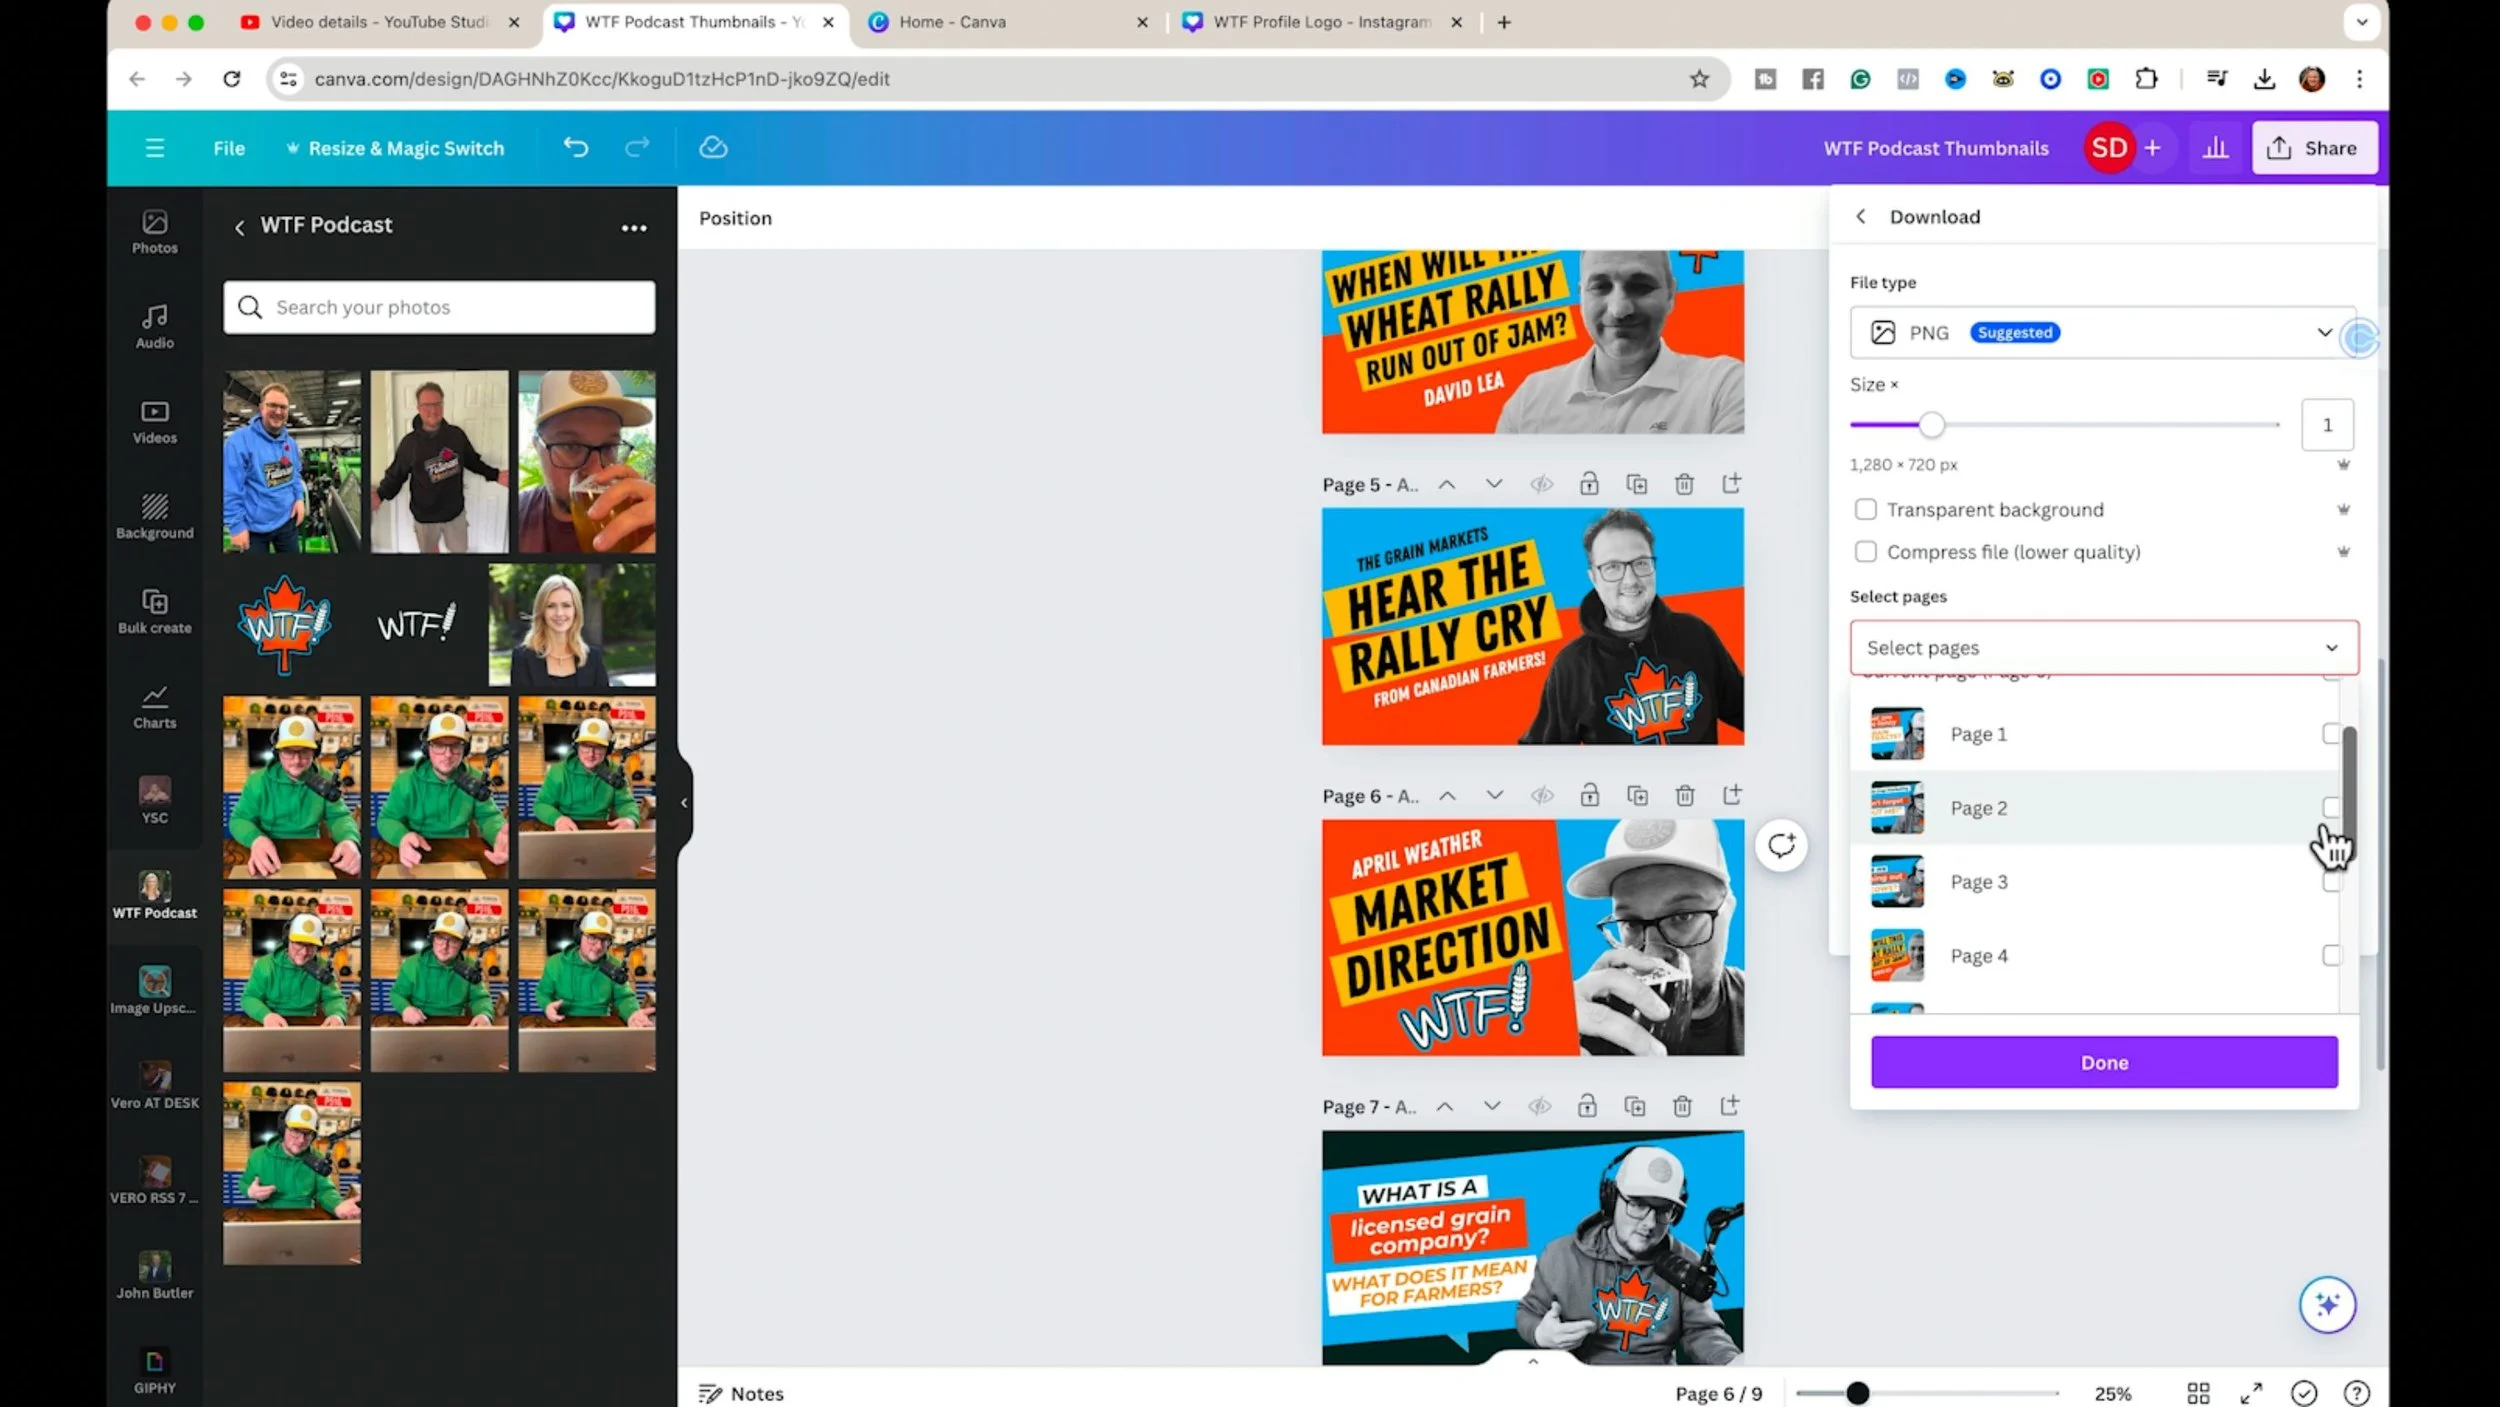
This process helps me develop ideas for a set of customized and cohesive-looking thumbnails for the client to either hand to their team or to use themselves. This makes it very quick and easy for anyone to produce a new on-brand thumbnail every week.
Typically, I like to make a set of at least six that can be cycled between for variety.
CANVA TIP: What I really love about Canva is when you apply effects to an image in your template, like removing the background or putting a heavy, contrasting black and white filter on it, it will remember those settings and apply them to the new settings of any picture you drag in its place.
So while it can take five minutes or so to move things around and create a thumbnail, the real time-consuming part of creating a thumbnail is deciding on the phrase or the words that you put on the thumbnail. Those are very important, so we’ll discuss that in the next section.
An easy place for me to start with Ryan’s channel is to go through his most recent 6 to 10 videos and replace the thumbnails with new designs. That will give him a great set of thumbnails to use moving forward.
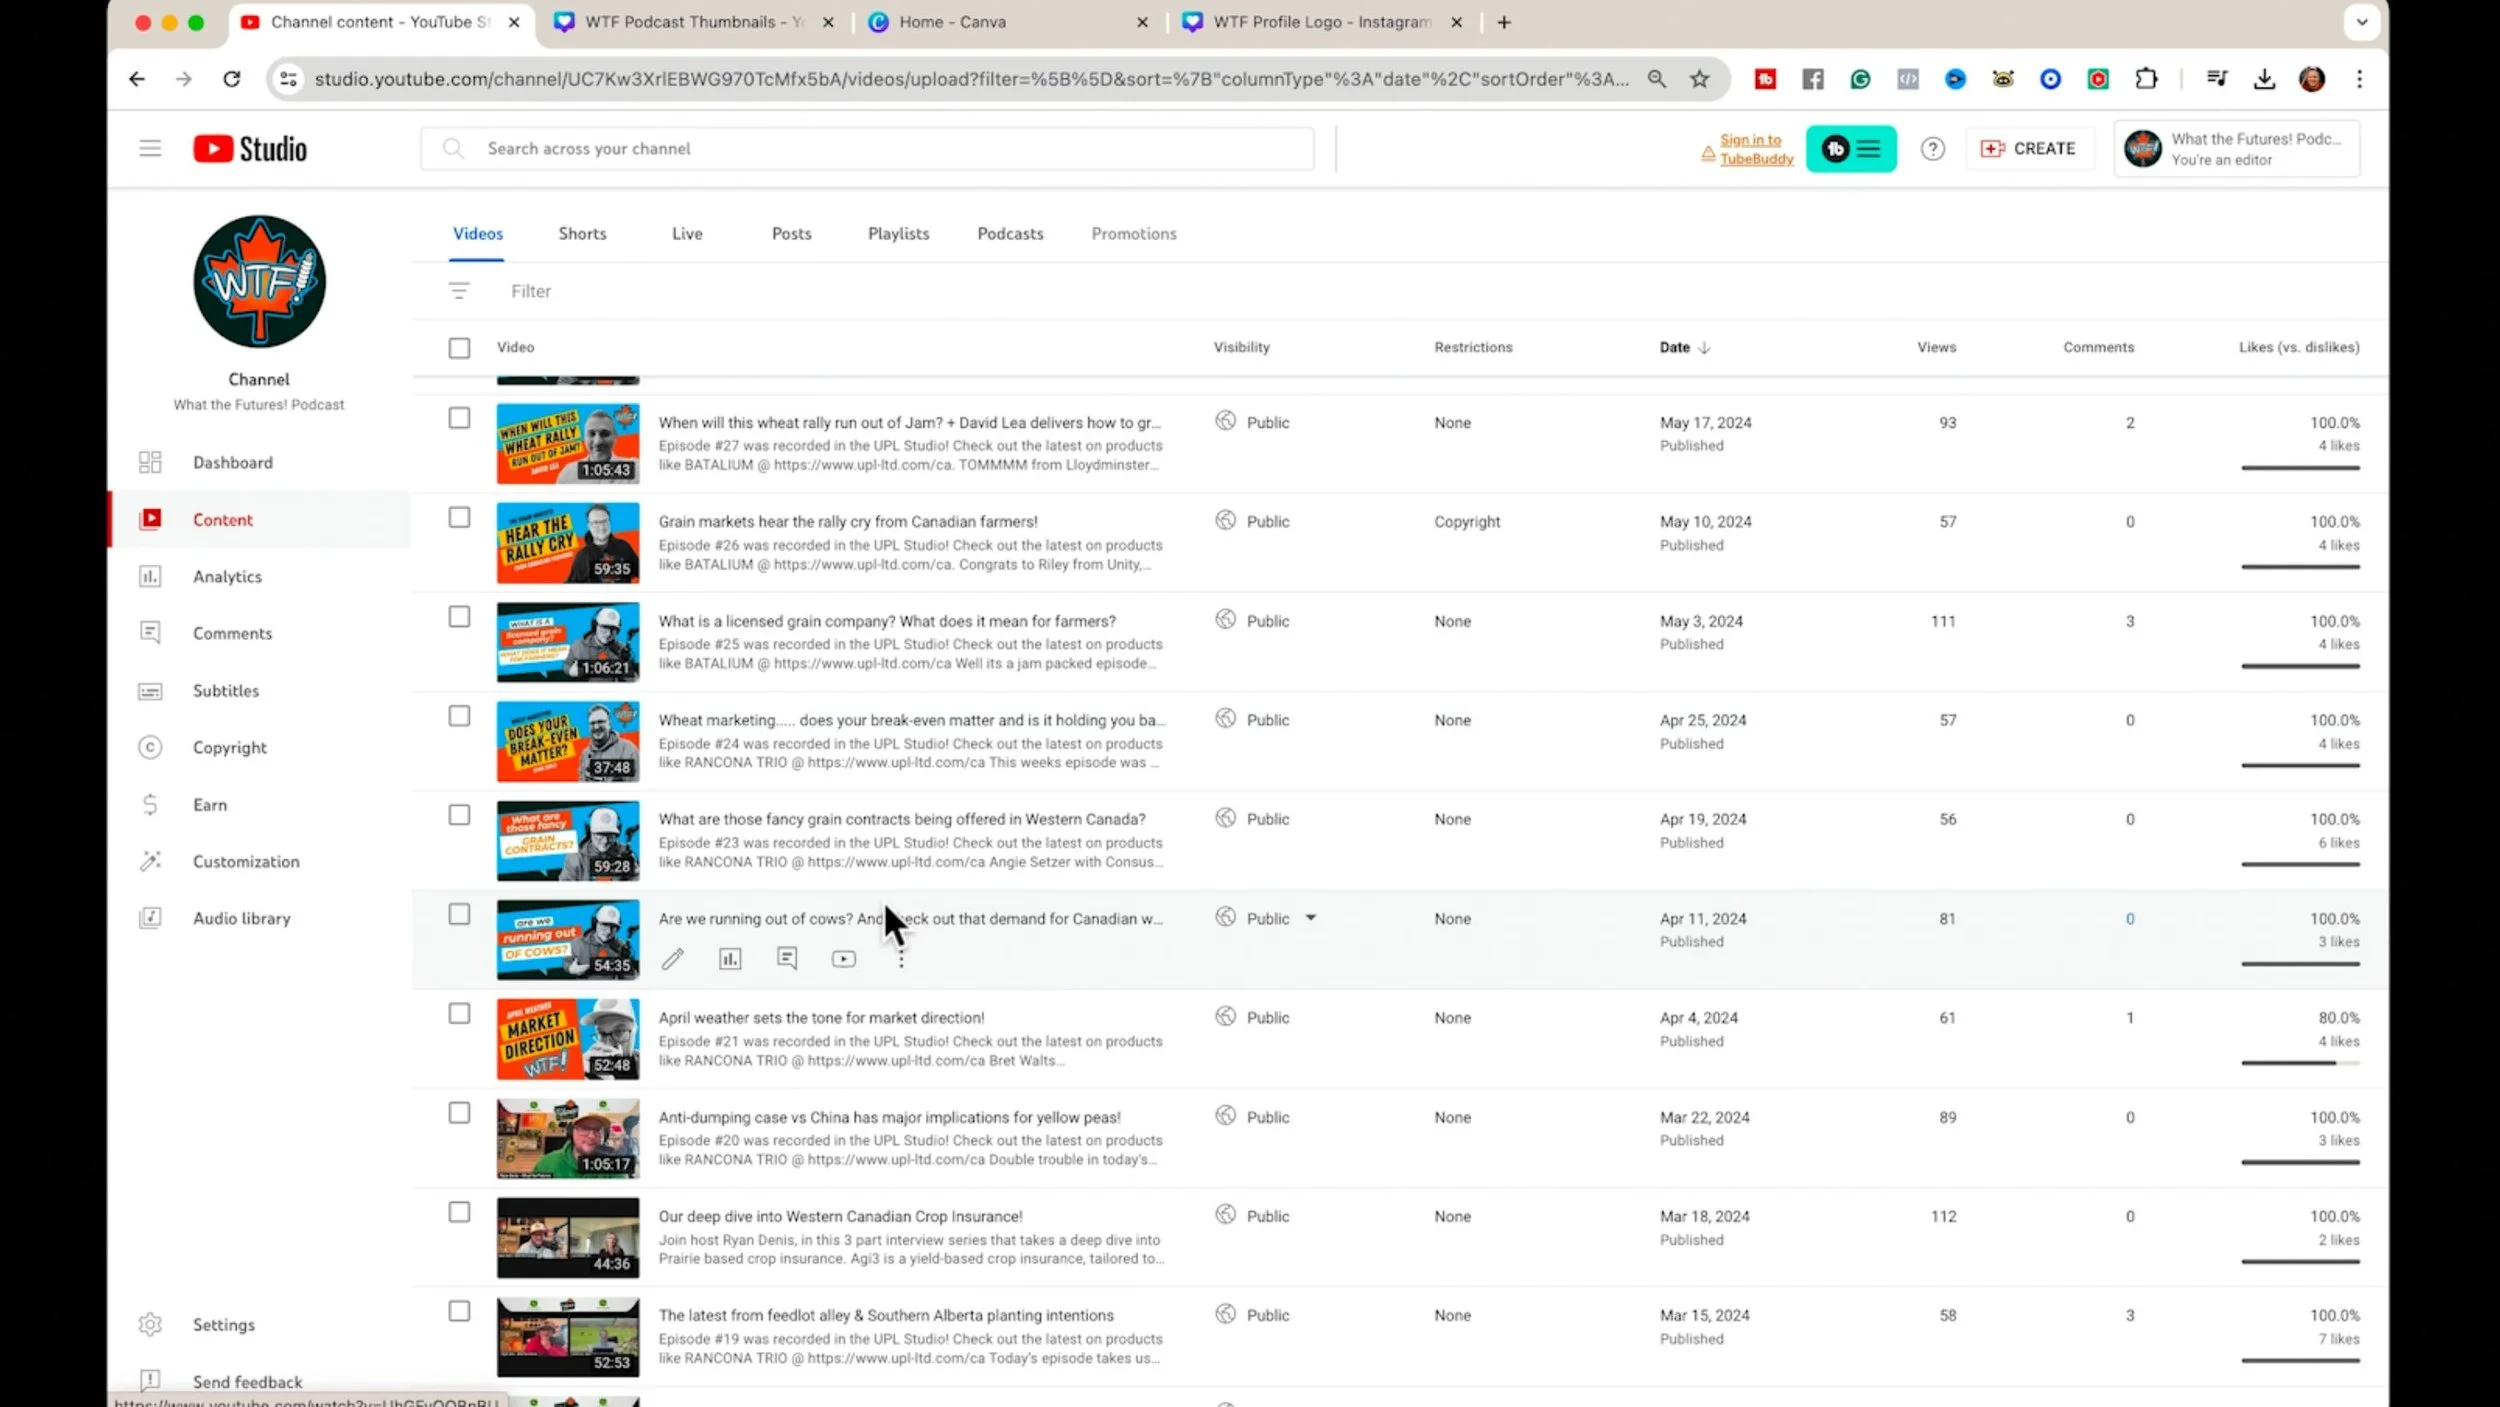
I love watching these thumbnails change, viewing the channel, and seeing it all update and all come together. Afterward, I compare my before and after screenshots of his video page to see the full transformation.
Podcast makeovers are our jam! If you're interested in working with us directly, click here to learn more about our services.
1. Drop the podcast video episode into Descript
2. Wait for the transcript to generate
3. When that’s done, go to the Publish section of Underlord (right side panel), and click YouTube description to generate a short episode description with timestamps
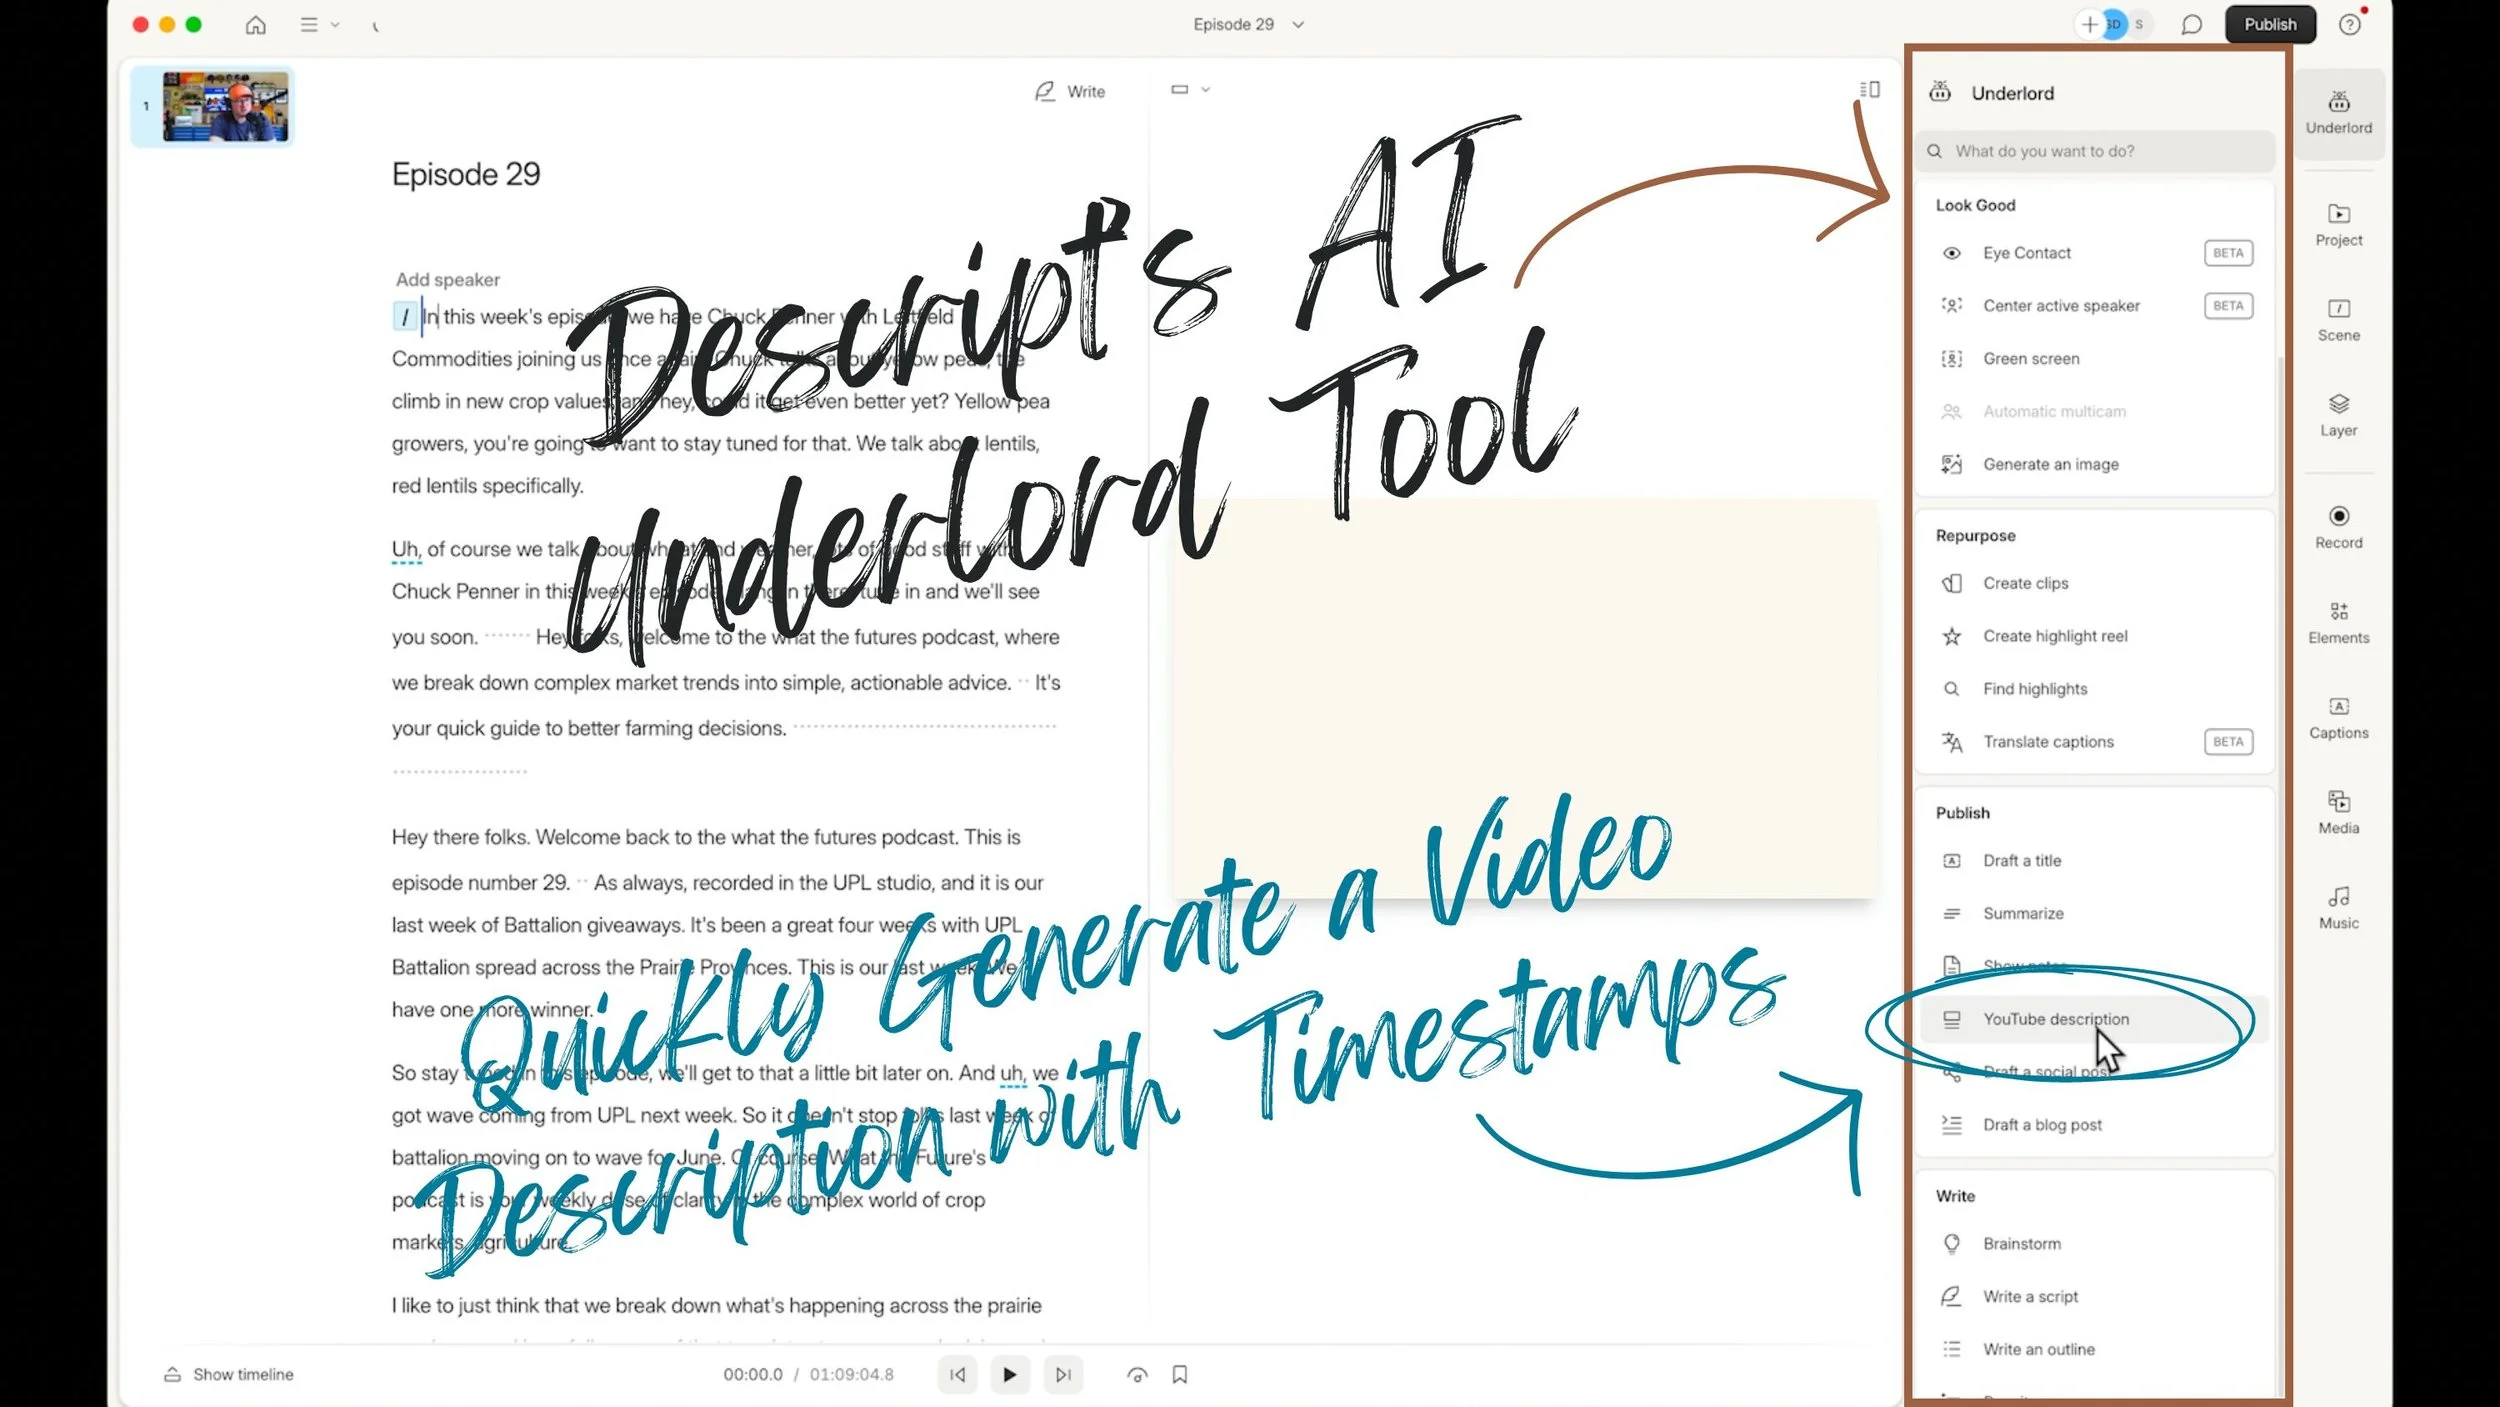
4. Click this nifty copy-to-clipboard icon in the bottom right corner to copy Underlord’s description and timestamps
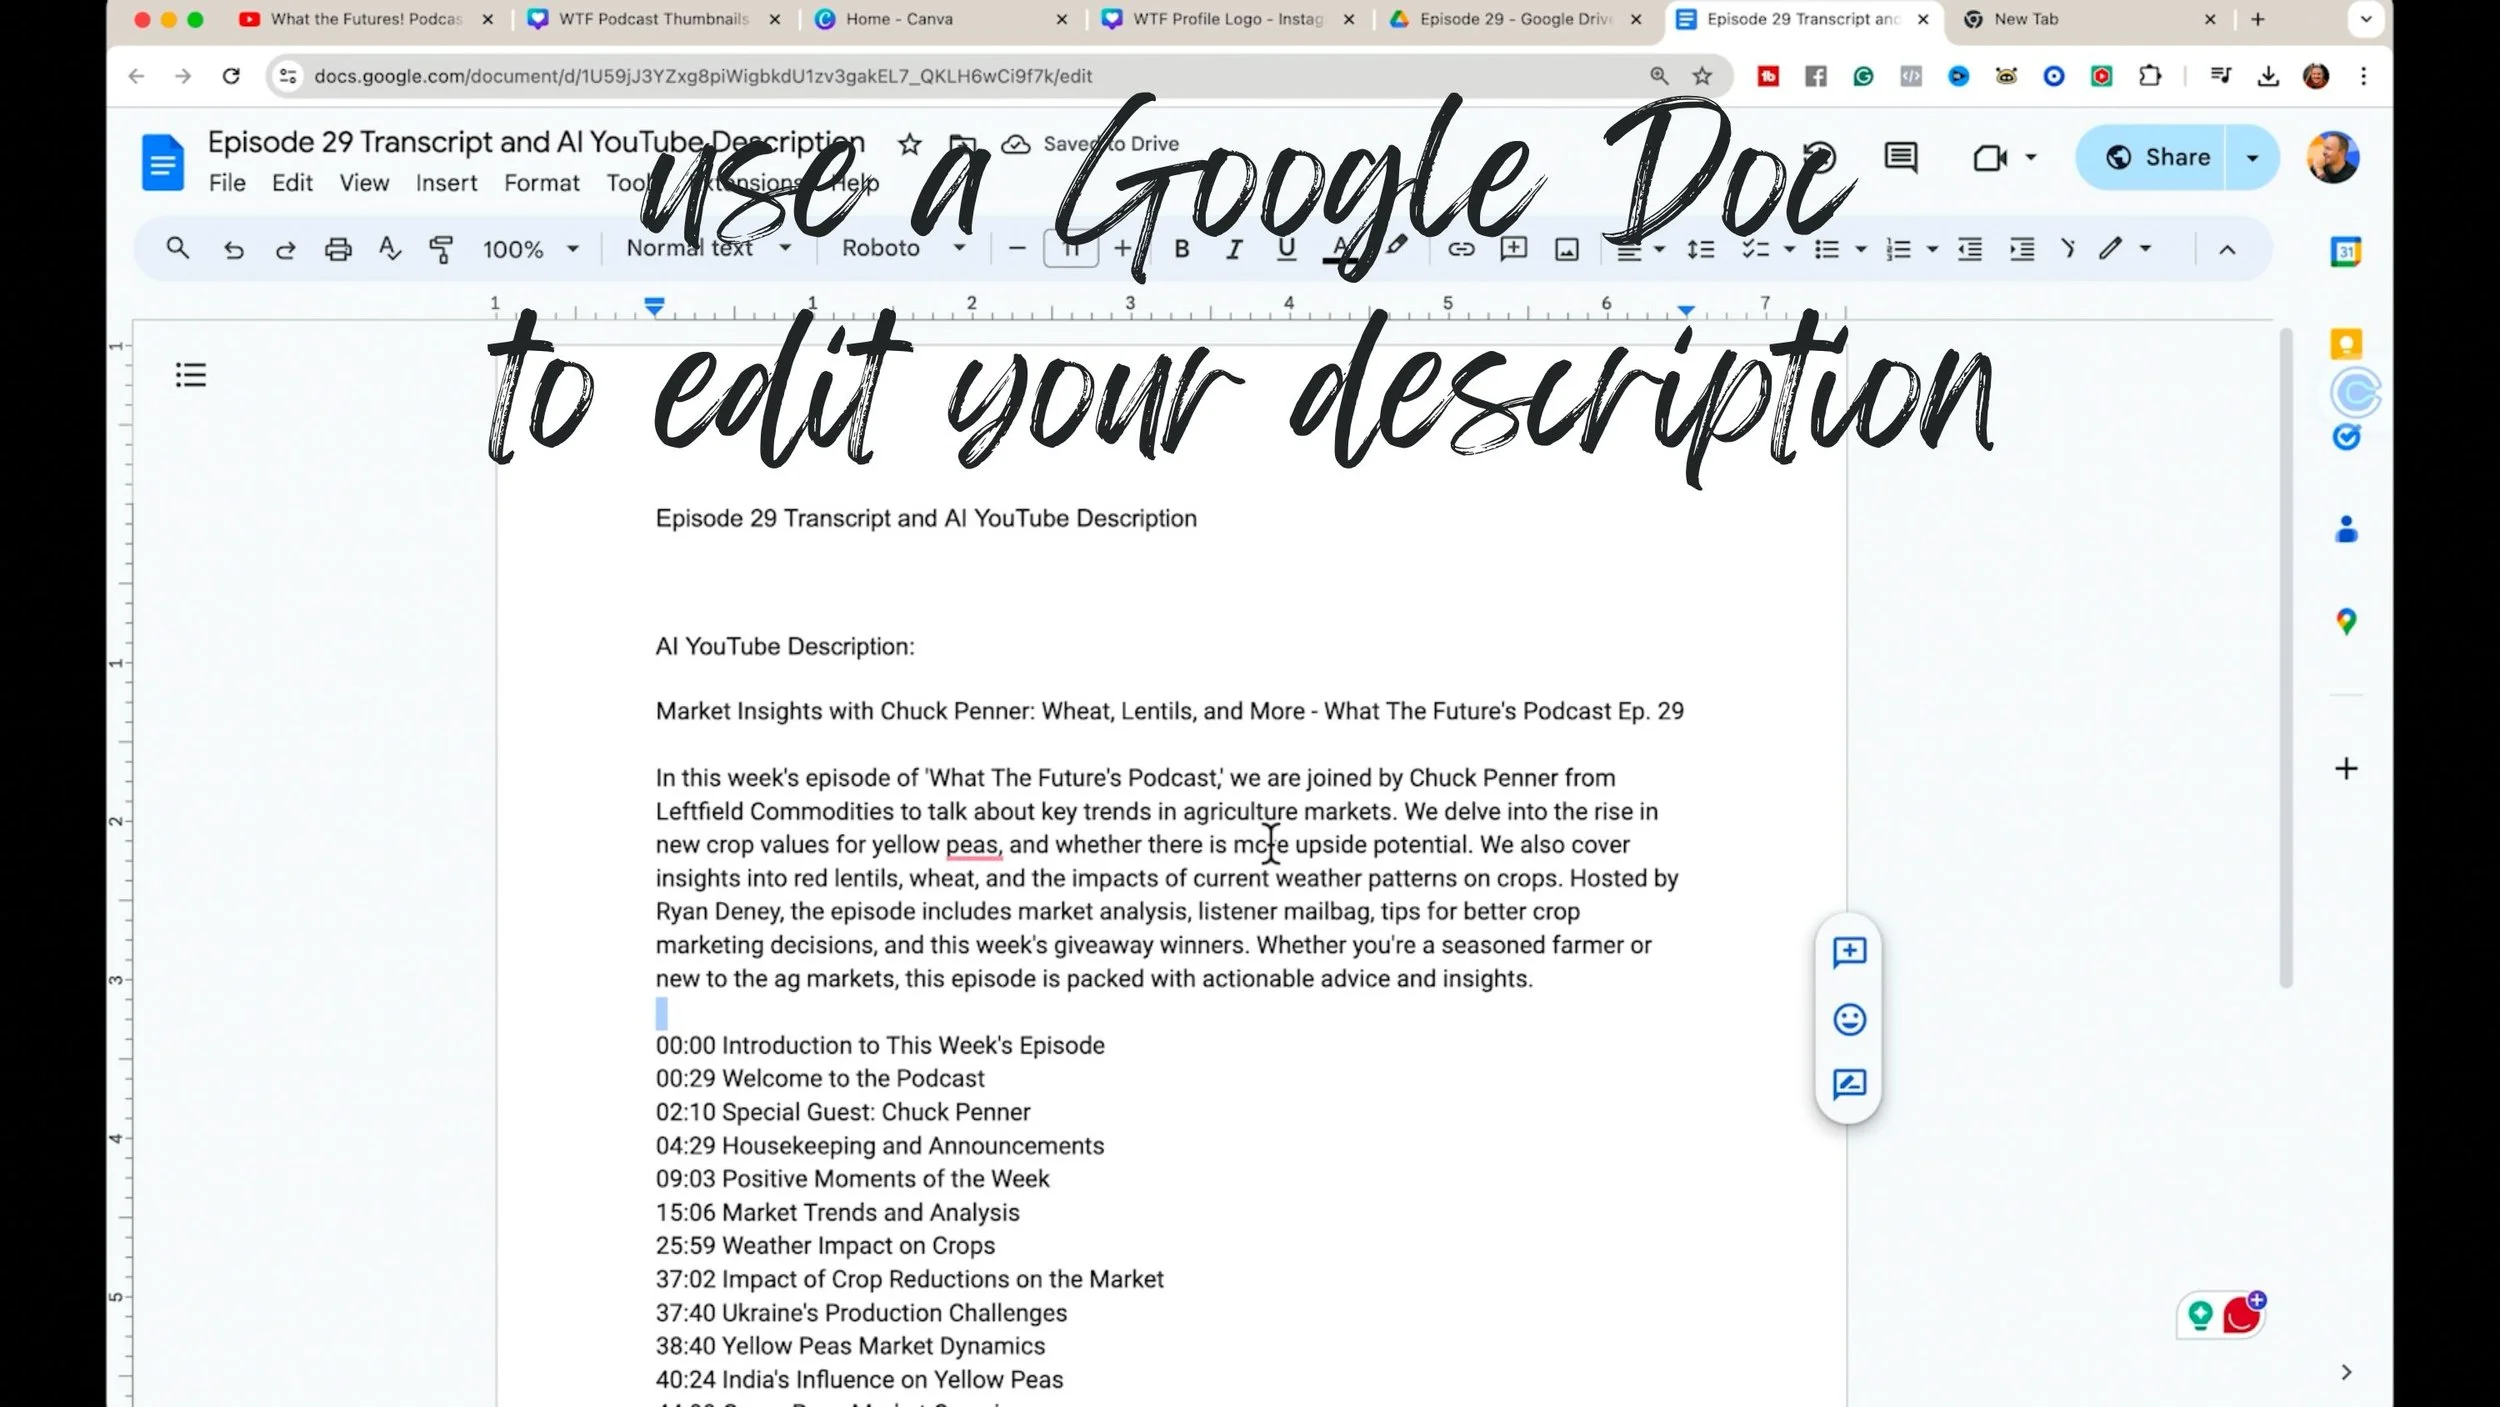
5. Paste the description into a Google Document to edit and SEO optimize your YouTube description
This is a great deliverable to clients, especially clients who work with a social media manager or a podcast manager who does all of this administrative work for them.
Using Descript to do these tasks is a no-brainer because it generates the information quickly and is very useful for the publishing process on YouTube.
6. Go back into Descript and copy the whole transcript
Press CMD or control + A to select All.
Next, press CMD or control + C to copy it.
7. Paste the transcript into your Google Doc
The transcript is incredible information to have.
8. Cross-reference Descript’s AI-generated description with the client's information for the episode to create a great YouTube description and streamlined list of timestamps.
These timestamps are really great for SEO and the whole user experience.
Go through the AI-generated timestamps and choose the ones you want to keep
Change the wording to target your keywords, or sound more like you
While the video file is uploading to YouTube:
This is the perfect time to start filling in all the information!
Of course, you can always come back and edit it later.

Refine the title as needed. Of course, you can use AI and chatGPT to help find variations or shortened versions of the title.
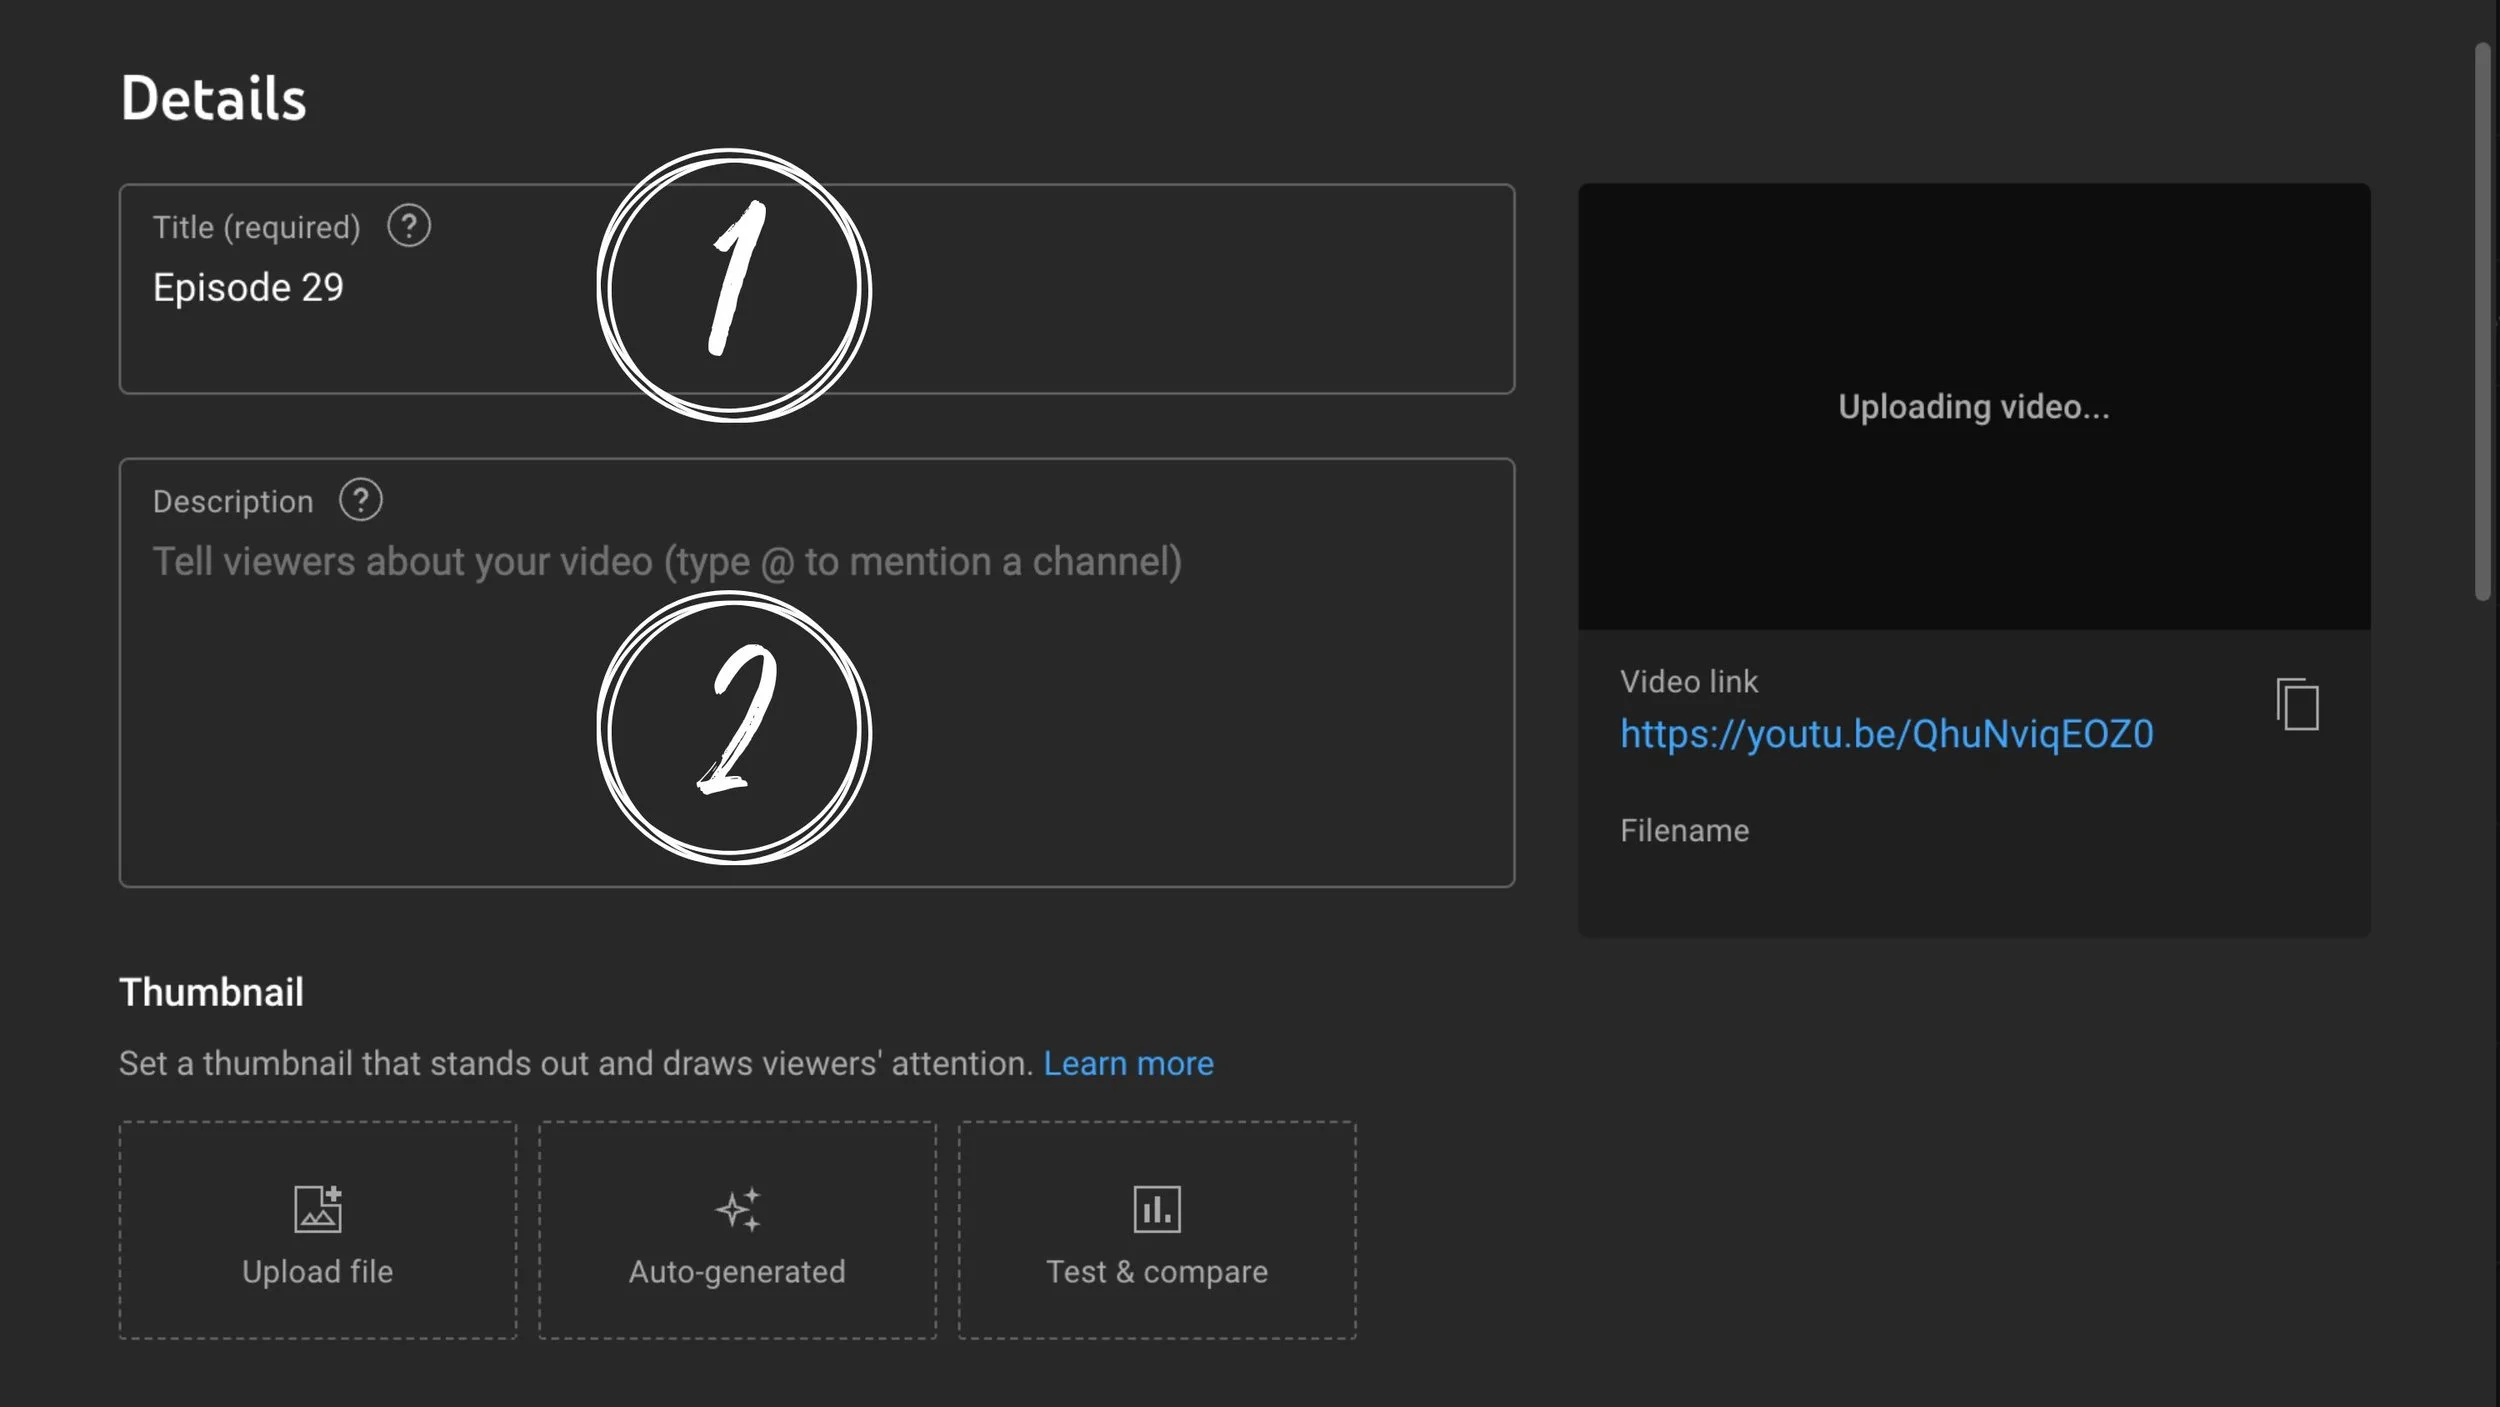
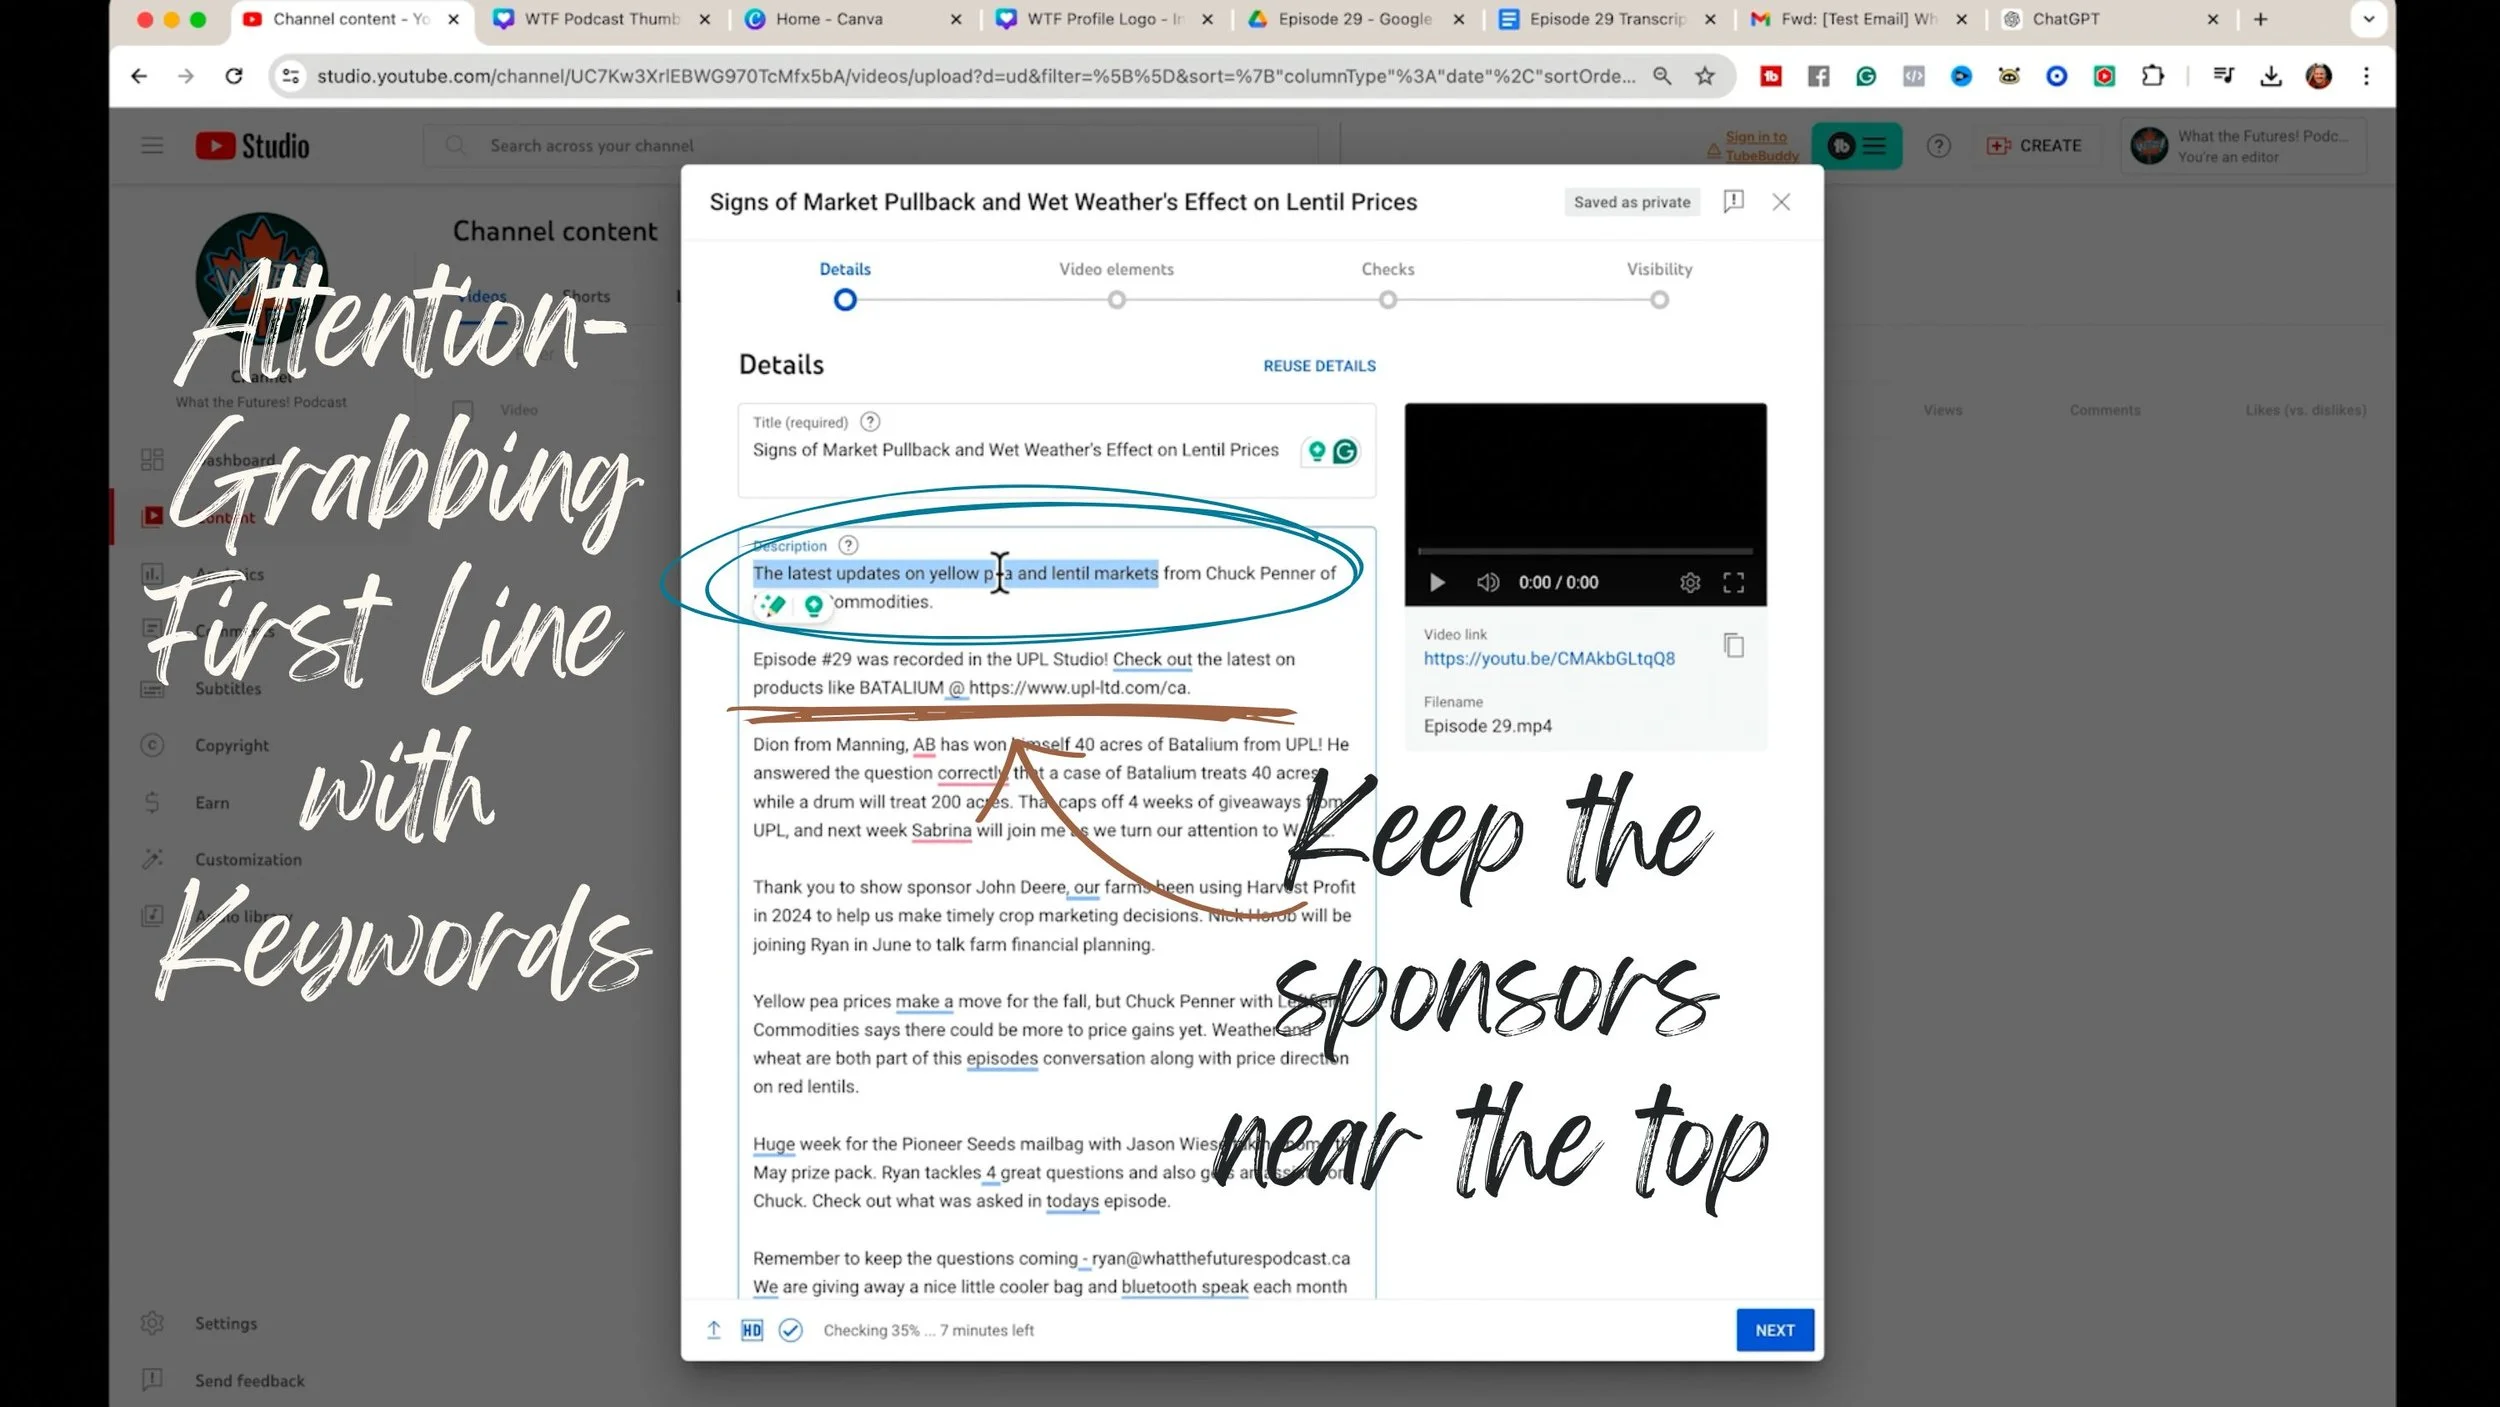
The description is a nice place to talk about YouTube's strategy. This specific instance is one we run into a lot when we're talking about sponsorships because we need to keep our sponsors near the top, if not the first line of our description. You can also drop this in the comments if you need it to have more visibility.
The first two lines of the description are very important for SEO and also, because viewers can read the first sentence of the description as they're scrolling through and deciding what to watch. So this is very valuable real estate where you can put some important information.
Those first two lines of the description show up on people's phones and when people are browsing.
I still recommend you keep the sponsor right near the top in the second sentence.
Then craft a very attention-grabbing first sentence that says what this episode is about and the big takeaways from this episode.
This is a good practice for SEO and also to increase your CTR or your click-through rate.
For Ryan’s episode description, I came back to the Underlord in Descript and said, “Hey, can you give me a few options of single sentences that would describe the key takeaways from this episode?” And we get something like this:
“The latest updates on yellow pea and lentil markets” , this will help us rank in SEO.
If somebody's typing in “yellow pea updates” or “lentil markets,” this video would likely populate.
Add accurate timestamps so viewers can find the topics they care about. Chapters make a long episode easier to navigate.
Let’s look through the AI timestamps and clean them up.
The one thing I like to look out for is to eliminate timestamps that are too close in time to each other.
Pick and choose the most important ones to keep which are typically the ones with keywords.
We don't want to overwhelm people with too many chapters. We just want to give them a few timestamps to choose between to help them easily navigate through the episode.
And then title your timestamps section by writing TIMESTAMPS above the list.
[Caution] You have to include the zeros (00:00) at the top of the timestamps list to get the timestamps to function. Other than that requirement, you can put in any timestamp you want.
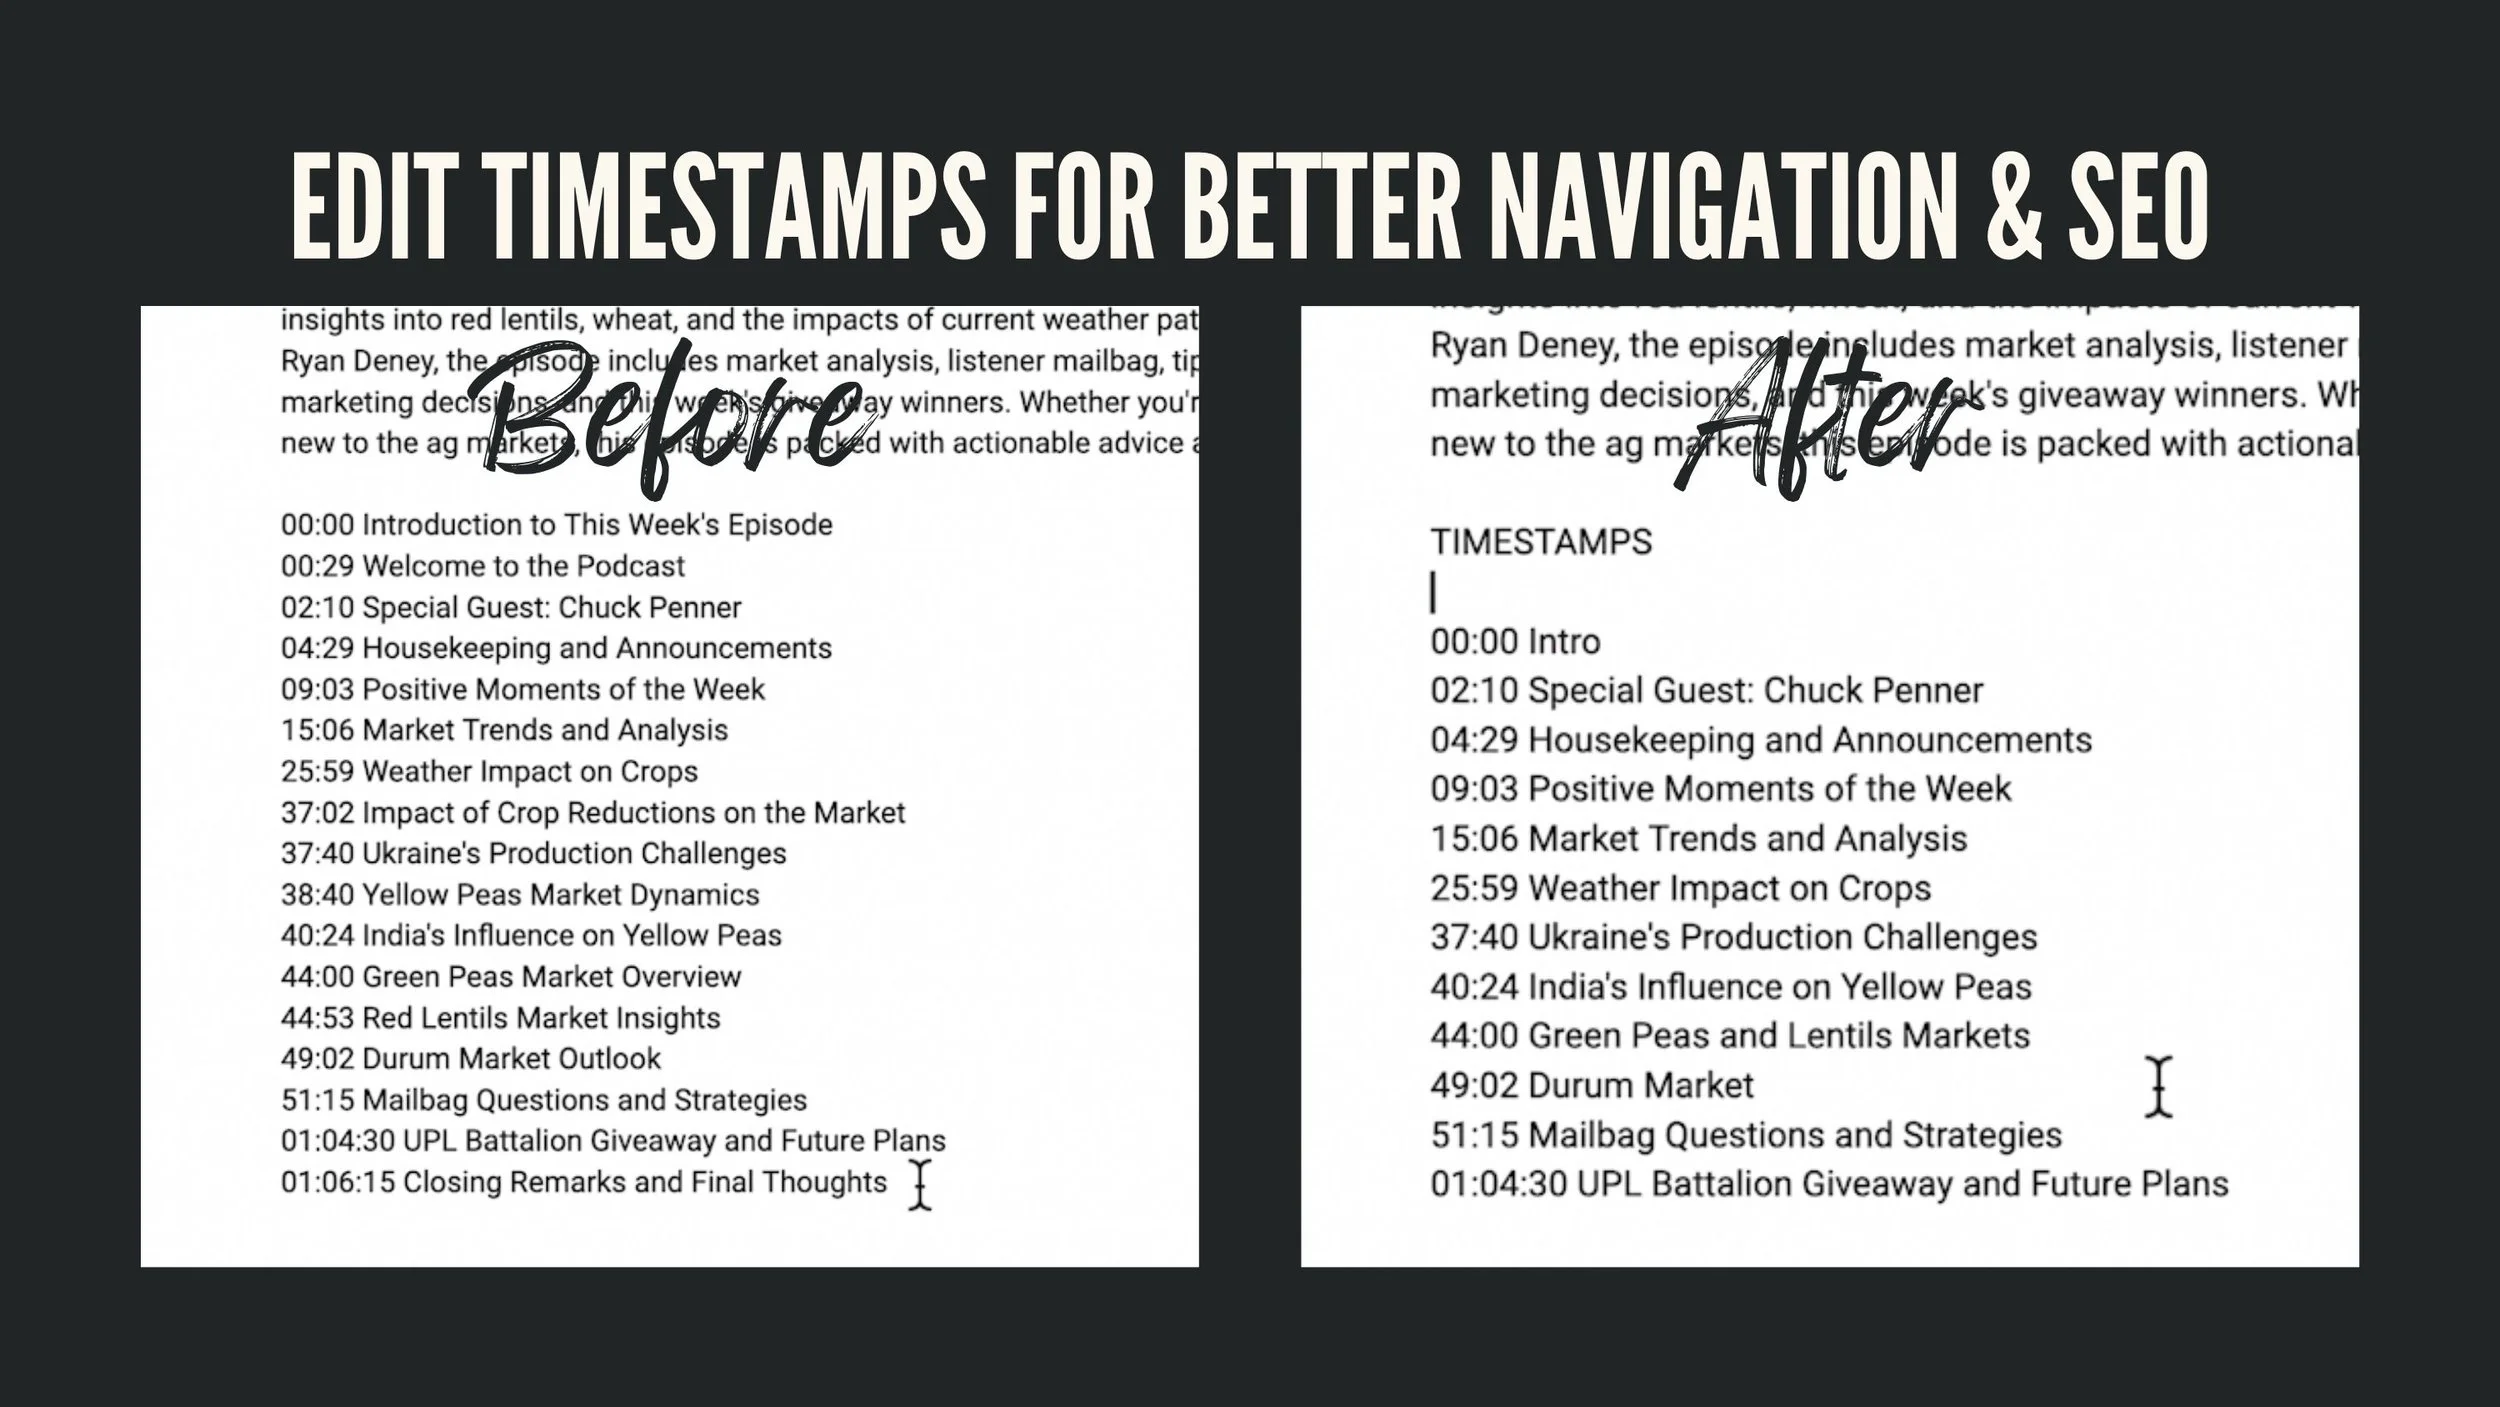
When you’re done you can just copy and add the timestamps to your YouTube description at the bottom.
And that’s it for timestamps and the description!
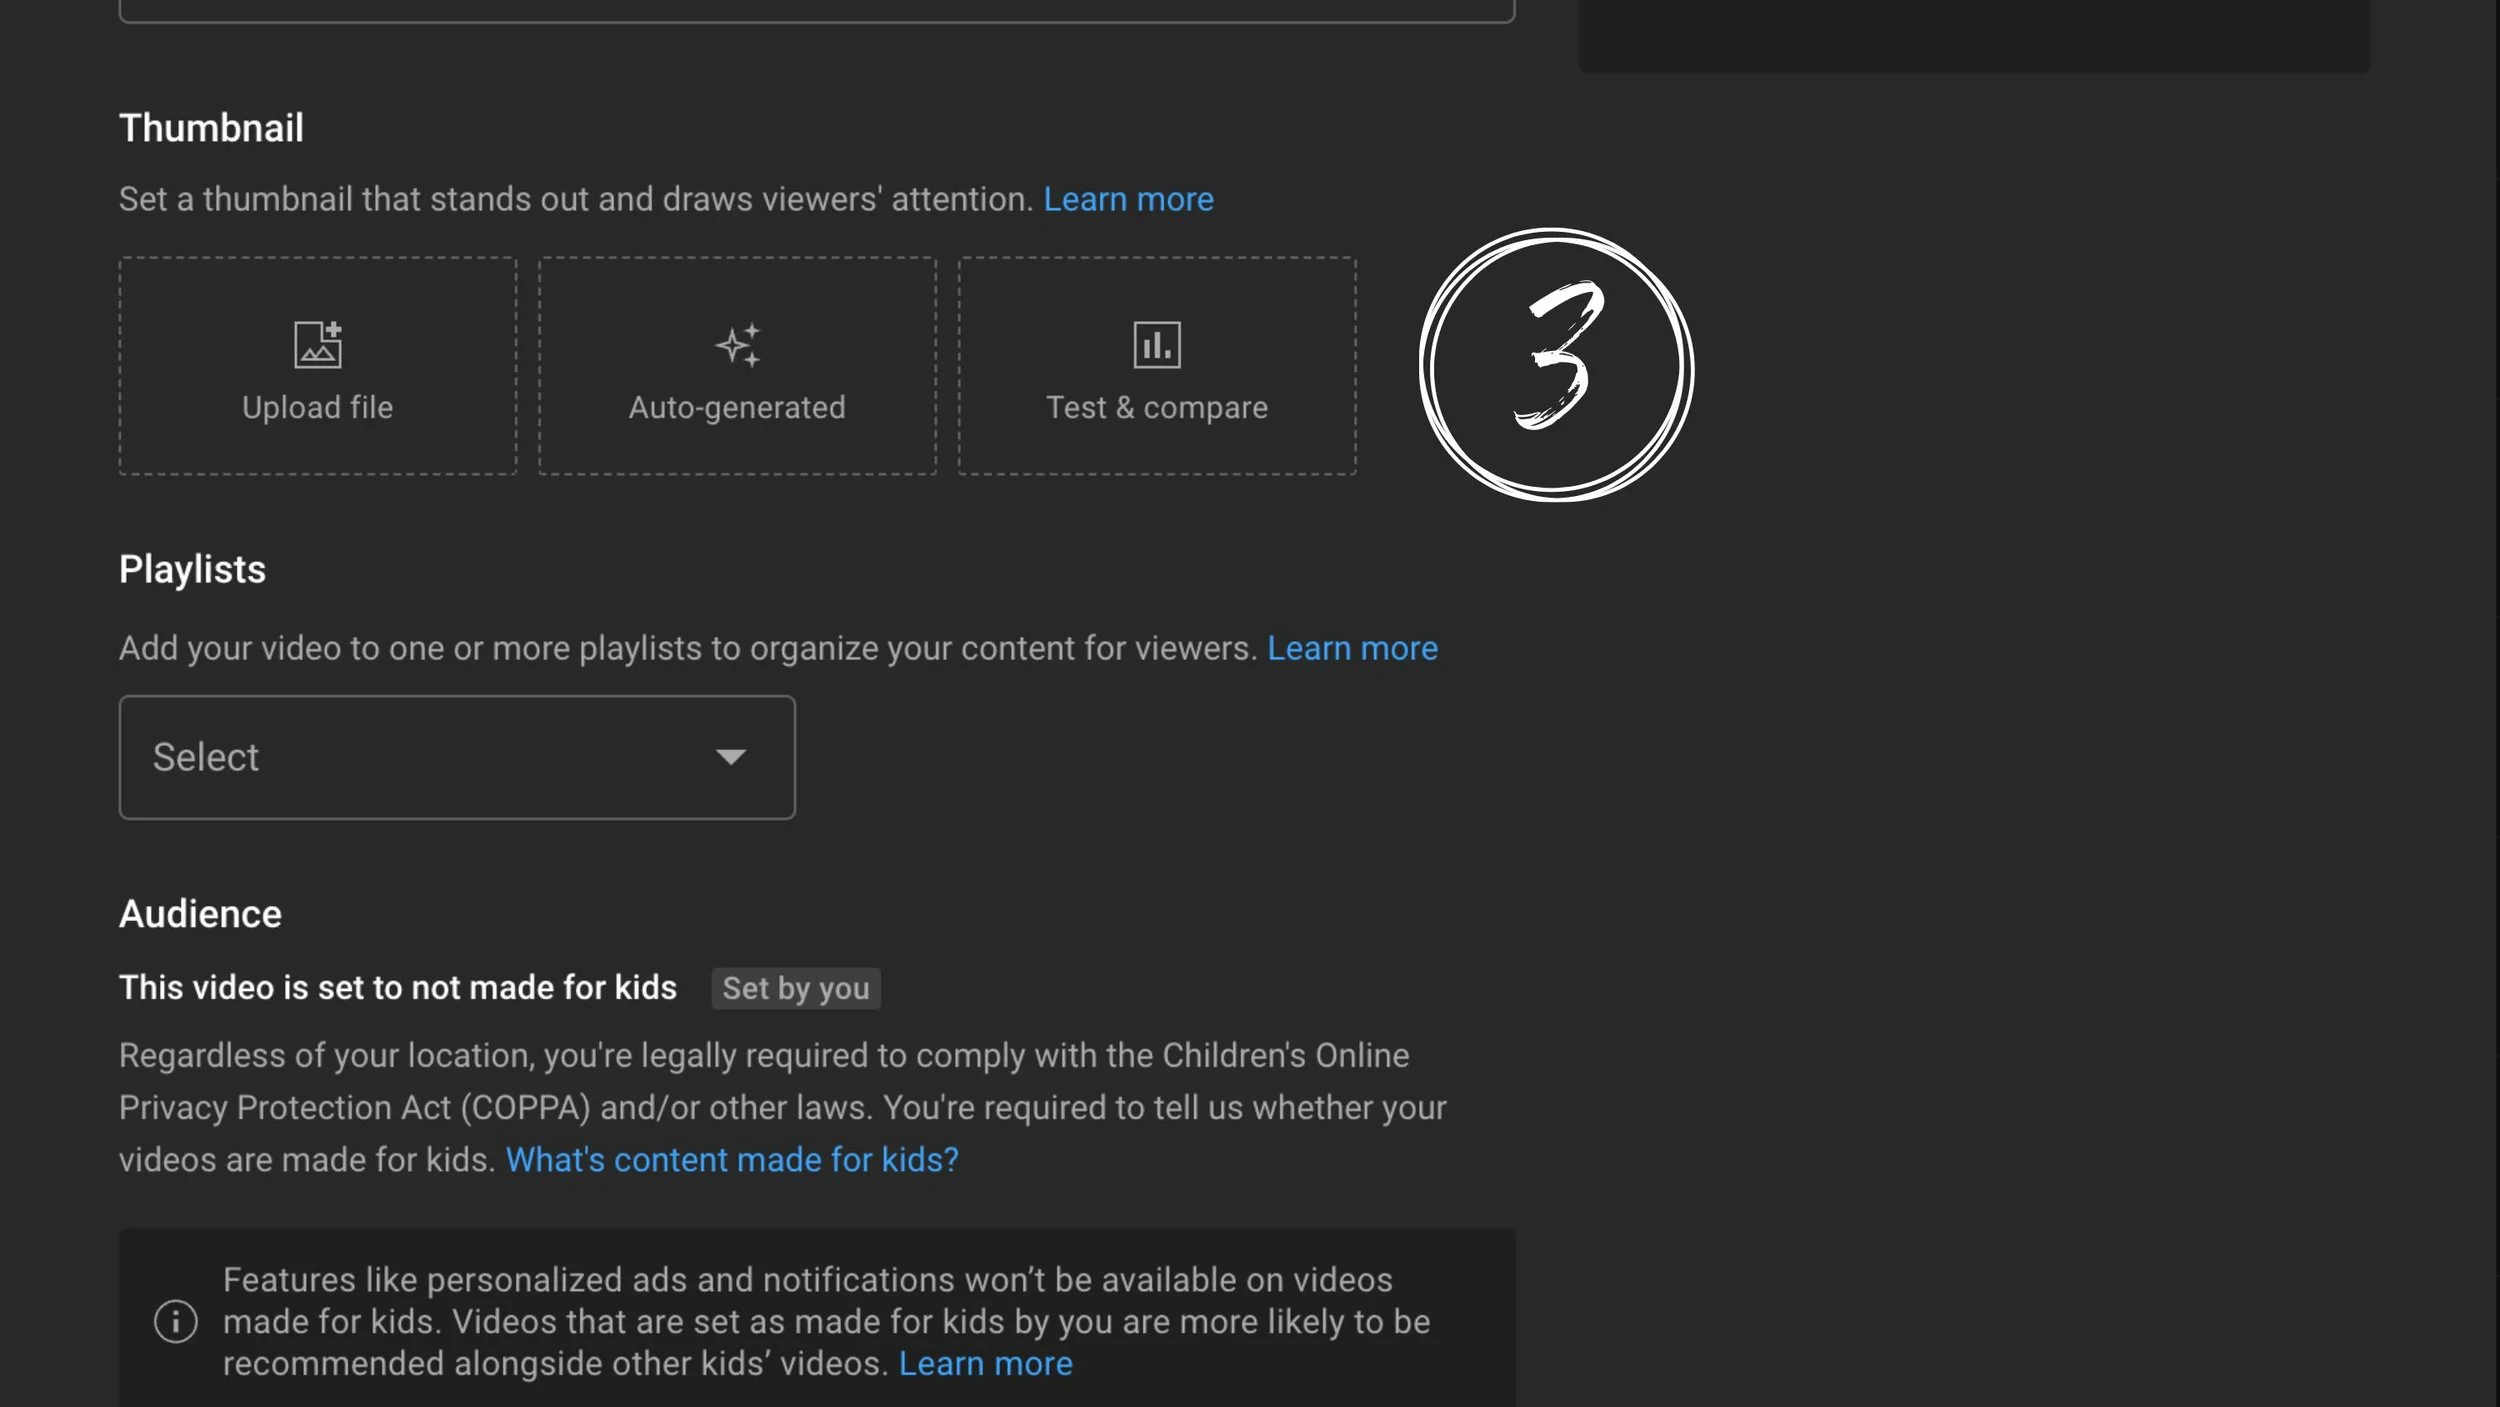
Since the video is still processing, now is a perfect time to make a nice thumbnail for Ryan’s video.
If you’re a podcast editor, thumbnail creation can be a fun little extra that you add to your set of deliverables.
So again, you can ask Descript’s Underlord, “Can you give me a few ideas of short relevant phrases I can include on a thumbnail?”
Copy and paste Underlord’s thumbnail phrase ideas into your Google Doc.
And now we can compare the phrase ideas to the original title, “Which markets are showing signs of a pullback? And what does wet weather mean for lentil prices?”
Since we're concerned about market pullback and lentil prices, I can check the AI ideas for thumbnail phrases or go with my understanding of what this episode is about.
I'm thinking a good phrase for the thumbnail here would be:
Signs of Market Pullback and Lentil Prices
Choose a template, and duplicate it by pressing Command or Control + D for duplicate.
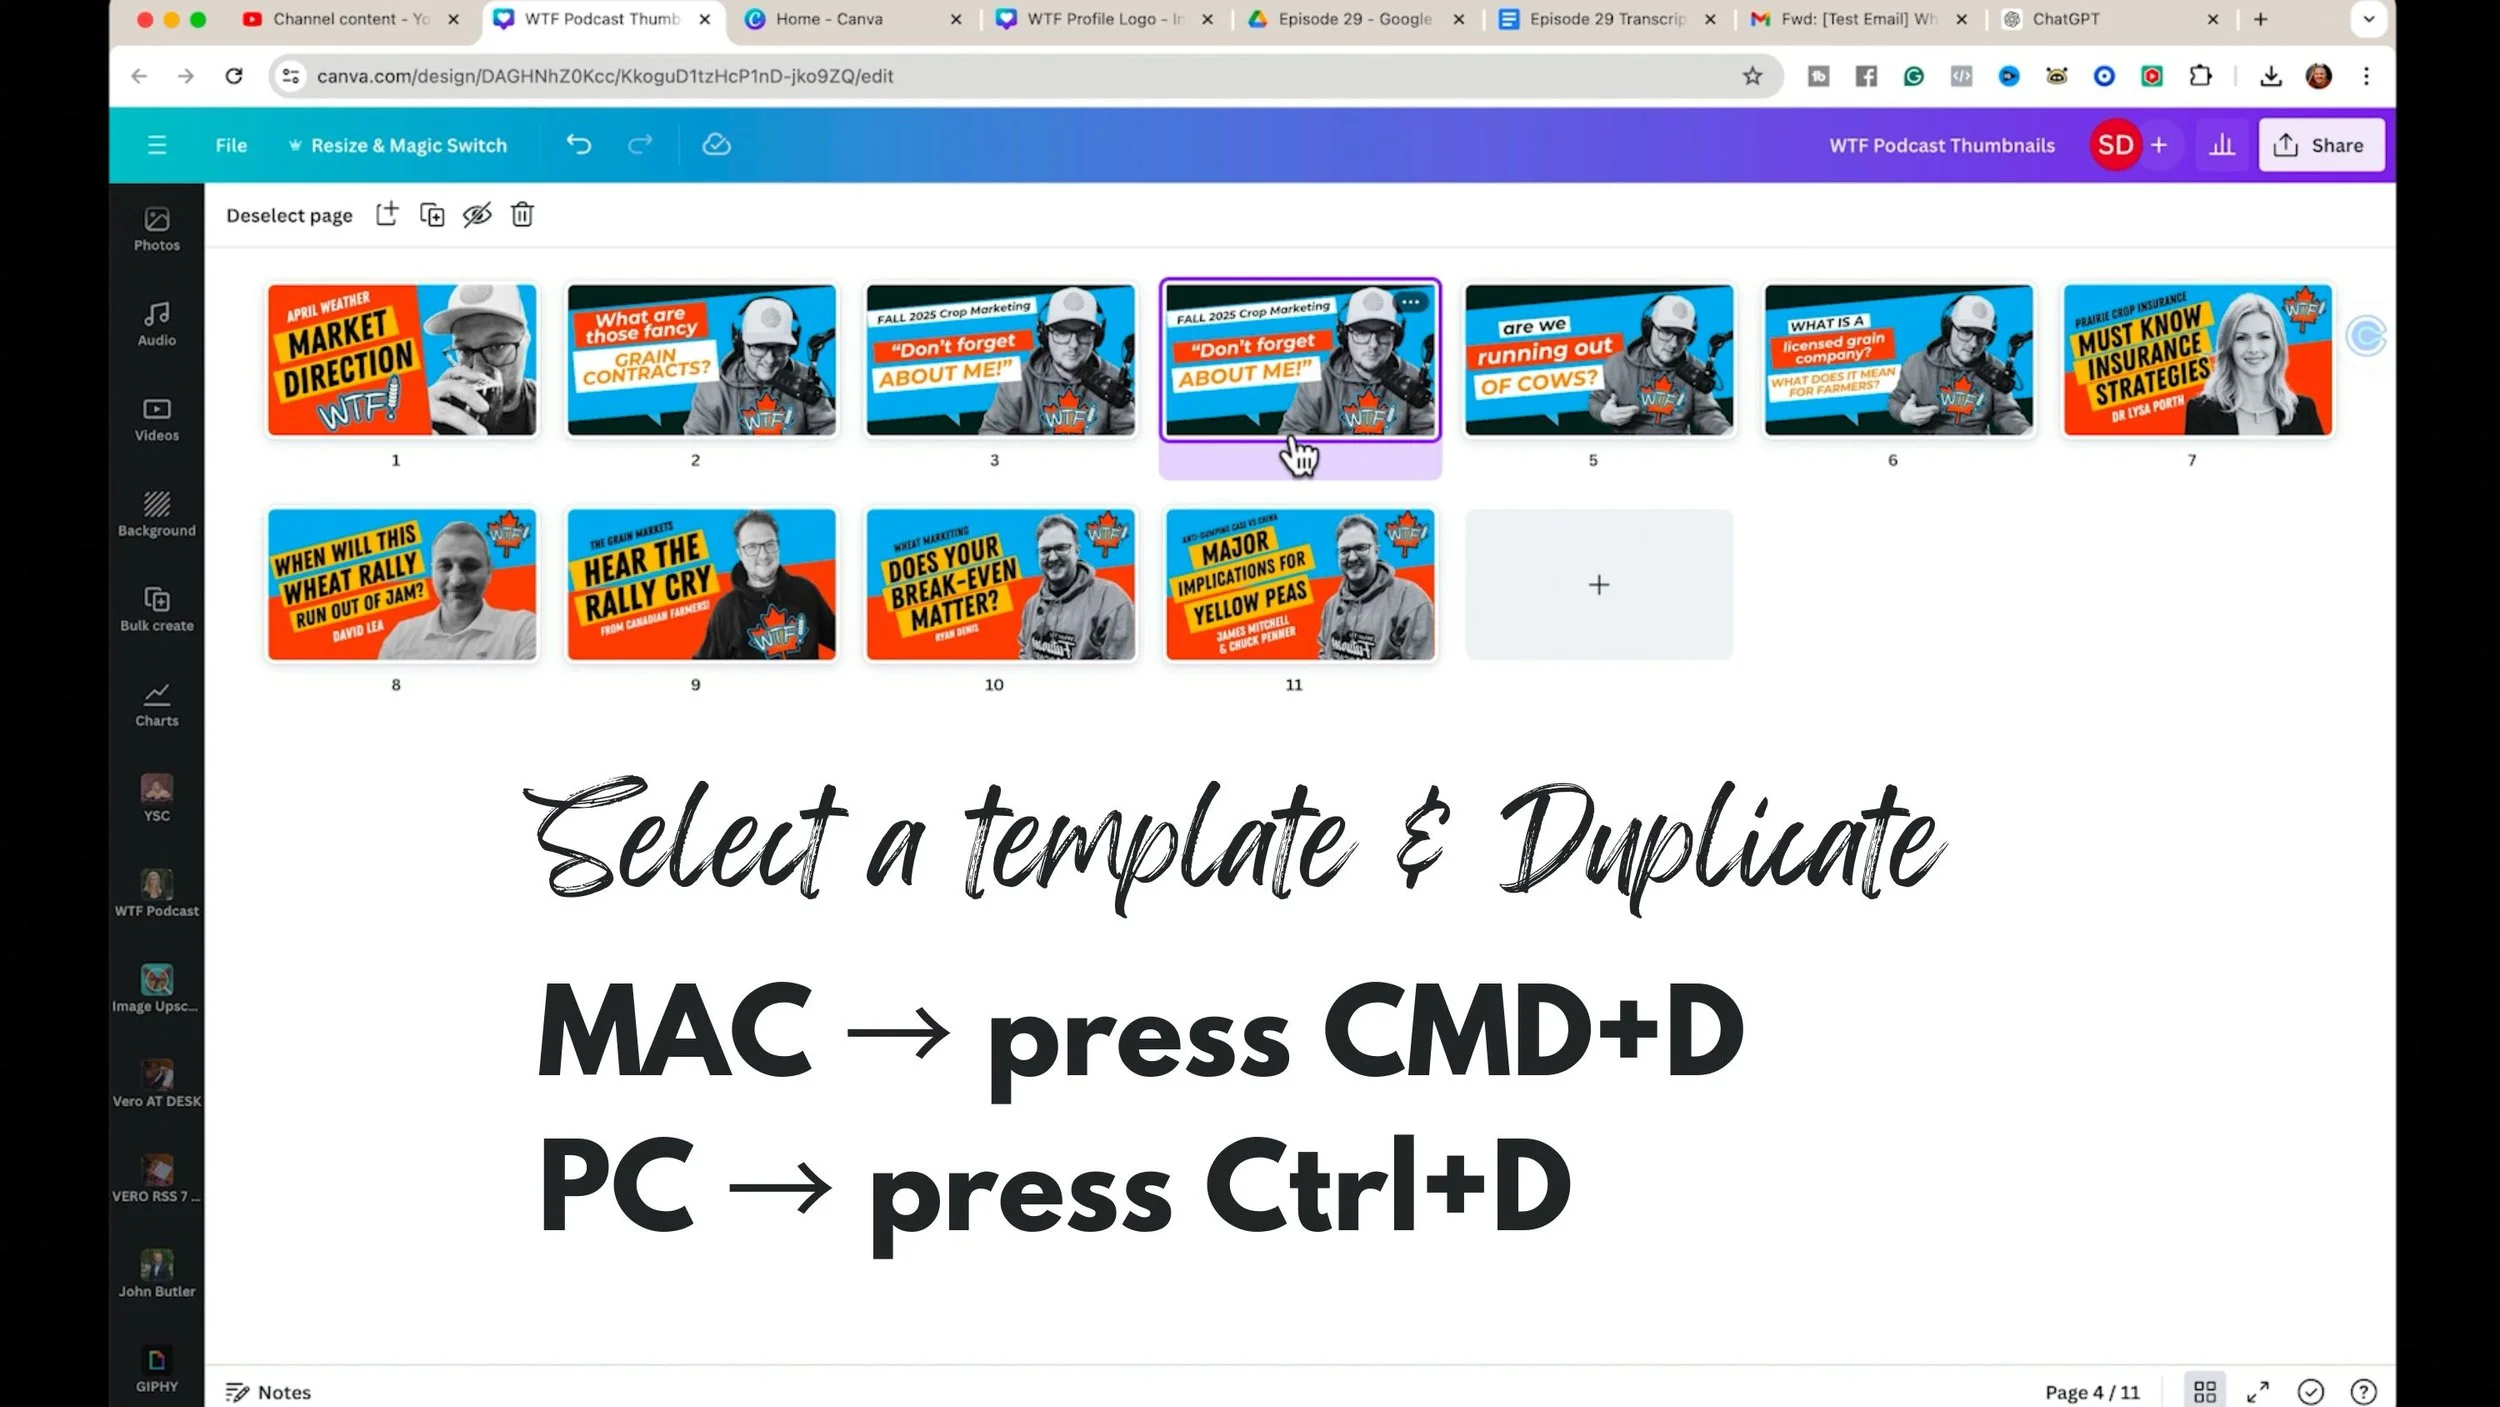
Now I can replace the text with the new thumbnail phrase.
If there’s a new guest on the show, you can drop the new picture right into the same spot and that picture will automatically replace the old one. The new picture will also take on all the special effects and properties of the original image.
Resize and move elements around to make a new, very similar thumbnail.
It can be helpful to group the text and the shape behind it before rearranging the elements.
A little trick to group them:
hold Command or Control and click the top element (the text) to select the element behind it (the shape)
hold Shift and click the top element again (the text) to select both the text and the shape element
after they’re both selected, click Group in the popup options bar
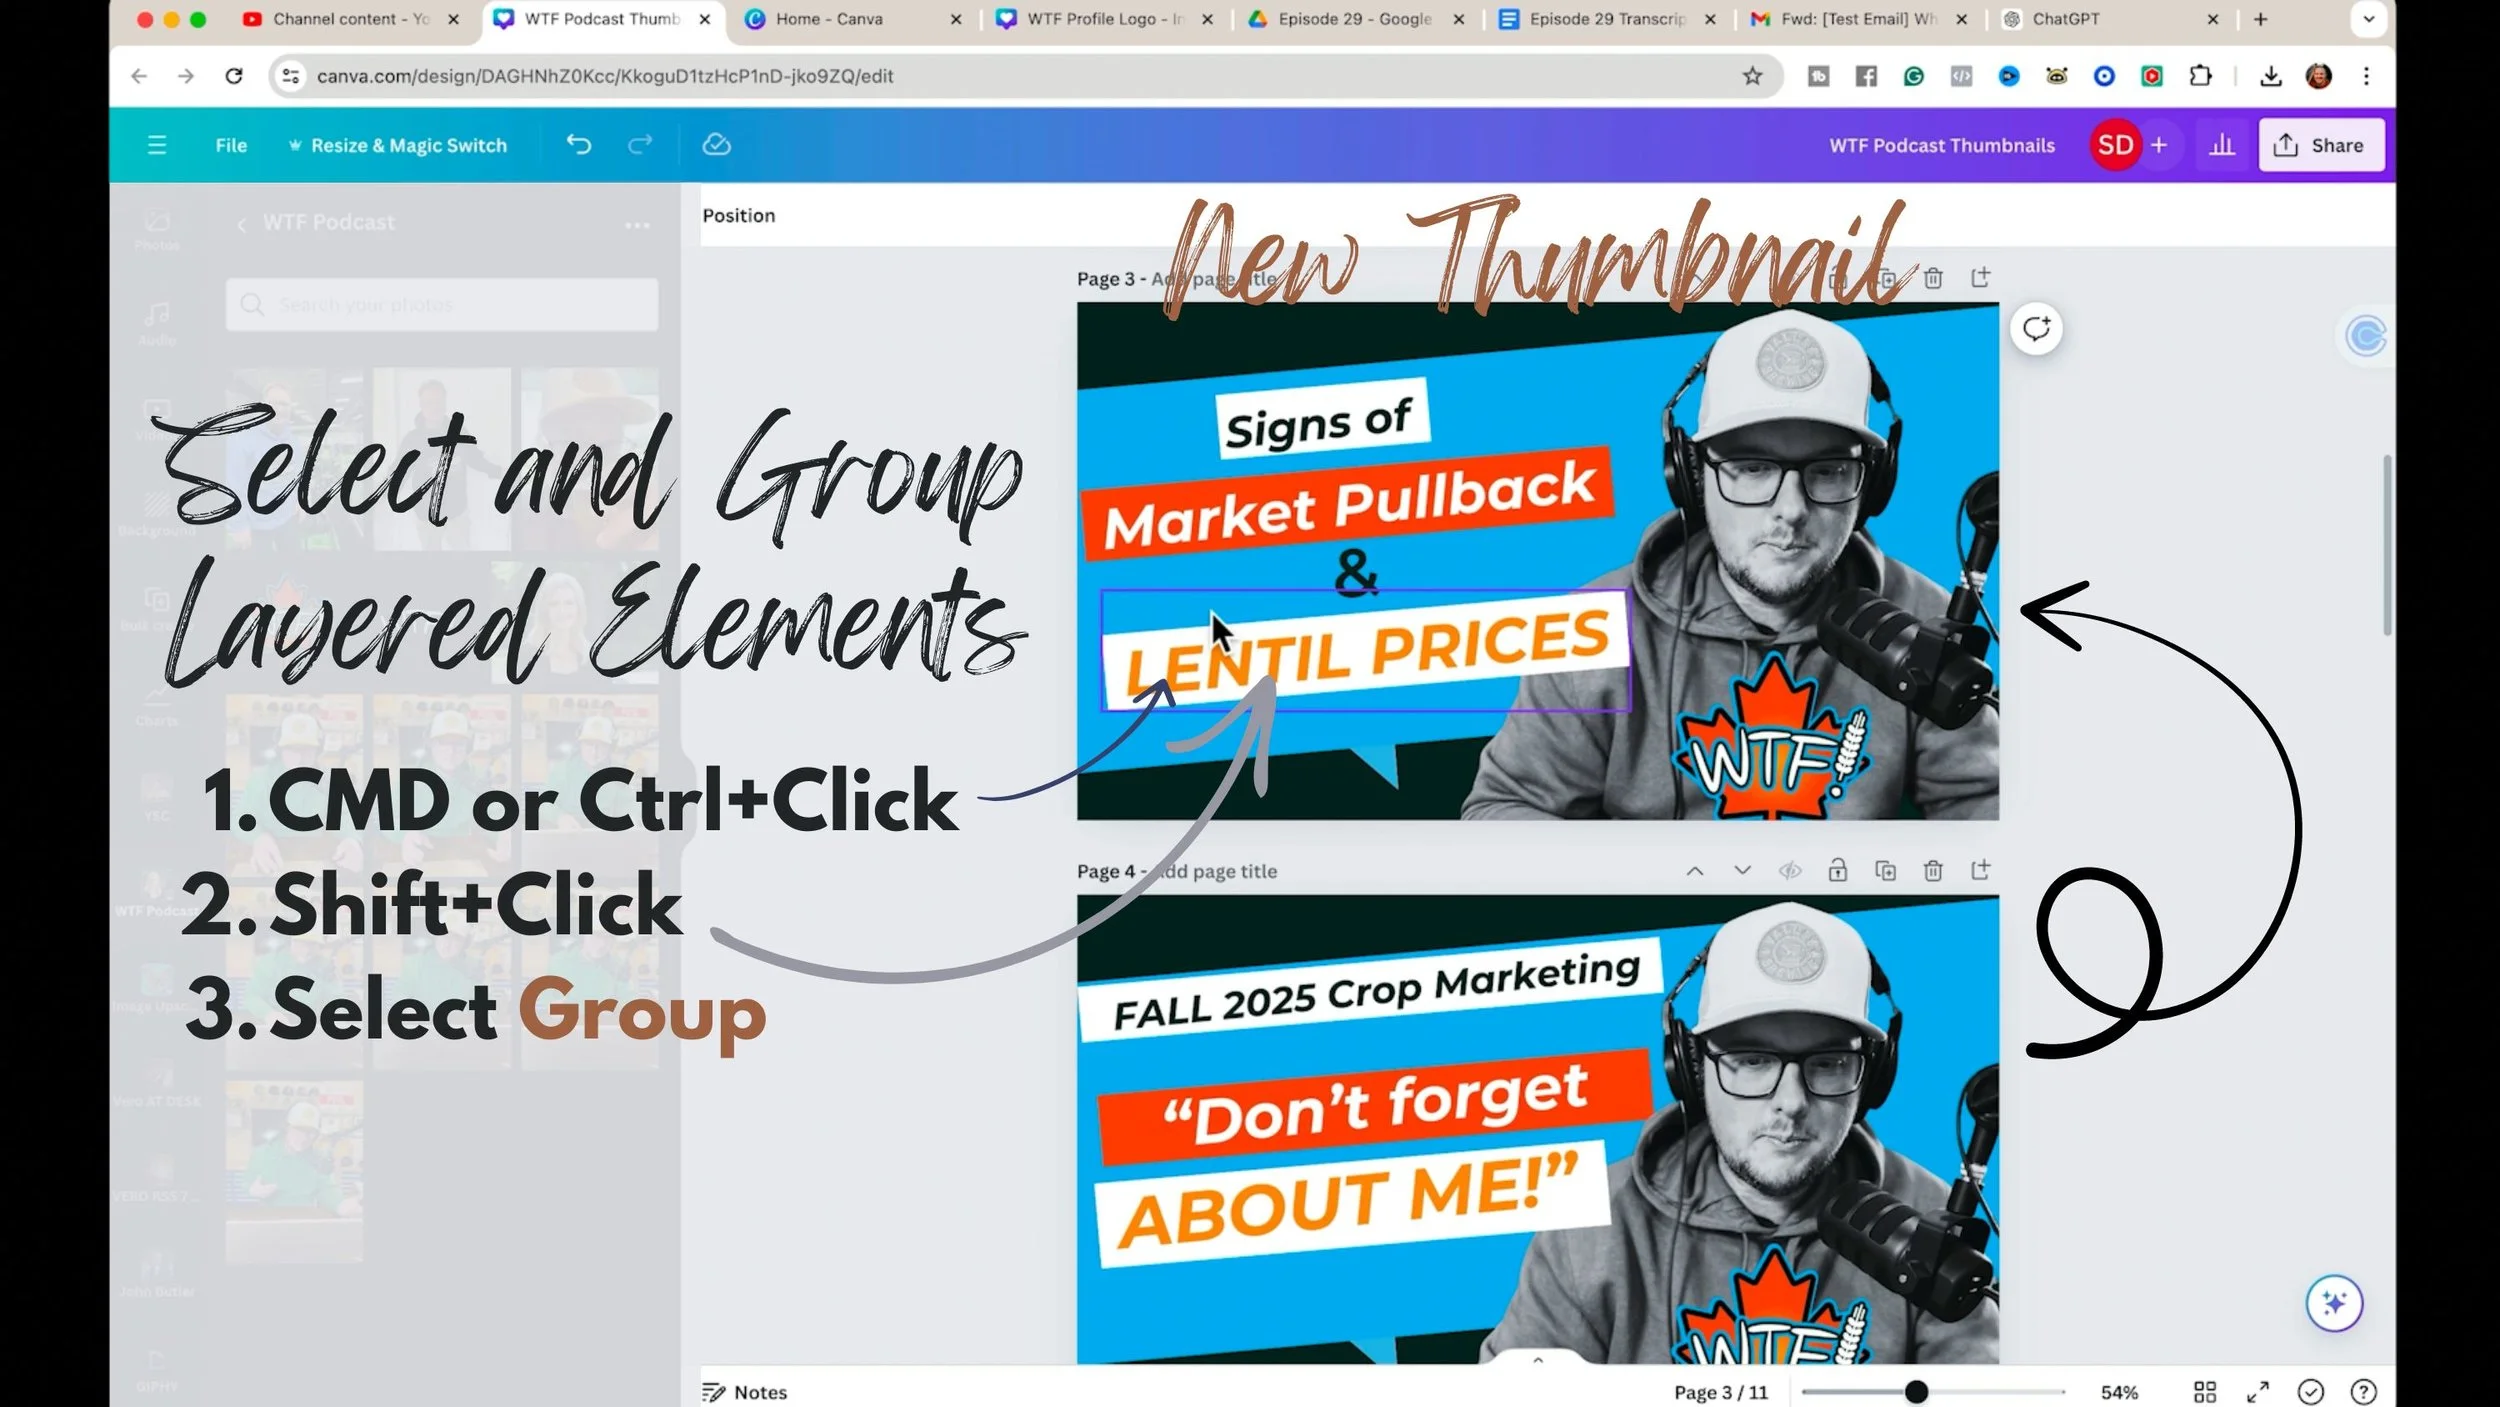
When you’re done creating the new thumbnail, it’s time to download it from Canva.
Click Share
Click Download
Select PNG
Select the page you want to download
Click Done
Click Download
And now let’s go back to YouTube.
Go to the Thumbnail section and upload the thumbnail we created and downloaded.
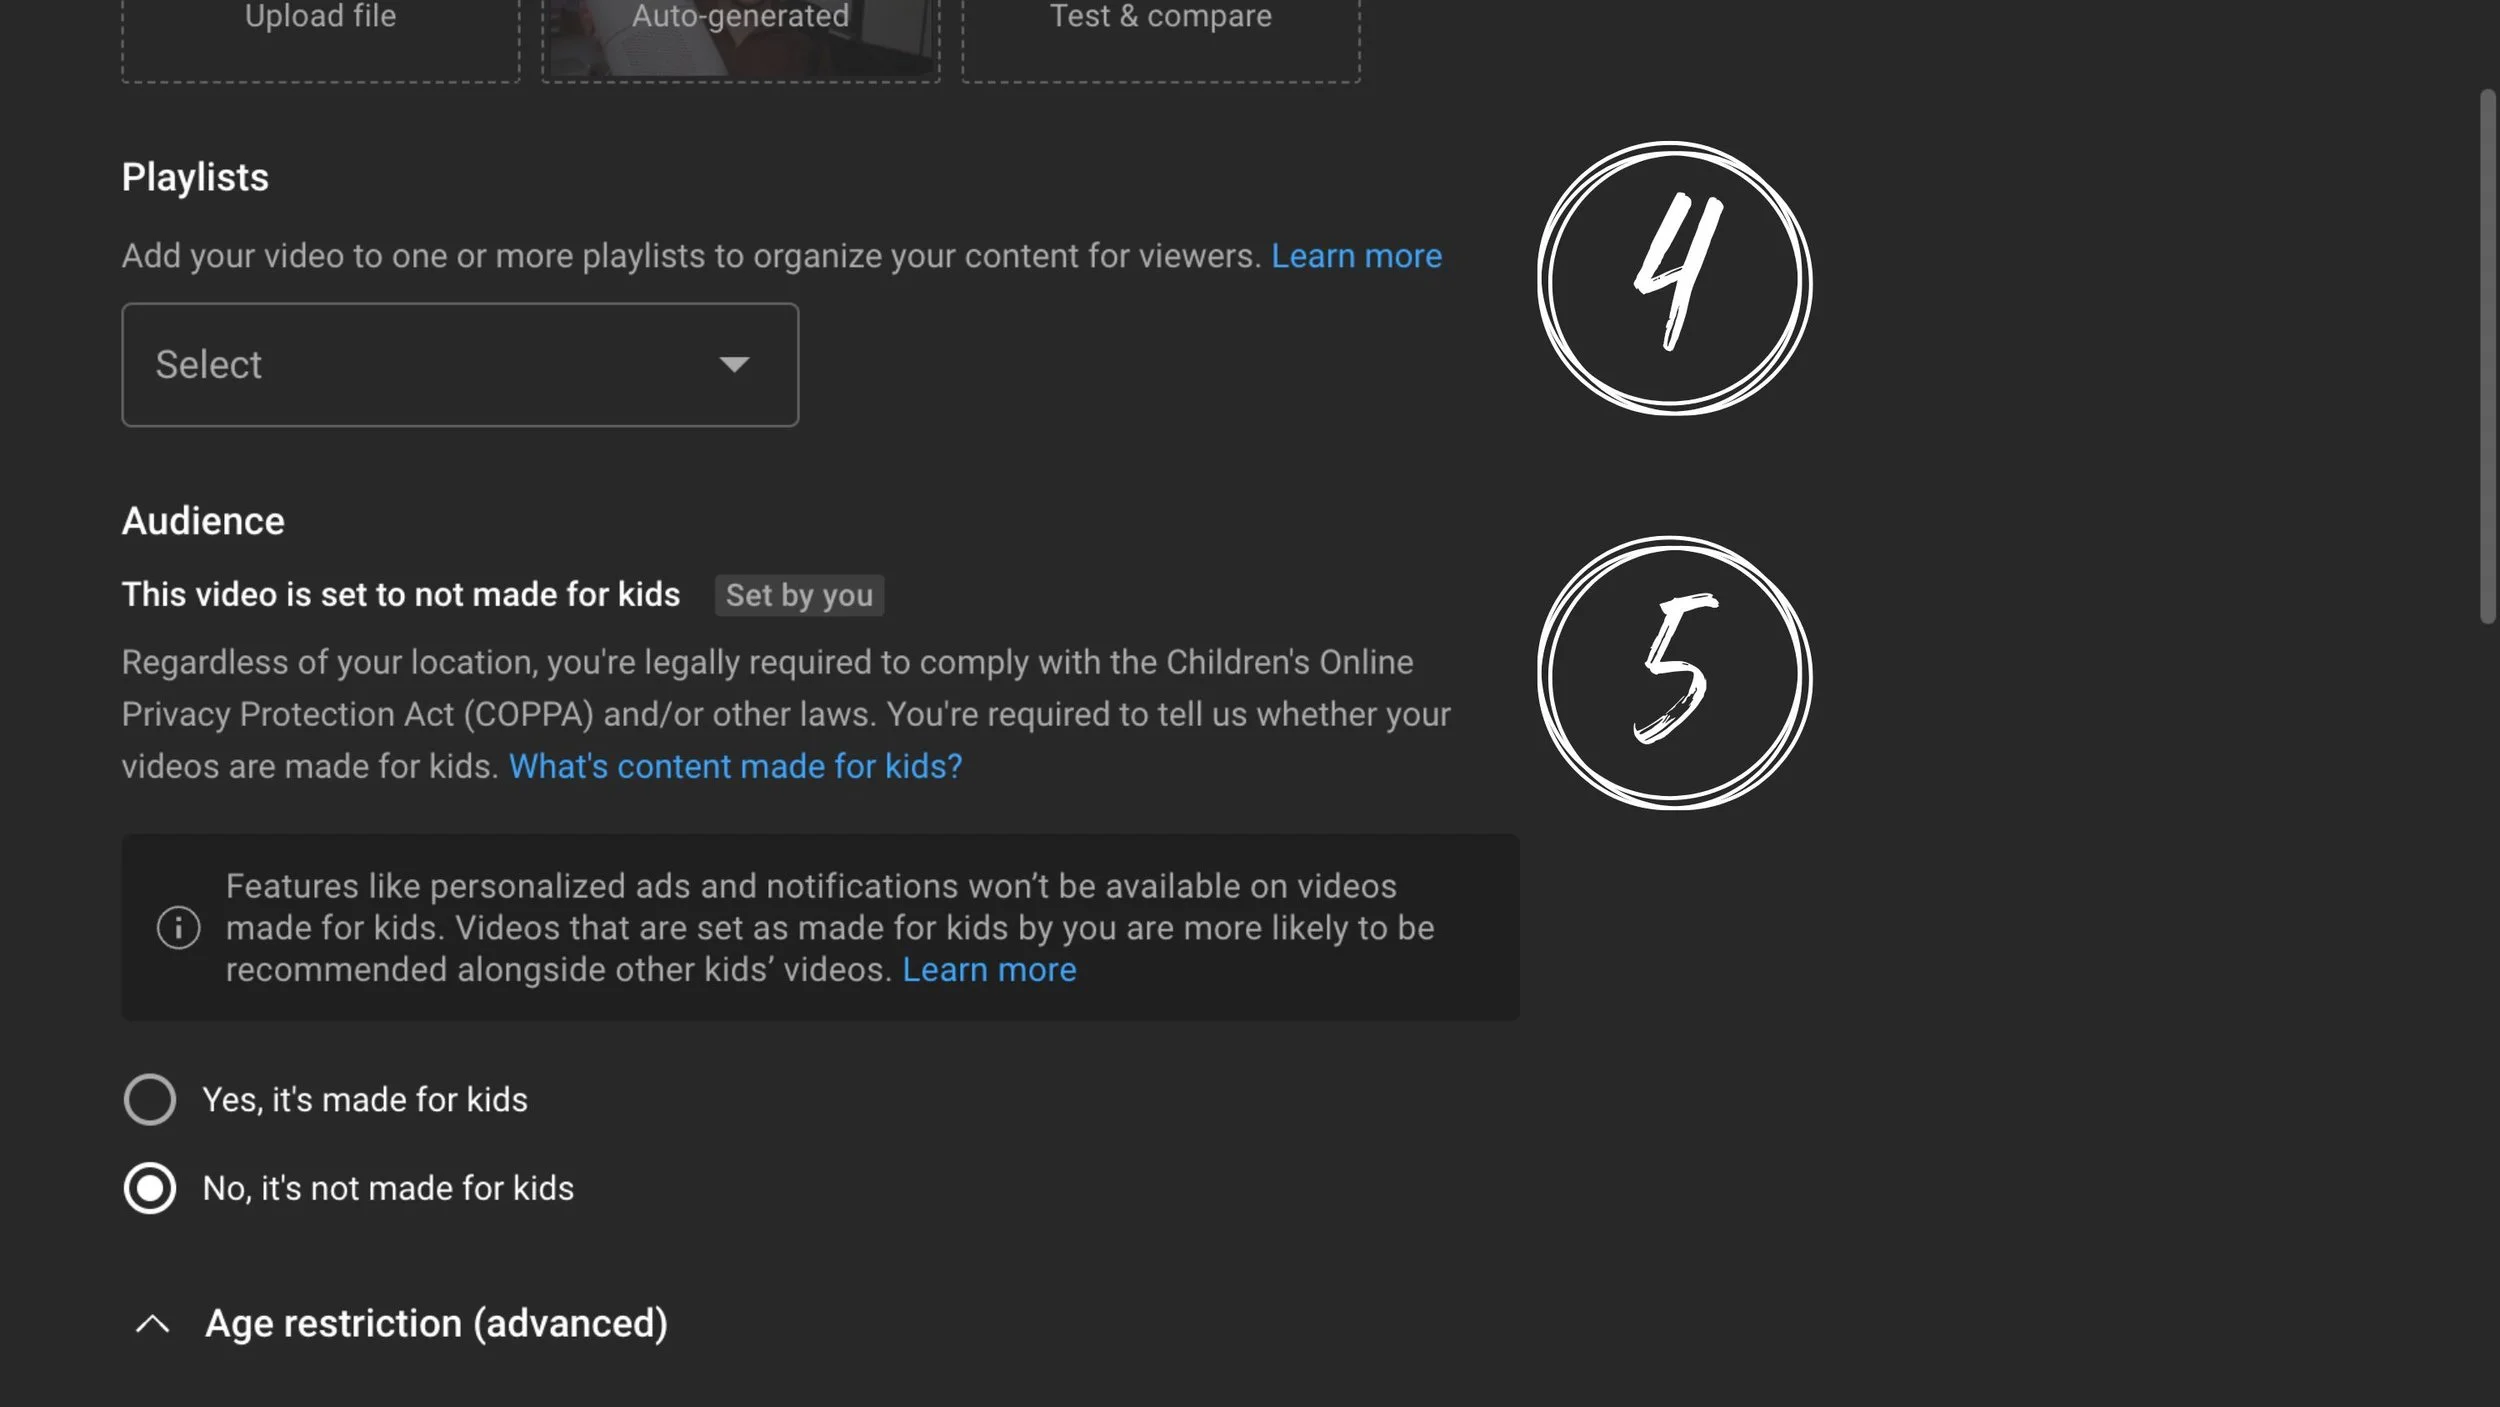
Add your video to one or more playlists to organize your content for viewers on YouTube.
Simply select a playlist. For Ryan, we want it to go on his podcast playlist.
No, Ryan’s podcast is not made for kids.

Before moving on to the SHOW MORE section on page one, complete the time-saving optimization tips outlined in the box below.
Now here are some important and time-saving optimizing tips that you can do on your channel.
WARNING: You must make these adjustments to be able to add captions and subtitles to your videos.
In your YouTube Studio, go to Settings.
From Settings, choose Channel.
From Channel, go to Advanced Settings.
Select > No, set this channel as not made for kids.
Set the audience designation accurately for your content. Use a channel default only if it fits the videos you publish, and review exceptions.
Once you've made that little adjustment, click on SAVE.
Go back to the Settings.
From Settings, choose Upload Defaults.
This is a really cool place to put things that you're always going to have in your description.
calls to action
the links of sponsors that you always have for your show
You can have those be a default in your description every time you upload to YouTube.
Let's go to the Advanced Settings tab.
Select the video language so it always defaults to our language.
For Ryan, I selected English (Canada)
Select the title and description language.
For Ryan, I selected English (Canada)
Choose comment settings and moderation that fit your audience and the content.
Checkmark Show how many viewers like this video.
And now that you've made those settings, click on SAVE.
WARNING: If you made these adjustments and you’re still not able to select the subtitles for your video, do the following:
Go back to your channel content
Check the box at the top to SELECT ALL of the content on your channel
Click on the Edit dropdown menu
Select video language
From the Video language menu, select your language
Click on the blue UPDATE VIDEOS button
Check I understand the implications of this action
Click Update Videos
Now all of your past videos have been updated to your language.
Moving forward, because you made the adjustments in the settings, all of your videos will now also be set to that language.
You should be able to add subtitles now!
Now let’s return to the Details page for your YouTube video and click SHOW MORE to reveal the remaining video configurations.
Scroll down to tags on the Details page.
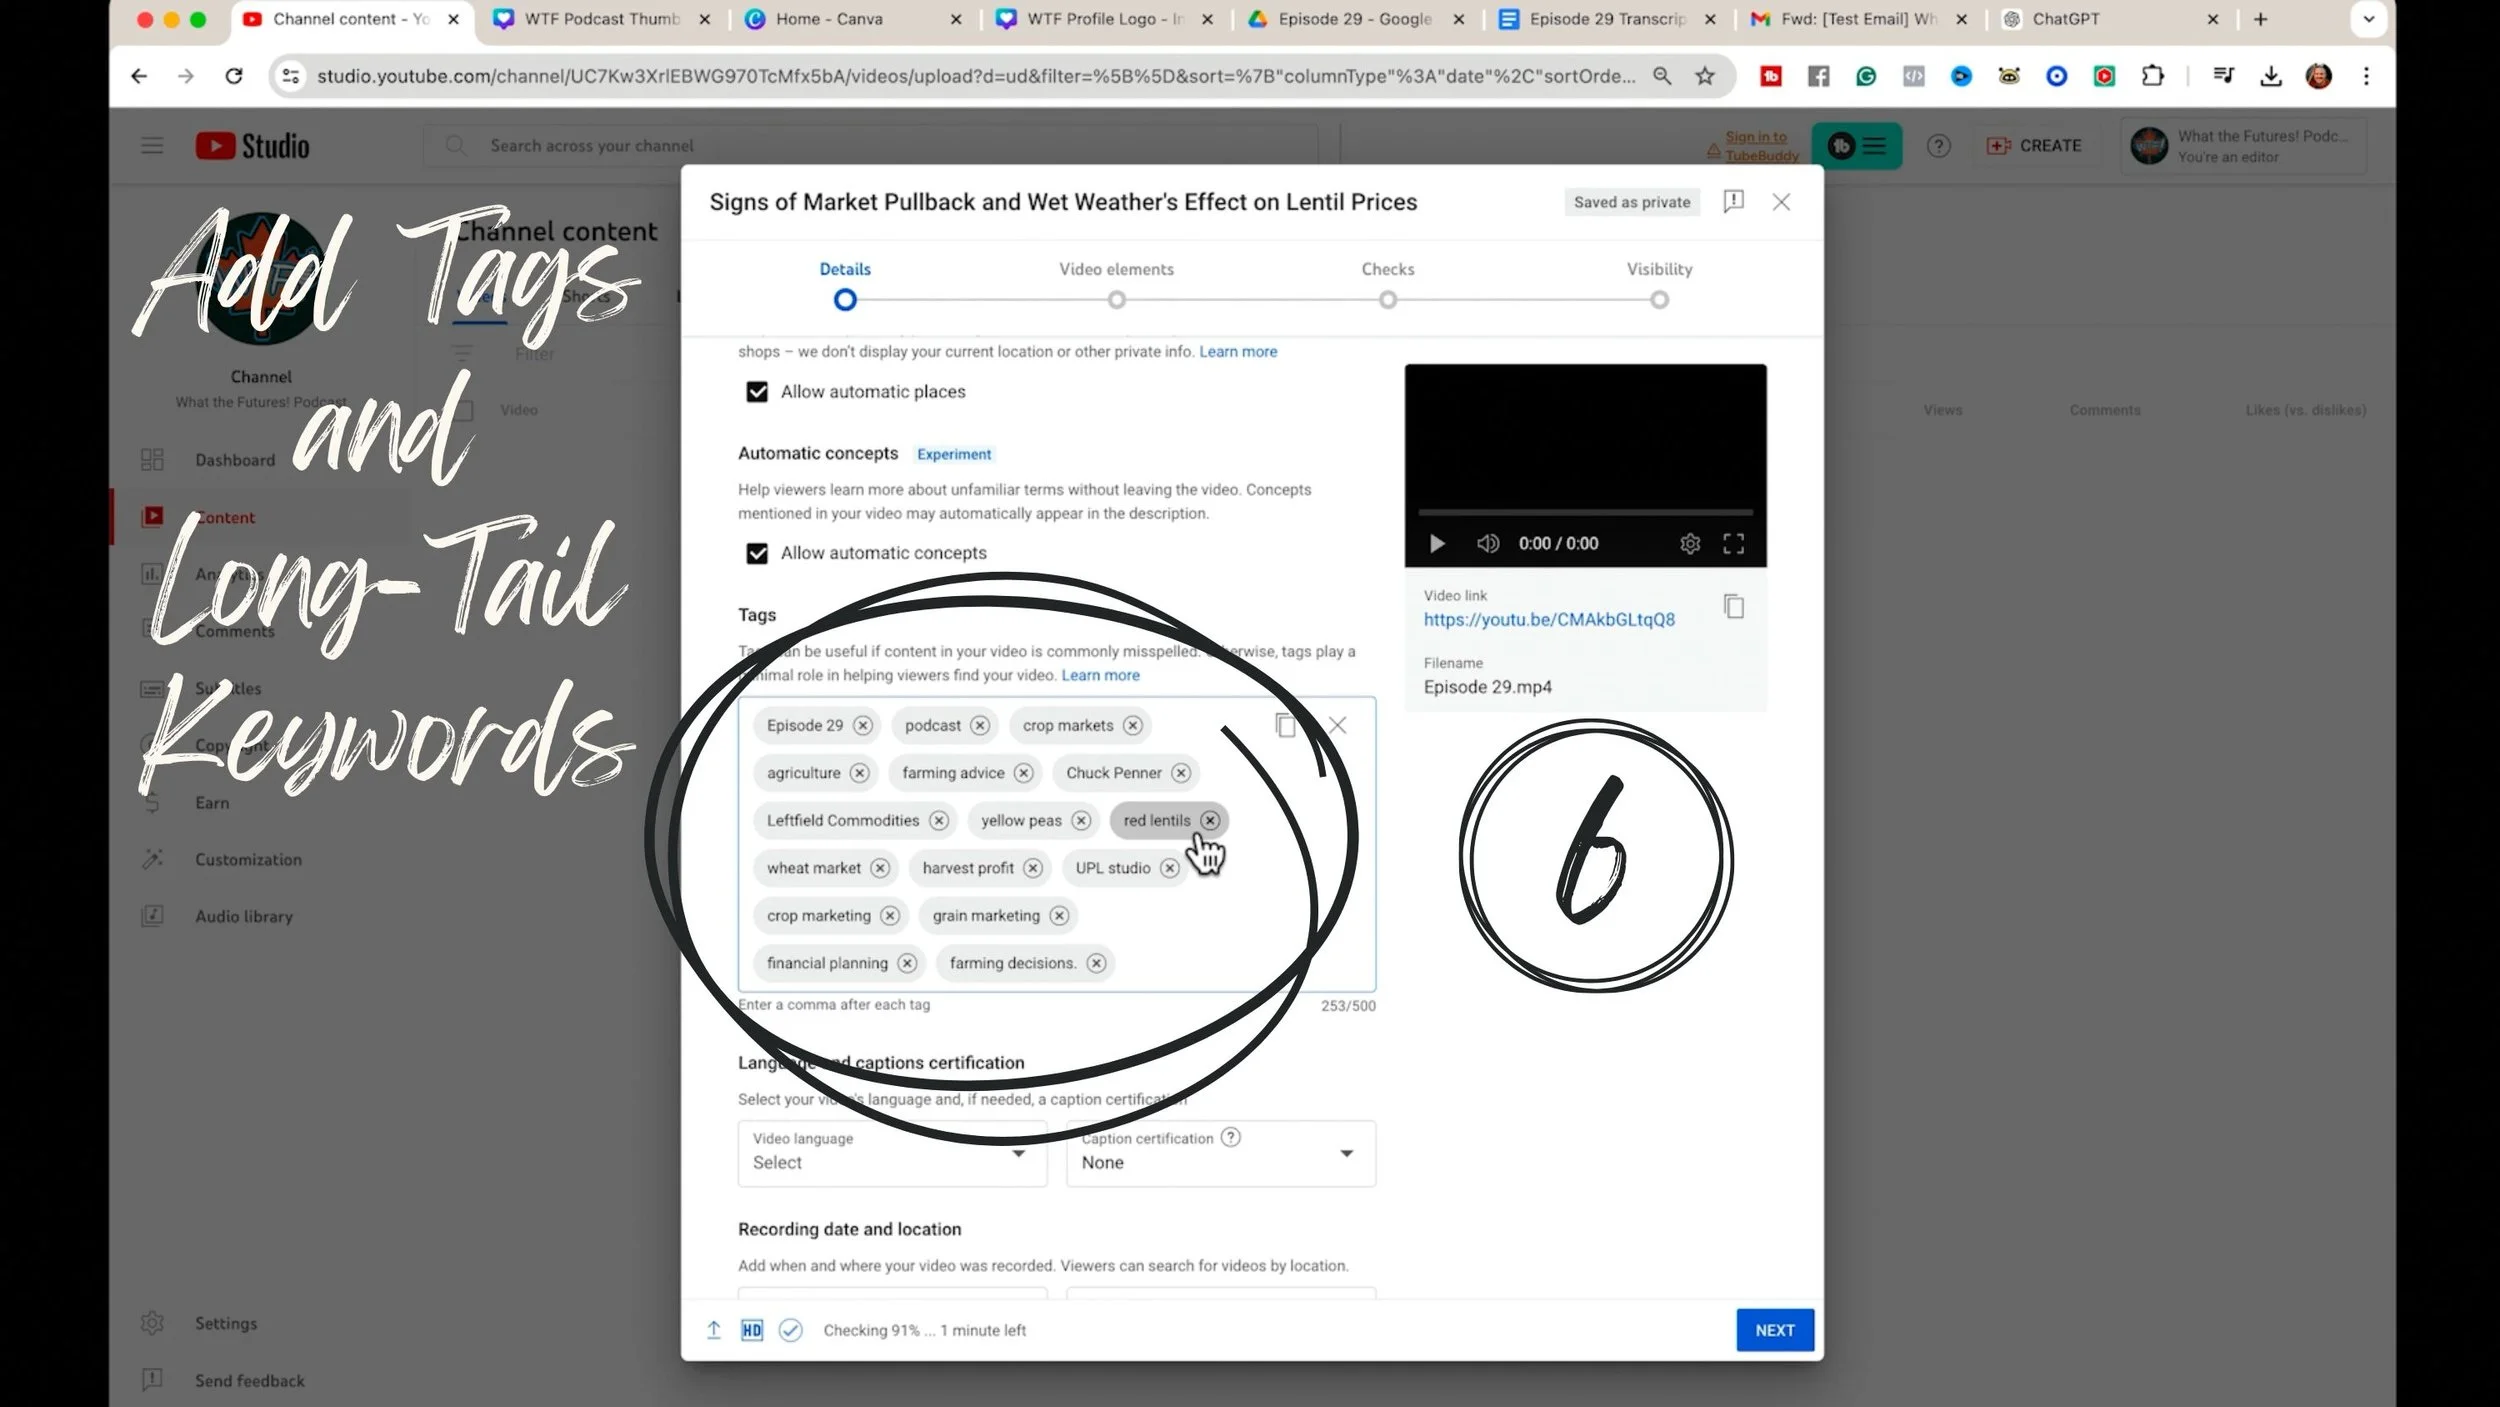
I always like to add some tags, even though tags are something that YouTube says play a minimal role in helping viewers find your video.
However, when working with TubeBuddy, tags will help you see how you rank for certain keywords which is a great thing to track as you use TubeBuddy to help you with keyword and SEO strategy.
If you don't know which tags to use on YouTube, ask Descript’s Underlord, “Can you give me some relevant tags separated by commas that I can have for YouTube?”
Then copy and paste the tags from Underlord into YouTube.
Crop markets, podcast, agriculture, farming advice, these are awesome tags for Ryan. It has the name of the guest. And some general tags like agriculture and farming advice. These are competitive keywords that his channel probably won’t instantly rank for.
So in your list of tags, I recommend you add a few long-tail keywords and keywords you're specifically targeting. And again, TubeBuddy will help you do that.
The last best practice that I highly recommend you complete is to add a pinned comment.
To add a pinned comment, click on the video link under your video on the right side of the details window.
But first, I asked AI, the Underlord, “Can you give me a few ideas of pinned comments I could add to this video on YouTube to spark engagement from my audience?
I like this pinned comment idea:
🎉 Don't forget about our exciting BATALIUM GIVEAWAY! Congratulations to Dion Baczynski, this week’s winner. Stay tuned for the next giveaway starting soon, and let us know how you are preparing your crops this season! 🌾🏆
The purpose is to spark engagement and get people to respond.
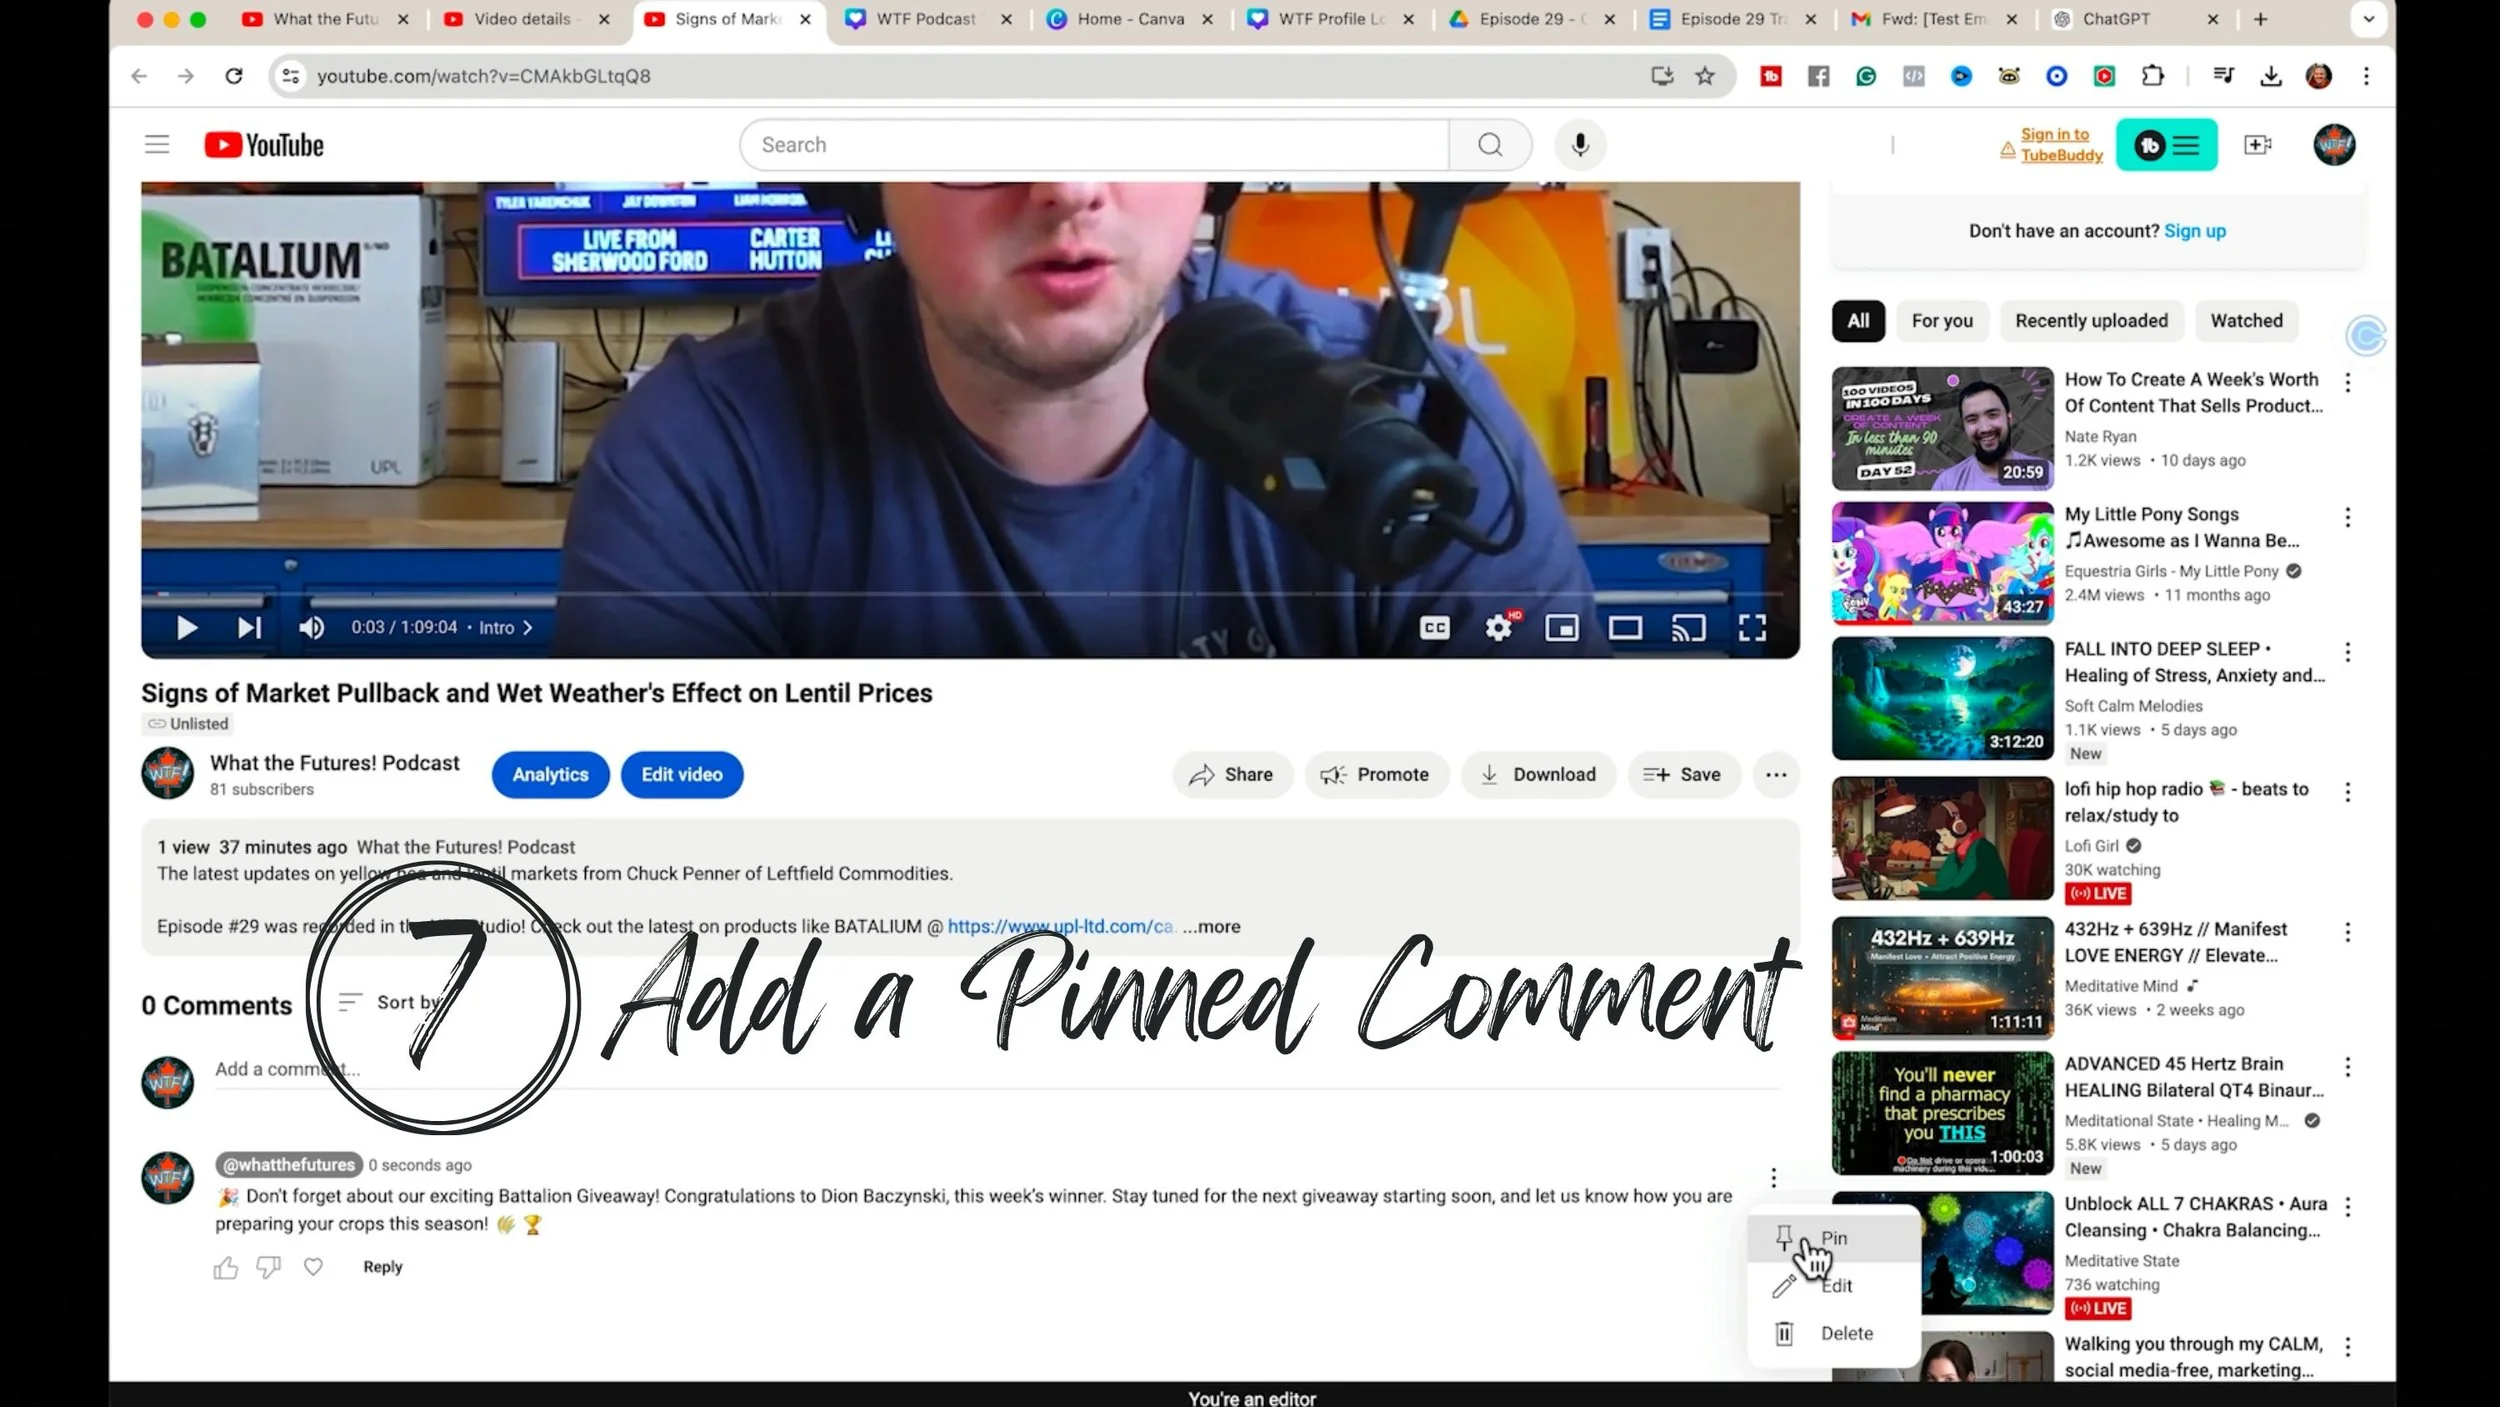
After you paste a comment in the box, click on the three dots (right side of the comment) and choose Pin.
Now you have a pinned comment for the YouTube video!
This is just another best practice because what we're trying to do here is to foster user engagement.
The next best practice to pair with the pinned comment is to reply to comments, to heart them and actually give them a good, no-fluff reply.
A useful reply can continue a conversation. Treat that as audience service, not an automatic ranking boost.
If you start a conversation that turns one message in your comments into three or four messages, that's some activity happening on your channel and YouTube may notice that.

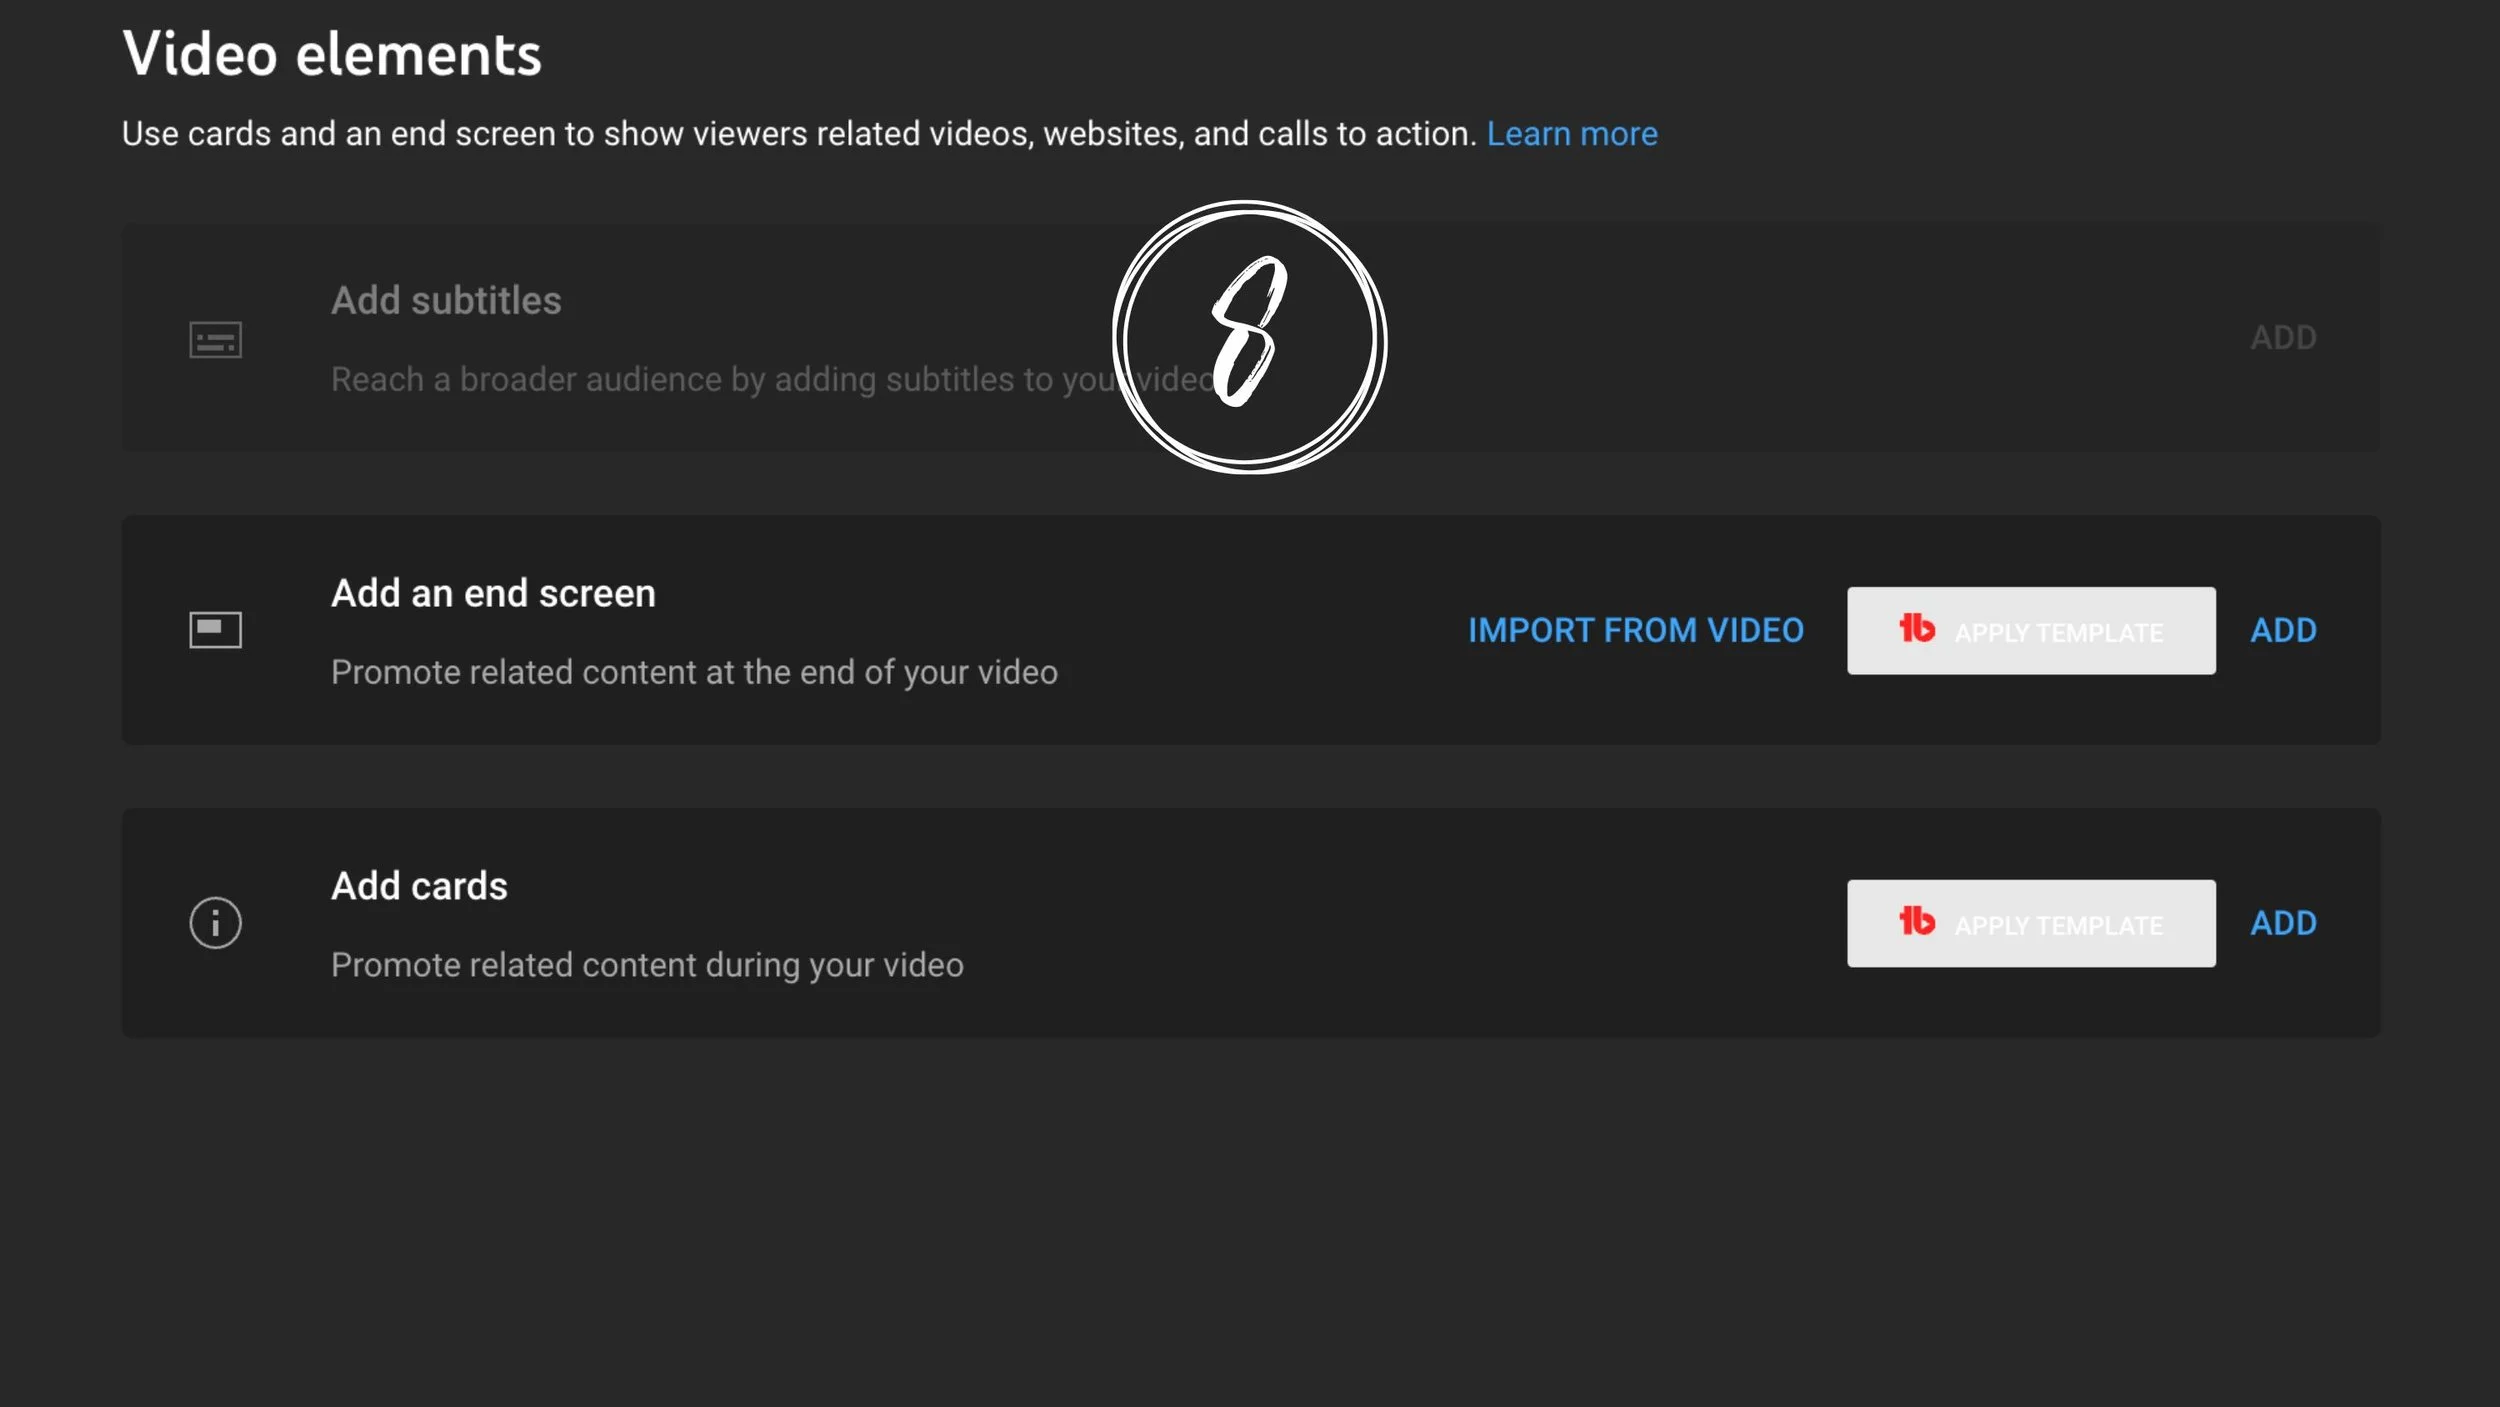
On the Video Elements page:
Click Add Subtitles
Click Auto Sync
Select All and Copy the transcript from your Google Doc
Paste the transcript into YouTube
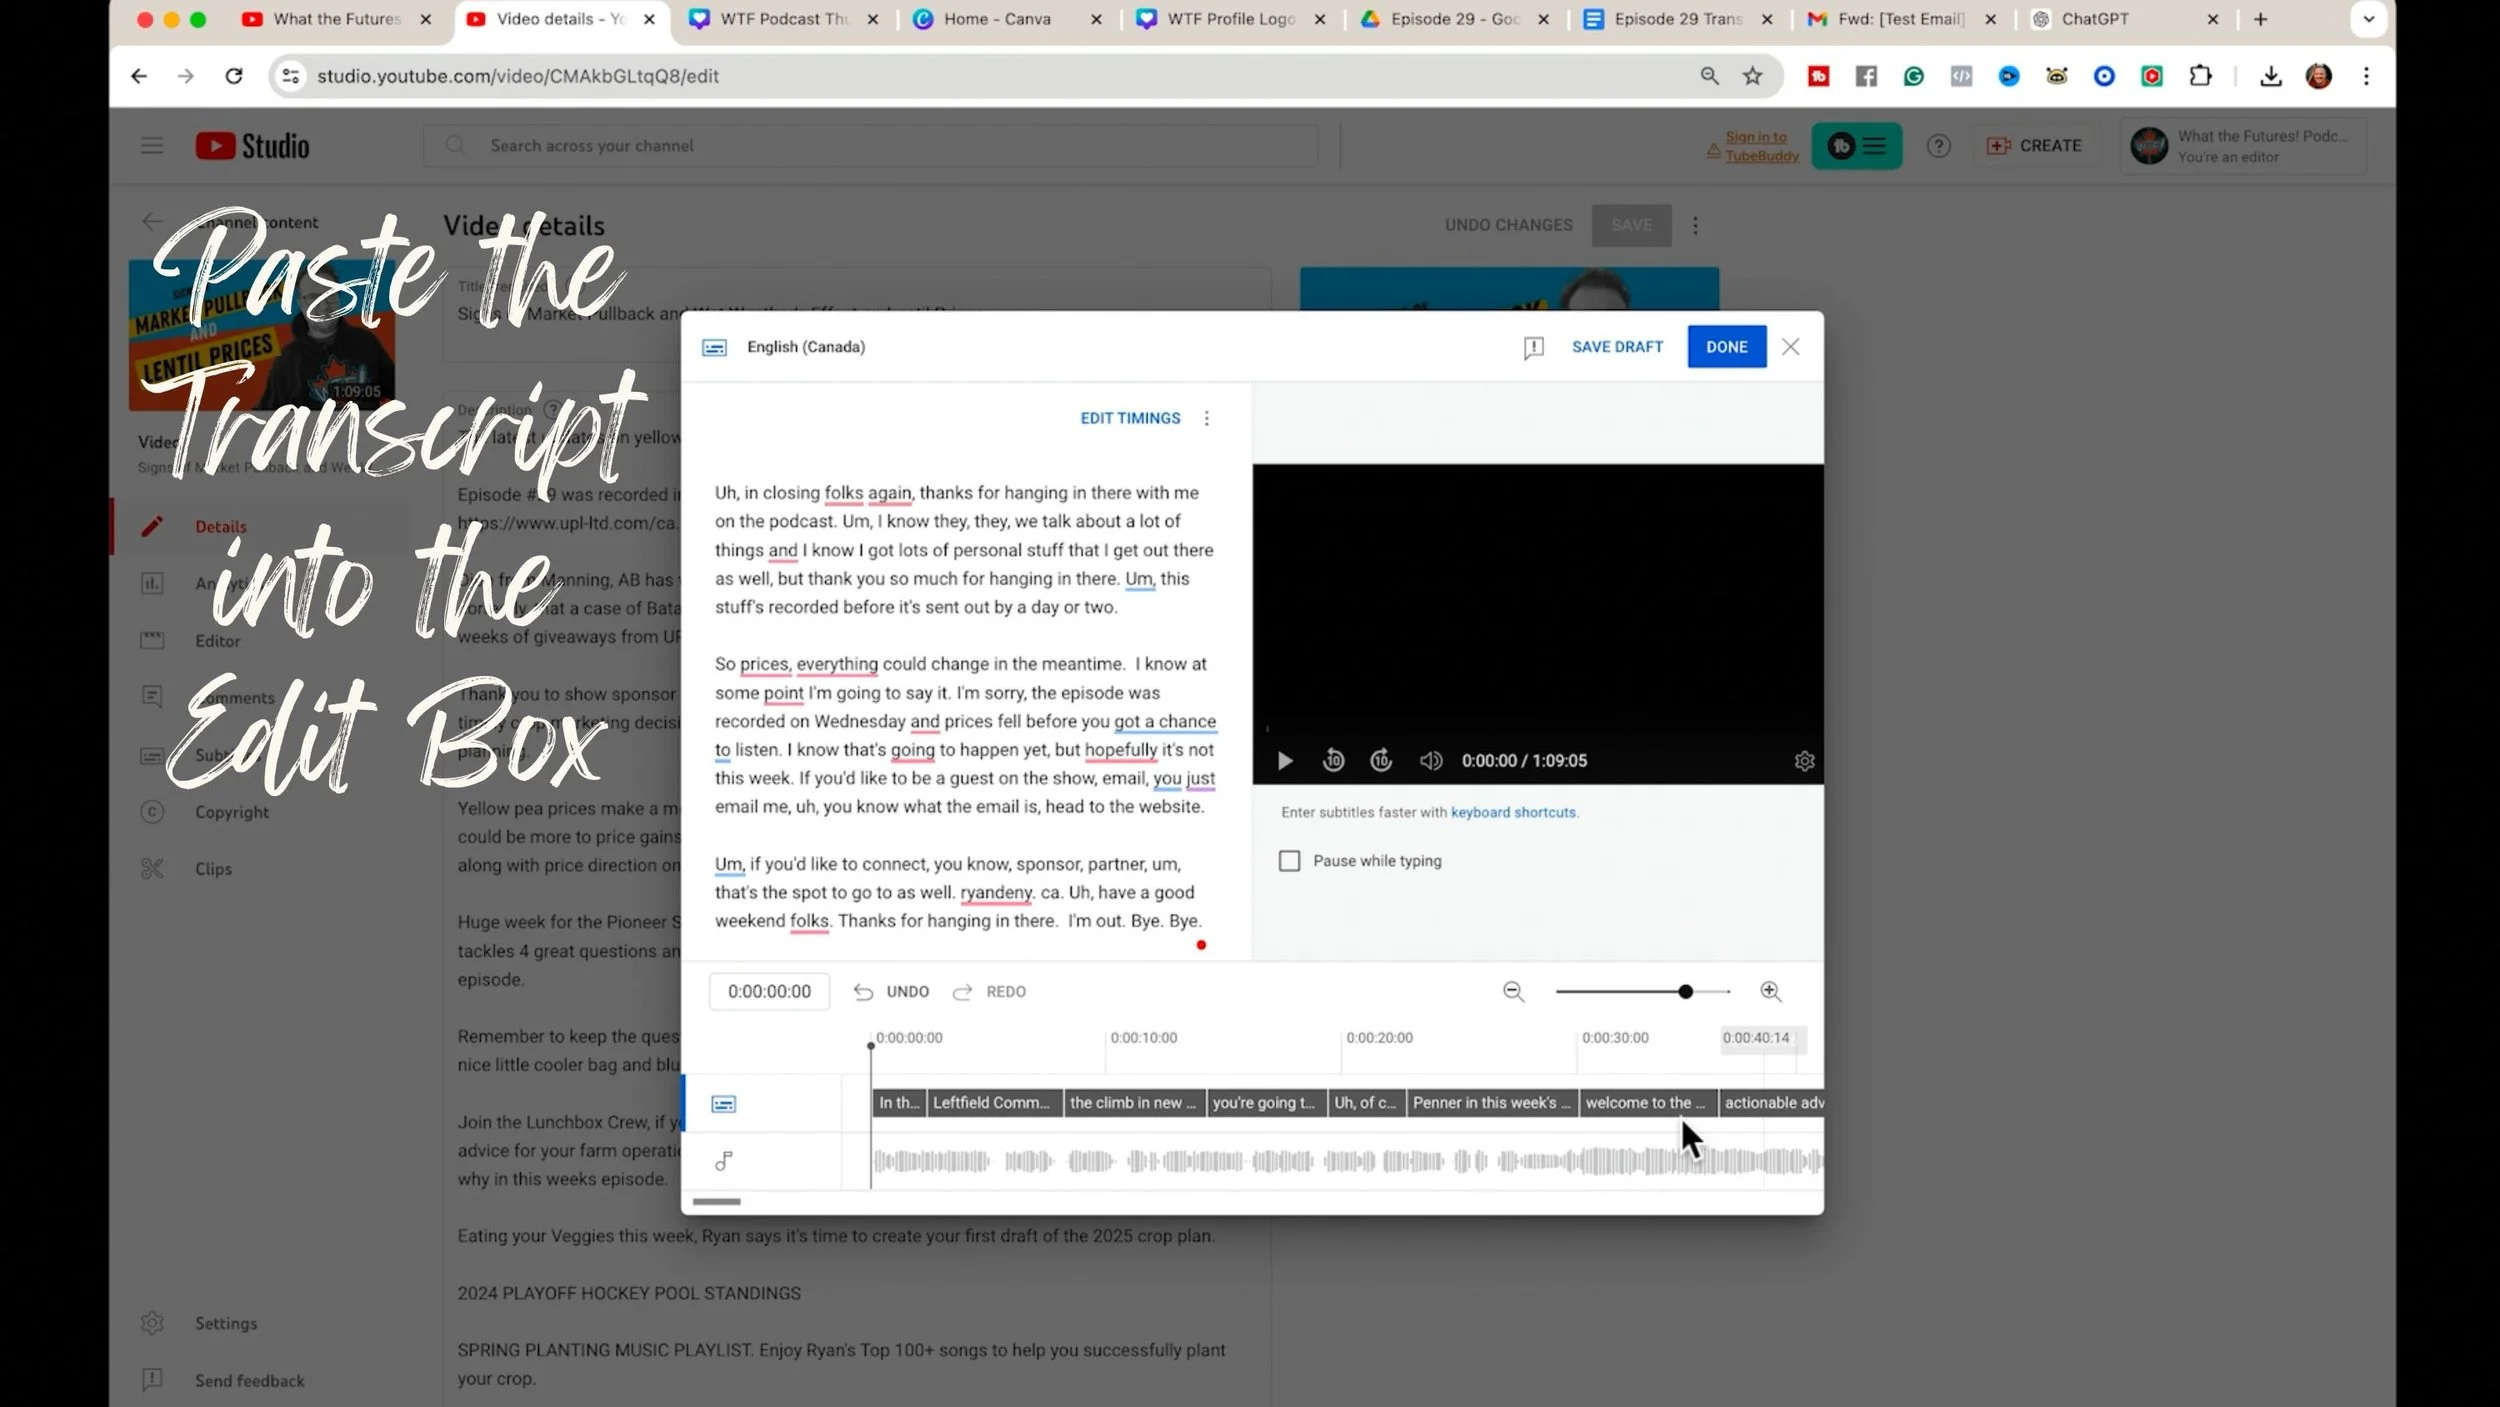
It's as easy as that! And look, you can see that YouTube has already created a timeline for the transcript. Click the DONE button
Review and publish accurate captions so viewers can follow the conversation, including when sound is unavailable.
The only thing that we haven’t added yet is an end screen.
A great strategy for end screens is to send people to the next video because that is a really cool opportunity to get people engaged, and looped or sucked into your episodes.
The last 20 seconds is when this end screen will show up on any one of your videos so you can think of it as a 20-second advertisement for your next video.
However, if this is the 20 seconds when you're wrapping up your episode, you can also click on the + ELEMENT menu (upper left corner), and choose video.
Then here choose Best for Viewer.
YouTube will analyze the viewer's history and that viewer's profile and decide which one of your videos they would be most likely interested in watching next.
You can make the video whatever size you want within the frame here.
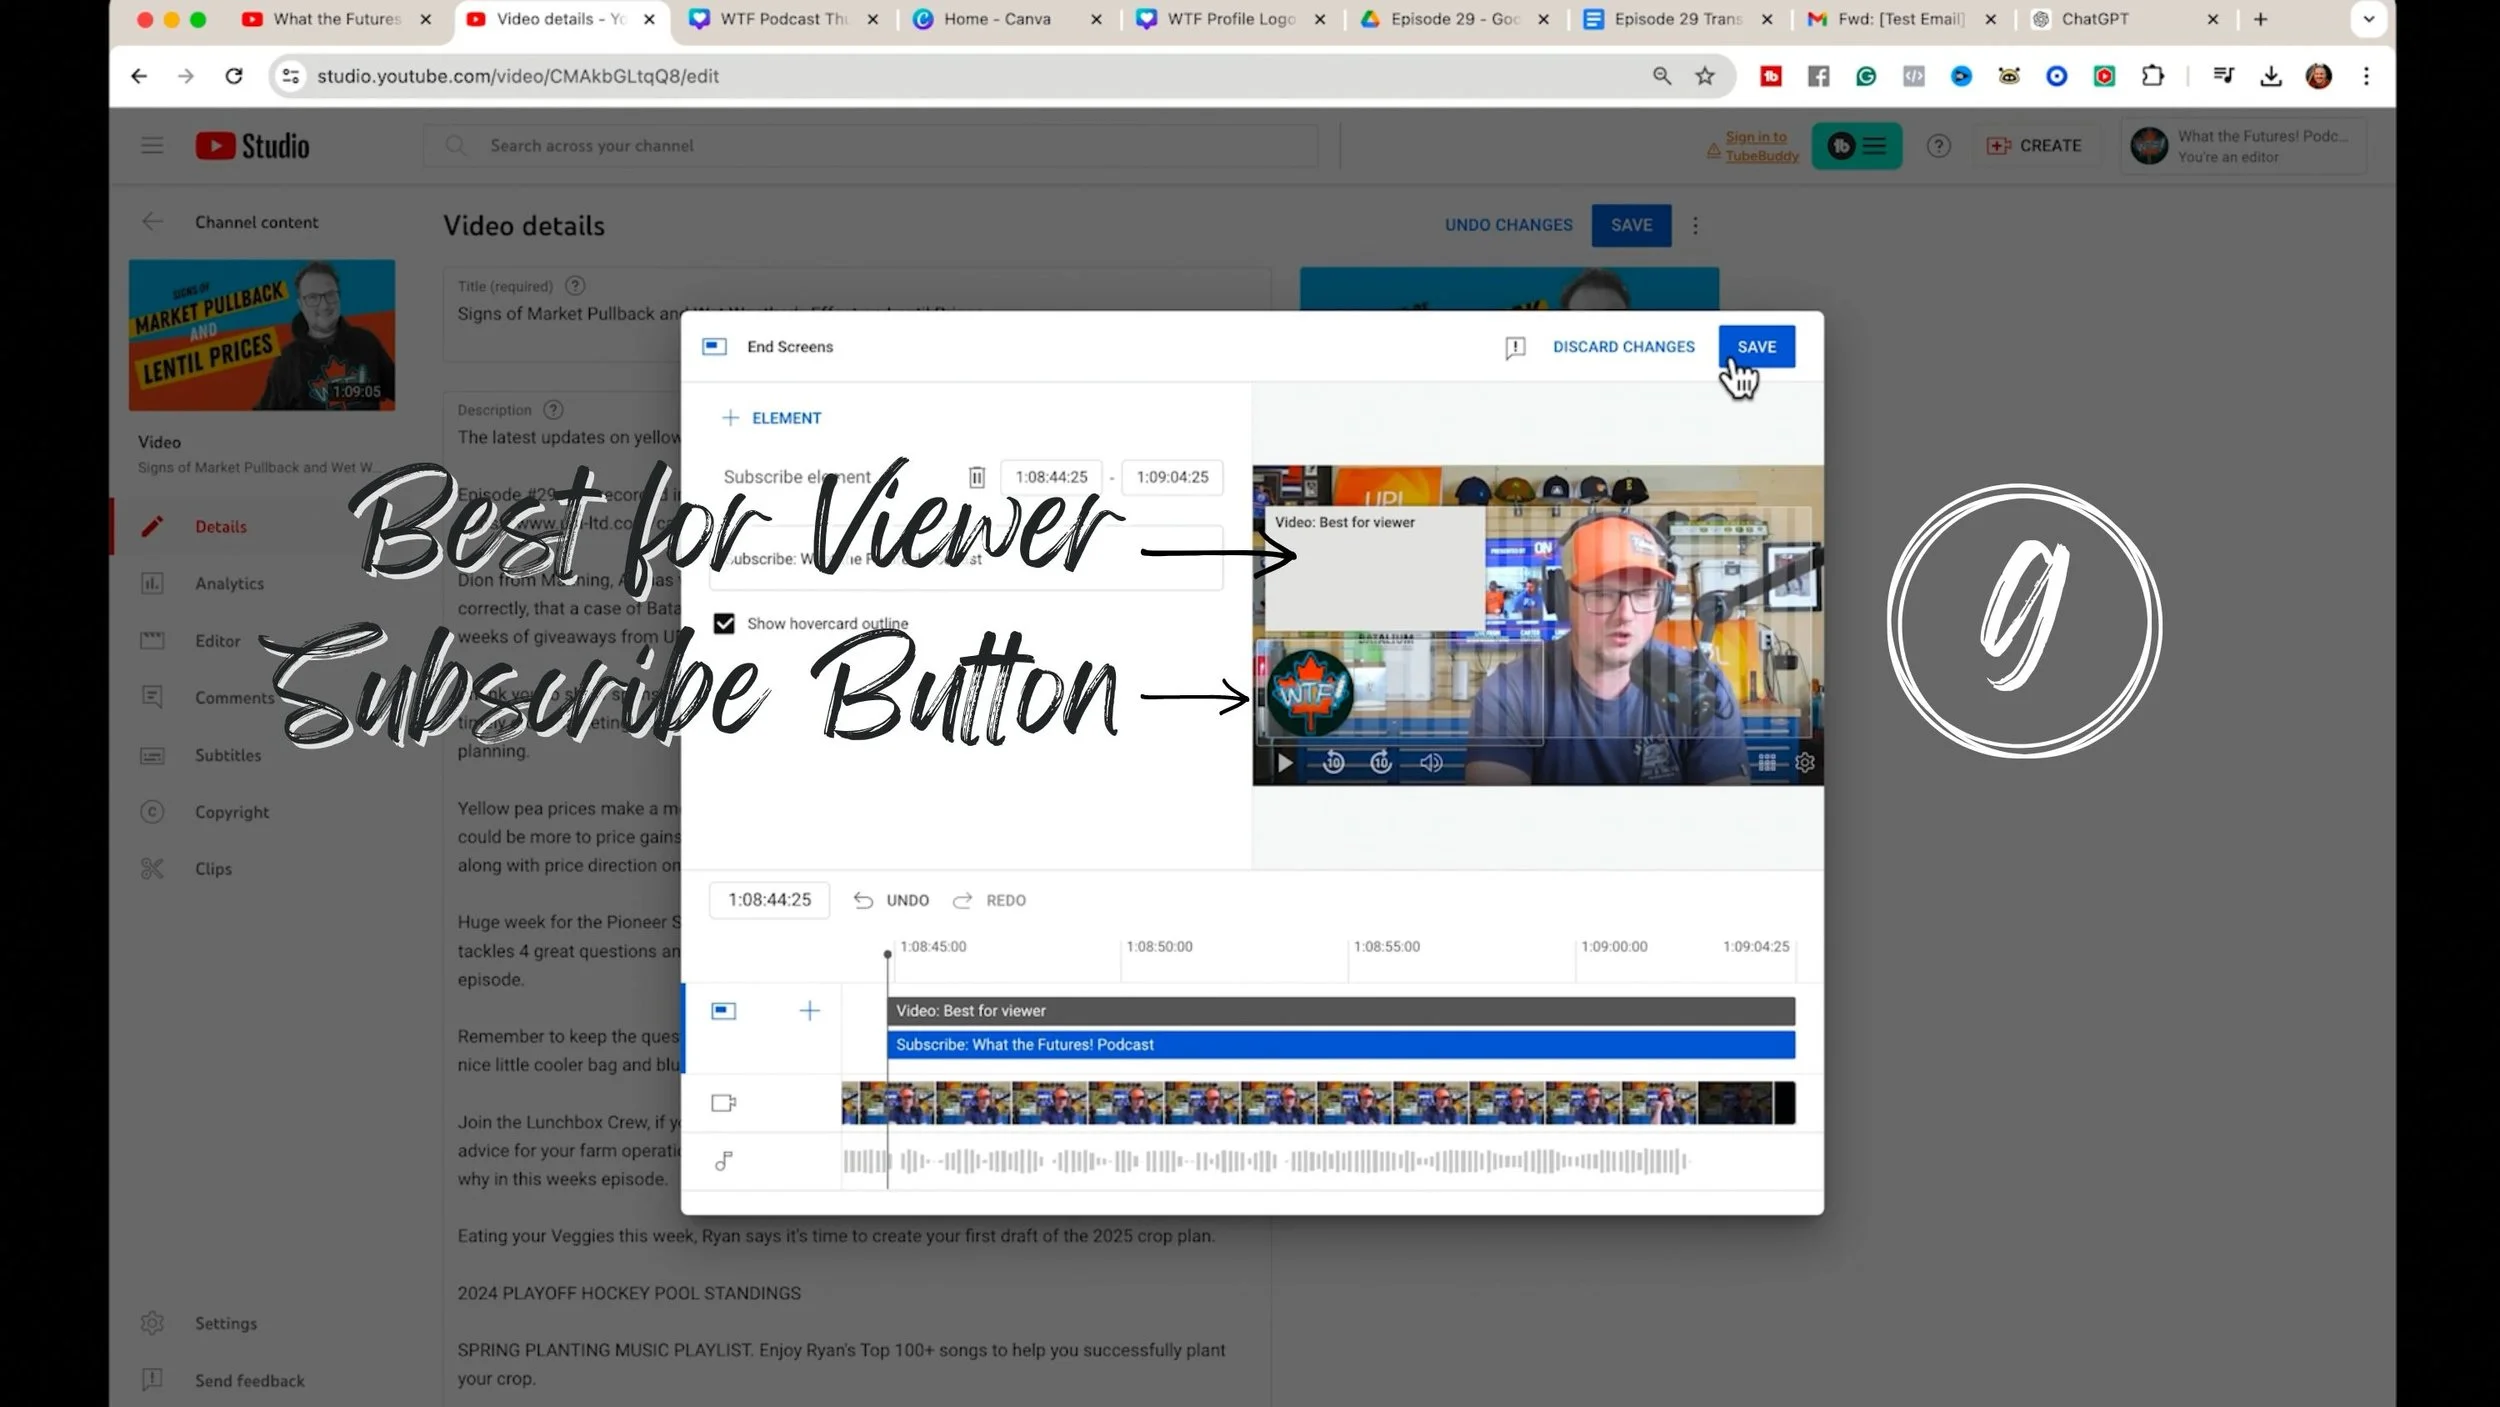
Click on the + ELEMENT menu again to add your SUBSCRIBE element and put it anywhere else on the frame. For the last 20 seconds, they can click on it to subscribe to the channel.
When you’re done creating your end screen, click on SAVE.
✅ You have your Subtitles (Captions)
✅ You have your End Screen
Cards can also be a great thing to add in addition to your timestamps, especially when you have other videos or episodes that you're referencing.
A card is a call to action that says to your viewers, “Hey, go check out this episode here where we deep dive into this topic! But for now, we're going to move on to the next episode.”
This is a perfect way to send people to another video.
Check this page to see if any copyright issues are found. If not, move on to the final page. visibility.
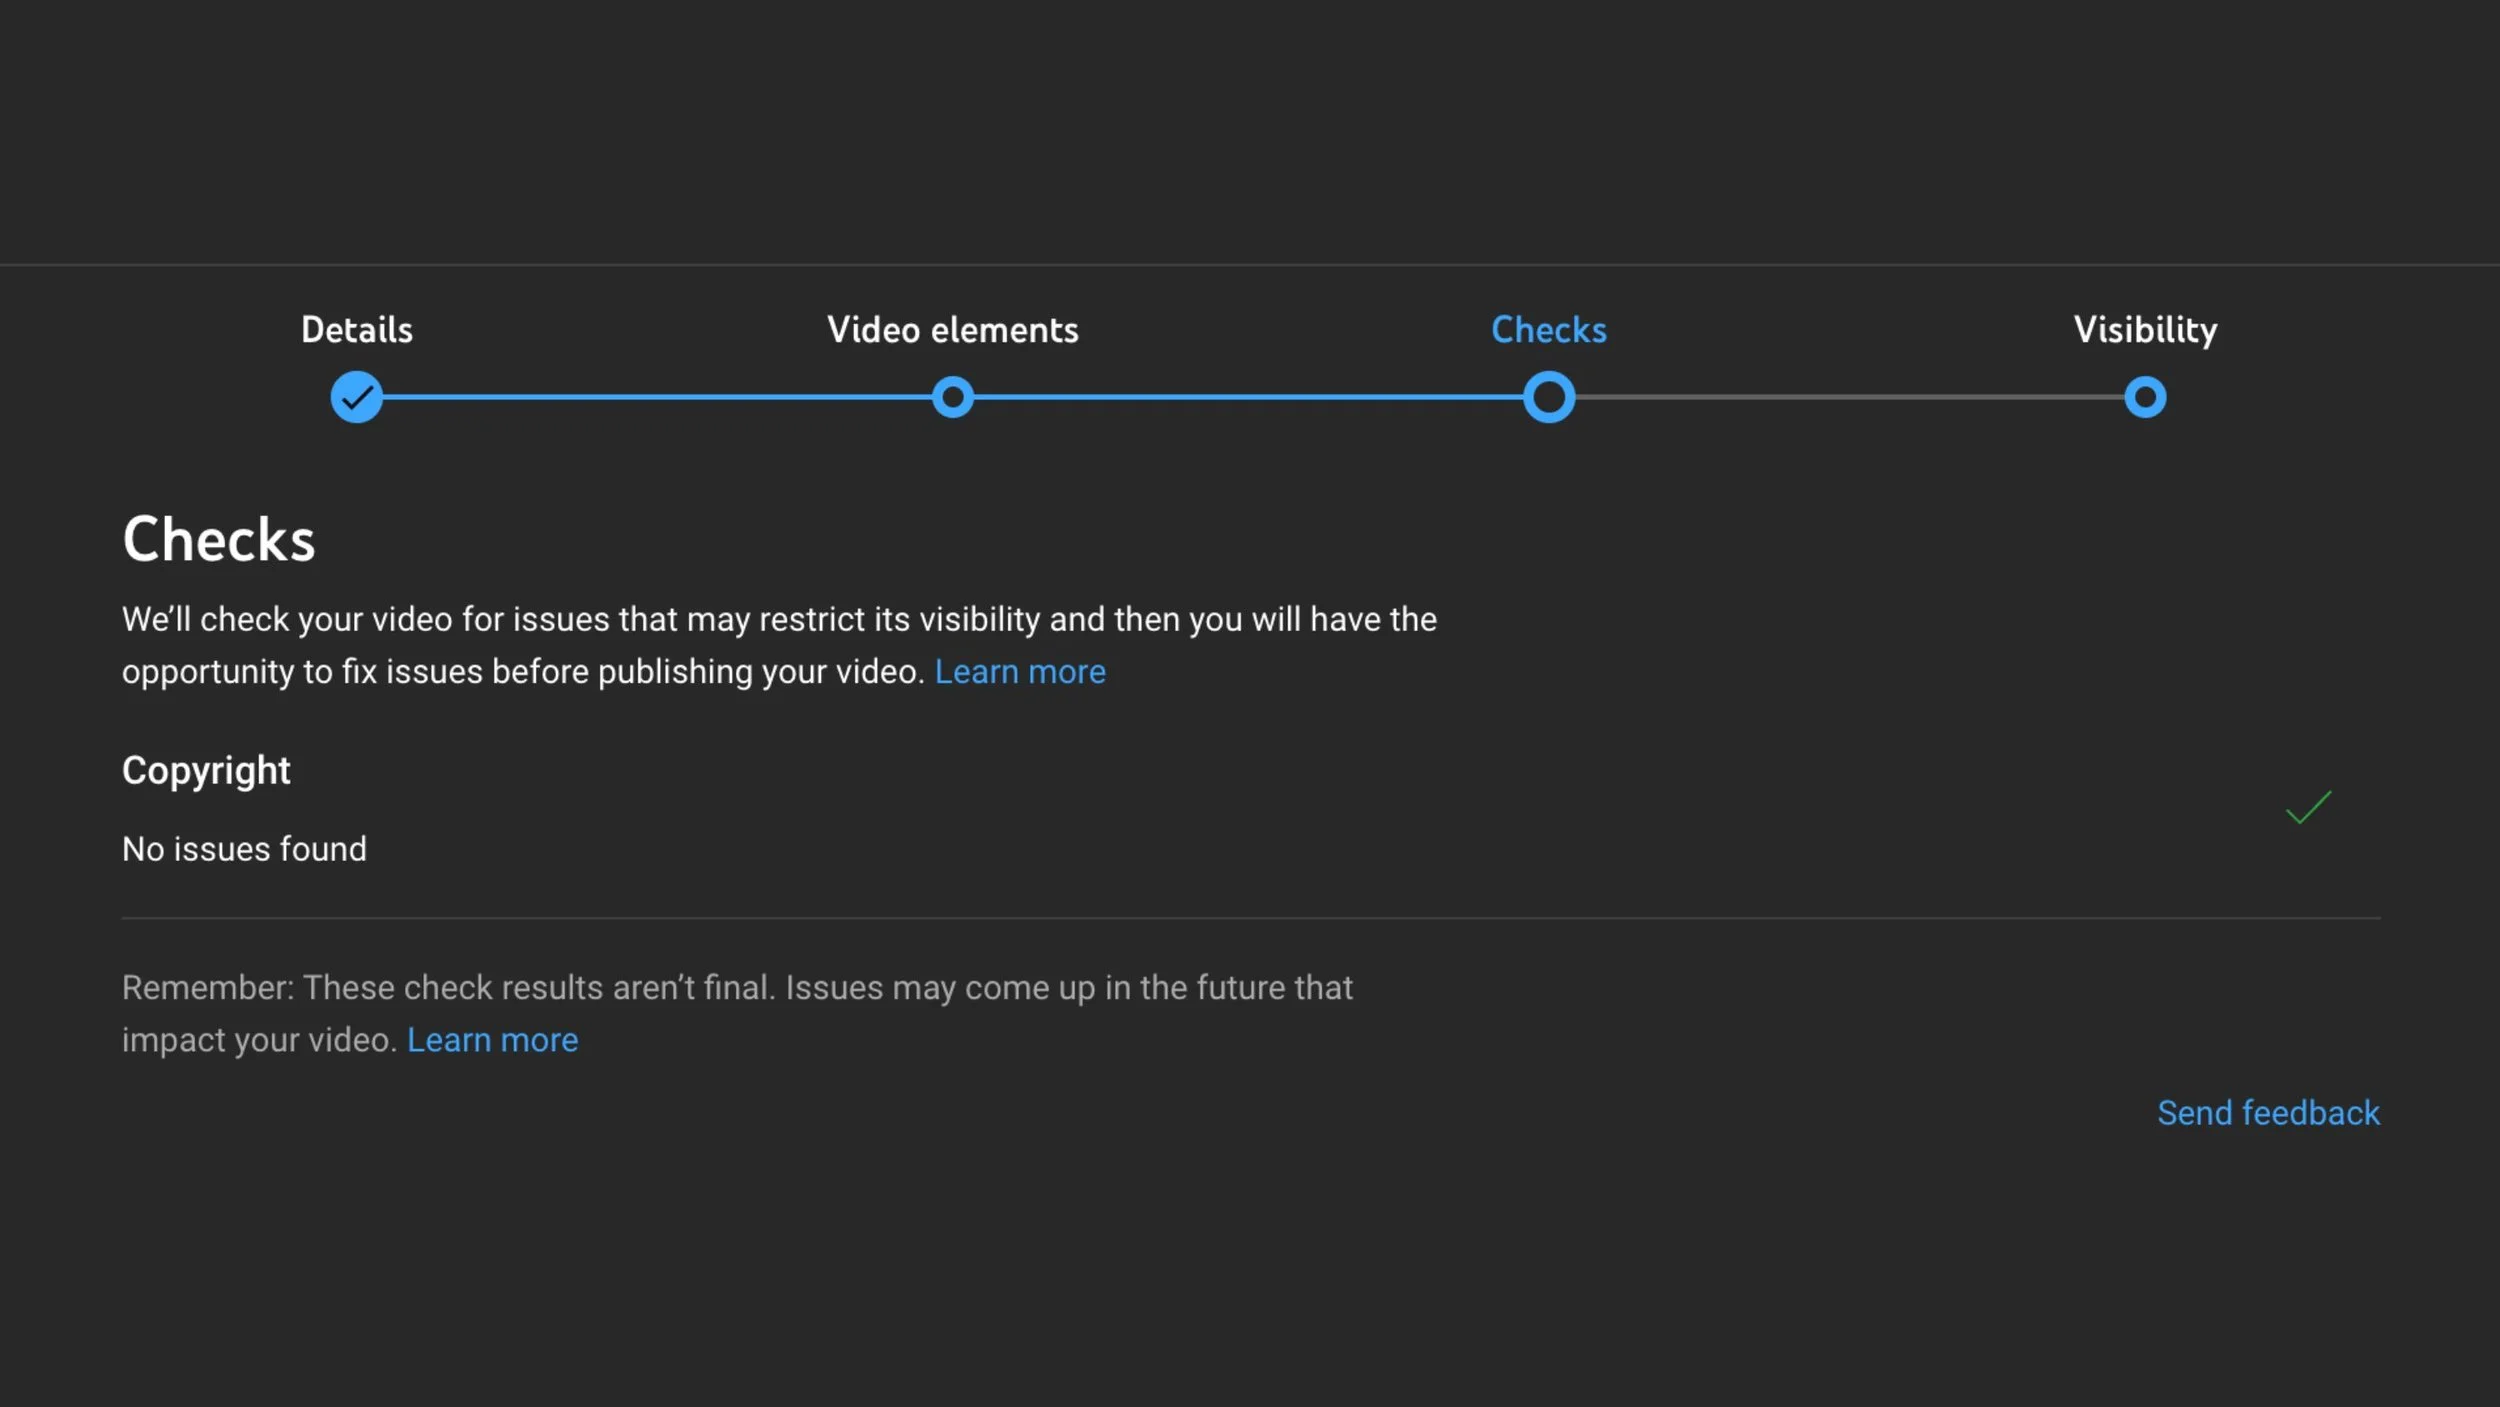
It’s time to publish your video episode!

On the Visibility page, select Public. (Keep it unlisted until you’re ready to publish).
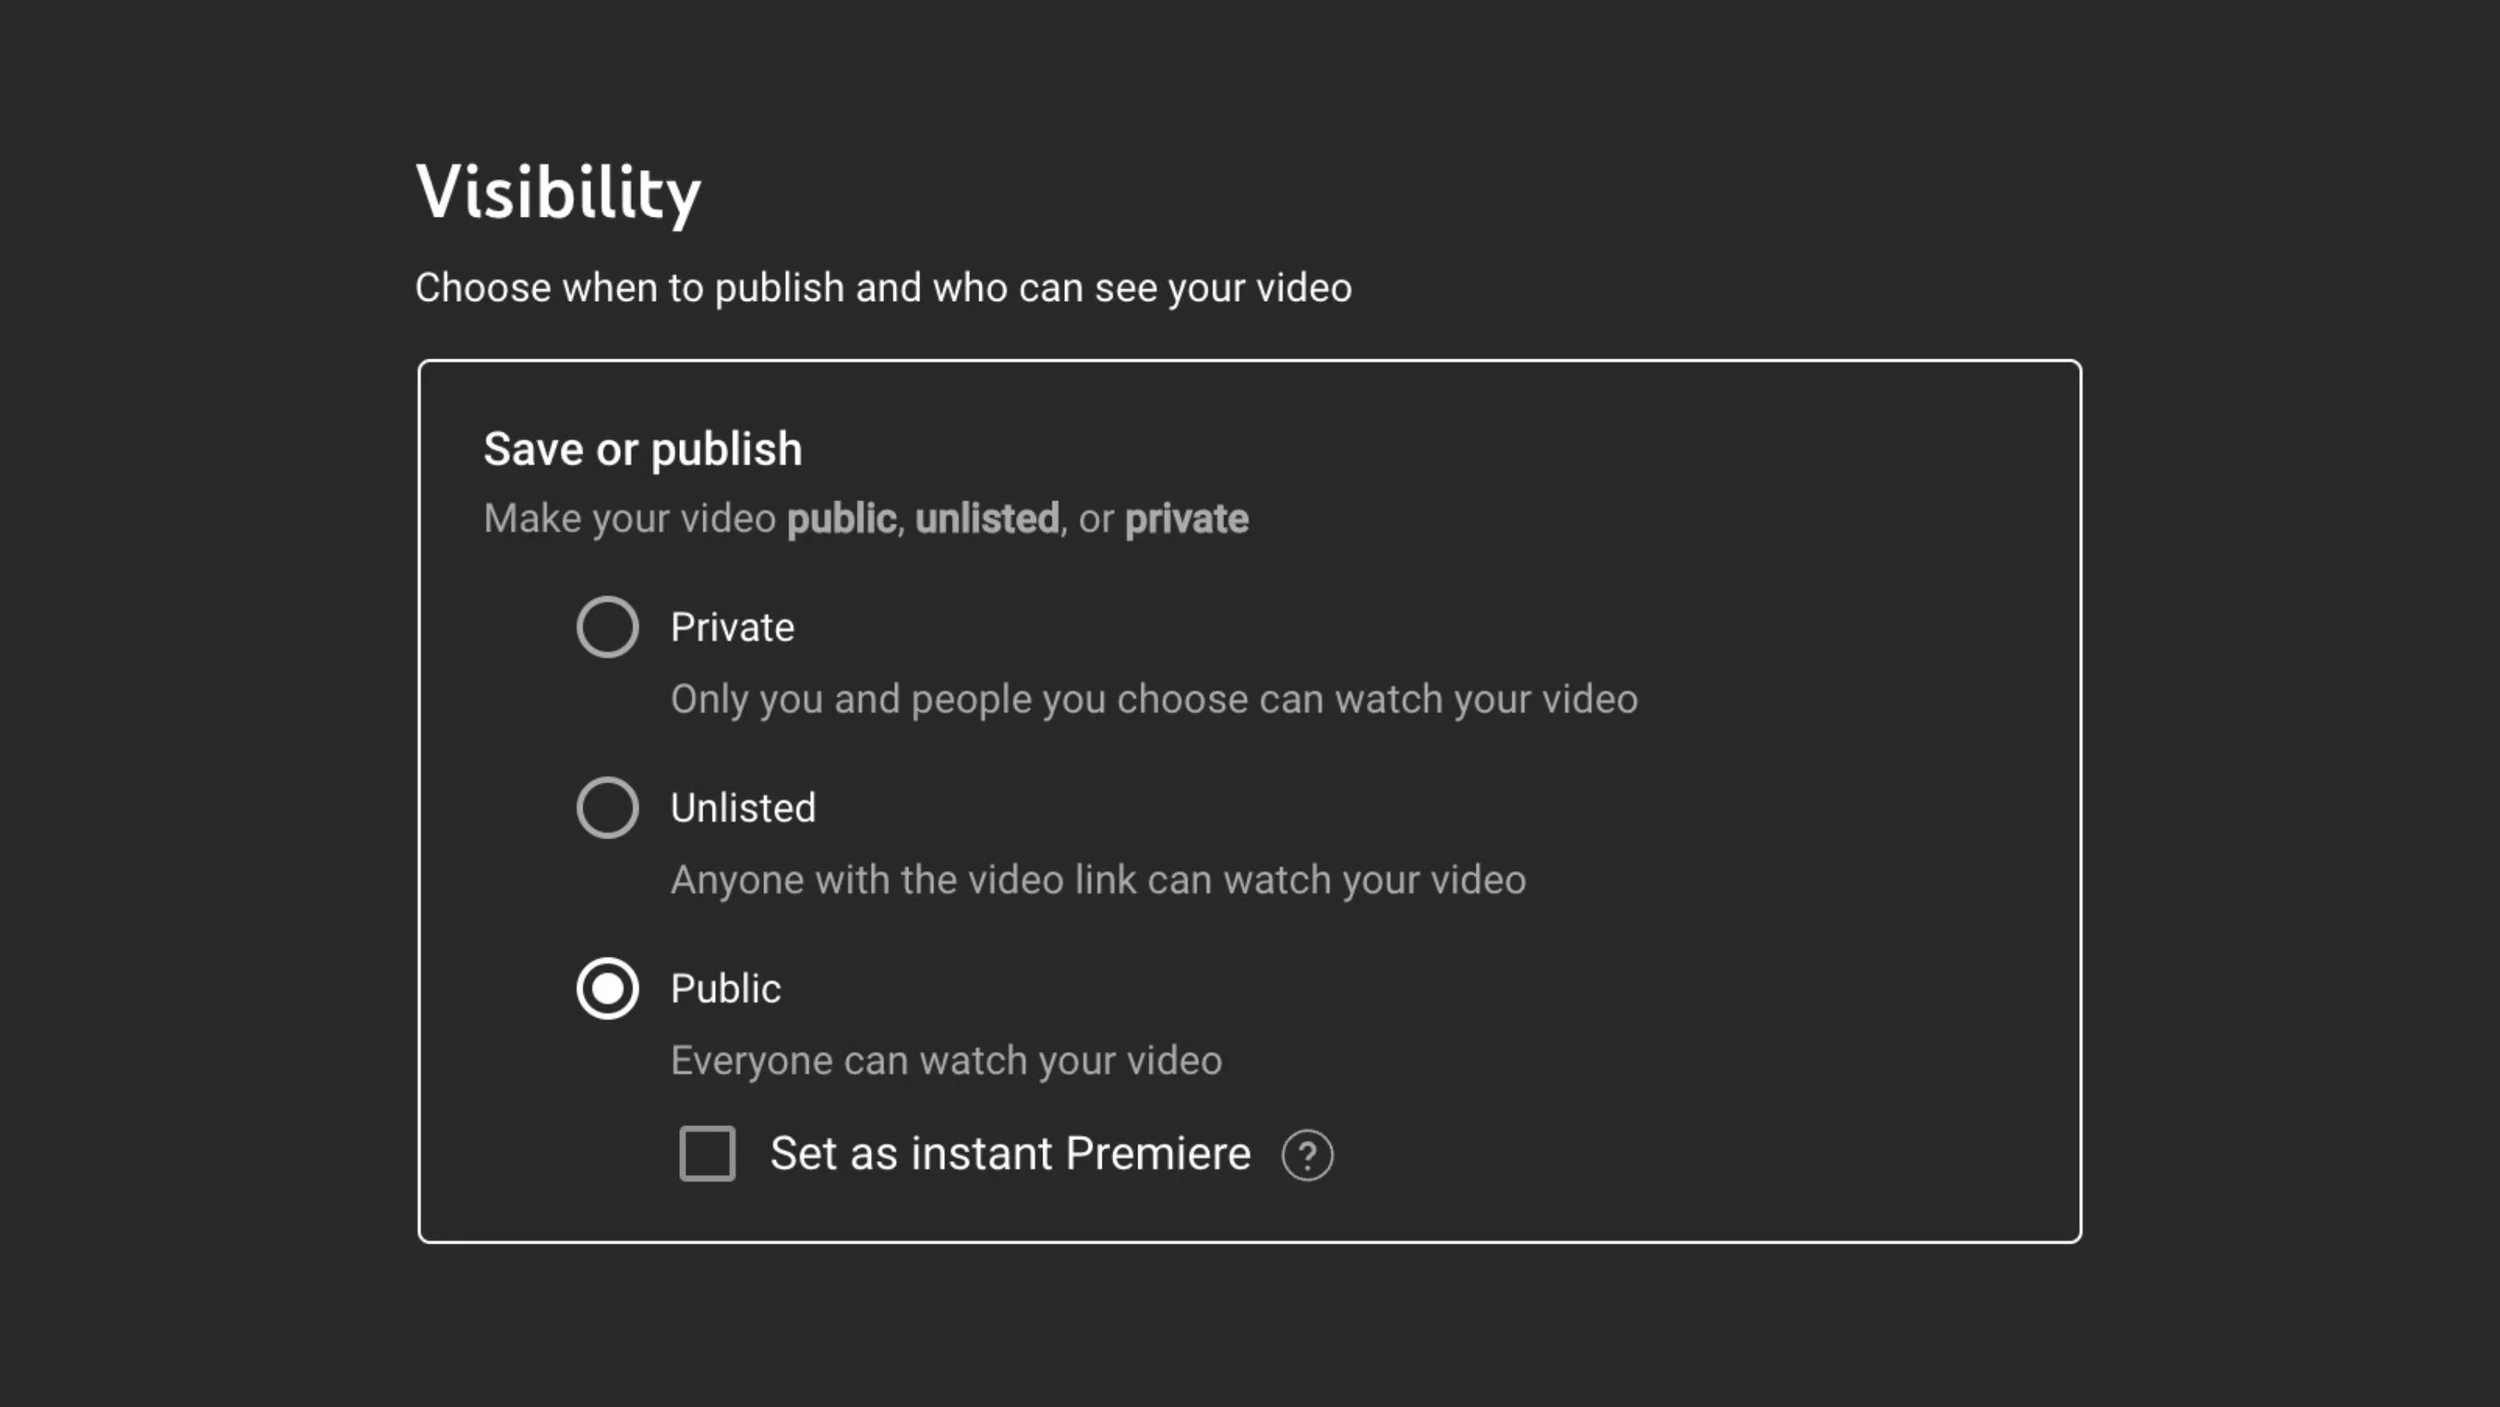
When you’re ready to publish, click the blue SAVE button.
That’s it!
A CRUCIAL LESSON
Before we move on to the third and probably best section, I first want to mention that we can all learn something from Ryan. Notice how he didn't get hung up on analysis paralysis, or over-preparedness. He got right into podcasting! 💪
TBH: The podcaster that you will be after you've made 20 episodes is much different than the podcaster you are right now.
It's in the actual episode creation and getting into the swing of doing it regularly that you will learn the most and more than you will from any YouTube video or coaching call.
So get in there before you're ready before you have the equipment.
And then much like Ryan has done, start making implementations, finding editors, finding people to bring onto your team as you grow and improve over time.
All right, let's move on to the next section: ongoing best practices.
You already know that podcasting is pretty complicated.
Even before incorporating video, we were still observing the same basic 3 stages of production.
PRE-PRODUCTION, planning, writing, outlining
PRODUCTION, recording
POST-PRODUCTION, editing
For simplicity, we’ll lump the publishing and admin work into post-production even though that's probably its own separate stage.
All three of these stages are very important, and it's nice to make a checklist that you can observe during each one of these stages.
But before we can make a checklist, we need to understand what our goals are to begin with.
And when you're thinking about the YouTube algorithm, or the algorithm of any platform, or creating content that performs well, what you're thinking about is audience satisfaction.
This means your goal is to entertain your audience and provide them with value.
So we should be constantly thinking of ways that we can improve the experience for our audience, get to know our audience better, and improve their satisfaction.
YouTube uses different recommendation systems across its surfaces. Focus on matching the episode to its audience, then use analytics to understand how viewers respond.
⚫ EYE-CATCHING THUMBNAILS
It’s how many people click on your thumbnail when they see it in a feed. This is a critical element and will really determine your success on YouTube.
If somebody clicks on your thumbnail 11 times out of 100, instead of the more average 4-5 times out of 100, that tells YouTube that your video is really valuable. As a result, it will trigger the algorithm to test your video with more test audiences.
Needless to say, thumbnails are very important.
Many YouTube strategists say:
the thumbnails are almost more important than their video
they spend as much time on the thumbnail as they spend on the video
they start their video creation process with the thumbnail and title and then create the video after creating the thumbnail and title
But the thumbnail is not the only consideration with CTR or click-through rate. We have 2 other important considerations: the title and the first line of your description.
⚫ THE TITLE
⚫ THE FIRST LINE OF YOUR DESCRIPTION
The title and the first line of the description are important for the click-through rate and SEO. They will help your videos rank if people search for any keywords you naturally pack into that title and that first line of the description.
Remember that it's also the interplay between these 3 elements that can spark more interest. So rather than just repeating the same phrase on your thumbnail, that is the title of your video, consider using different words on each element so they play on each other and spark more curiosity.
So if someone sees the thumbnail and then reads your title, does it make them even more inclined to click on it?
This is something that takes a lot of experimentation. And again, you can really fall into the weeds on this one topic alone, but don't worry, we've got your back with some thumbnail videos.
PRE-PRODUCTION, planning, writing, outlining
✅ Create a catchy thumbnail
✅ Create an engaging and relevant title and first line of description
✅ Do those 2 things BEFORE outlining or writing my script
PRODUCTION, recording
✅ Capture photos or poses for the thumbnail
Veronica with her podcast Content Jefe introduced me to the photo shoot icebreaker. She loves to record a virtual, mini, multi-pose photoshoot as an icebreaker with her podcast guests. Later, we extract frames from that photo shoot for the thumbnail.
POST-PRODUCTION, editing
✅ (Option 1) Create your own thumbnail, get into Canva and start playing around with the templates.
✅ (Option 2: What I Recommend) Work with a talented podcast editor who understands your brand and can be a critical team member and make exceptional thumbnails for you.
If you didn’t create the thumbnail, title, or first line during pre-production, do it now.
Watch time measures time spent watching. Read it alongside audience retention and the other information in Analytics.
Stronger retention can indicate that an episode delivers on its promise, but it does not guarantee wider distribution.
Here there is so much that goes into this!
Things you can do to increase your watch time:
make good content
increase the value by learning about your listeners and your viewers
learn what your audience wants to hear and see
try to solve problems
check your on-camera energy level
step up to the microphone and the camera each week with a lot of energy, vitality, and creativity to bring your best self every week
Here’s a checklist that will help you increase your watch time.
PRE-PRODUCTION, planning, writing, outlining
✅ Write, outline, or prepare a catchy hook, get them interested so they just have to listen to your episode until the end
What will you say to hook people in during the first critical 30 seconds?
✅ Prioritize the first question that you're going to ask your podcast guest or the first topic you're going to discuss, ask your guest a really big, crazy question
Get into it quickly
The first 1-2 minutes of your episode should be well thought out
No administrative stuff during the first 3 minutes
Prioritize the tasty meat where you're giving some takeaways, a lot of delight, and some laughter, but get right to the point!
(Optional) Include a roadmap to tell your audience where you’re going to take them during the episode
PRODUCTION, recording
✅ Check your energy
Hydrate and stretch
Take some good breaths
Dance, listen to music, or do what you need to do to feel awesome
Show up as your best possible self with a lot of vitality and energy
POST-PRODUCTION, editing
When it comes to post-production, there are many, many things you can do for watch time.
✅ Work with an awesome editor who can help you:
Put together episode trailers and a lot of fun editing bells and whistles at the start of the episode
Incorporate those assets that you have to hook people in and let them know that they're in for a treat and they're going to learn a lot or be entertained a lot in this episode
Make good podcast episodes that you would want to listen to.
If you find yourself getting bored when you're watching back on your podcast, take note of when you start to get bored and why you start to get bored and constantly make refinements to your performance.
Also, survey your people. Get your listeners on a call with you and ask them what they like about your show. Those surveys can be so valuable.
When you emerge and start making your show for your audience, you'll definitely see that watch time increase.
And that's watch time!
For engagement, let’s jump straight into the production checklist.
PRE-PRODUCTION and PRODUCTION, planning, writing, outlining, recording
✅ Plan and write down your CTAs (calls to action) and engagement sentences
Put them on a Post-it note on your computer so you remember to sprinkle them in throughout your episode
Ask people to subscribe and follow your podcast
Encourage people to comment
Encourage people to share your podcast with other people that they know
You'd be surprised how many of your listeners will do these things just because you asked. We know from collecting our analytics over the years of being on YouTube and working with clients on YouTube.
In the videos where we ask people to subscribe, many more people subscribe compared to the ones where we don’t ask people to subscribe.
Ask a useful question when it fits the episode, and respond thoughtfully. Comments are a conversation with your audience, not a guaranteed ranking signal.
POST-PRODUCTION, editing
And then of course in the post-production here, your editor can slide in or insert calls to action and engagement words or sentences.
✅ Slide in, insert, or interrupt your episode with calls to action and short engagement sentences
Add little engagement reminder graphics that pop up every so often (sound effects are optional)
Remind people to comment and subscribe
Remind people to click the links in your description to grab your freebies, and products, or sign up for your free webinar
Producing a successful video podcast on YouTube involves a multifaceted process that can significantly impact the visibility and success of your content.
From setting up a visually appealing scene and ensuring high-quality recording and editing, to branding your channel for a cohesive and engaging online presence, each step is crucial.
However, producing high-quality video content is only half of the battle. Optimizing your YouTube video uploads for maximum visibility and engagement is just as important, if not more important than production quality.
YouTube video optimization includes: refining your titles and descriptions for SEO, creating eye-catching thumbnails, selecting the right audience and tags, and using timestamps, subtitles, end screens, and pinned comments to enhance viewer experience and interaction.
Consistency, quality, and adherence to best practices for audience satisfaction are also essential for growing your channel and attracting viewers.
Use the production checklists to make your process consistent, then judge changes by how viewers respond over time.
Treat this as an ongoing practice: publish, listen to the audience, study the results, and improve the next episode.